Skip to content

A cup can look like a minor internal component until a fitted dress reaches its first serious fitting. Then the choice begins to affect almost everything the wearer sees and feels: the curve of the bust, the stability of a strapless neckline, the amount of cleavage, the way satin reflects light, and whether the bodice stays in position after the wearer sits, turns, or raises her arms. In corset, bustier, bodycon, backless, and occasion dresses, the cup is not an isolated insert. It works with the pattern, lining, underbust tension, boning, straps, closures, shell fabric, and the wearer’s actual bust shape. That is why a cup that looks impressive on the worktable can still fail once it is sewn into the garment.
Foam cups and molded cups are not strict opposites. Foam describes a material or padded cup construction, while molded describes a three-dimensional forming method. Many molded cups are themselves made from foam. For dress development, the practical comparison is usually between flexible or cut-and-sew foam construction and pre-shaped molded cups, then choosing according to silhouette, support, fit, fabric, size range, and production requirements.
The useful question, therefore, is not simply which cup sounds more premium. It is which construction can produce the intended bust shape repeatedly in the actual dress. A smooth molded cup may be ideal for one satin strapless style, while a panel-built foam cup may be far easier to tune for a sculpted corset neckline. The first sample often tells the story quickly: one small internal component can force changes to the neckline, side seam, lining, grading, or even the whole support system. Understanding those interactions before bulk production saves far more than the cost of the cup itself.
What Are Foam Cups and Molded Cups?
Foam cups use foam to add coverage, contour, cushioning, or structure, while molded cups are formed into a three-dimensional shape before garment assembly. The terms are not opposites because many molded cups are made from foam. In dress development, the useful distinction is usually between flexible or cut-and-sew foam construction and pre-shaped molded cups with a largely fixed contour.
What Is a Foam Cup?
A foam cup is better understood as a family of bust-shaping components than as one standardized product. The foam may begin as a flat sheet, be laminated with fabric, cut into separate cup panels, sewn into a three-dimensional structure, or supplied as a pre-shaped insert. Two components described by different suppliers as “foam cups” can therefore behave very differently in the same dress. Density, resilience, edge profile, thickness distribution, covering fabric, and the way the cup is attached all influence whether the finished bodice feels soft, firm, natural, rounded, or noticeably padded.
In women’s dresses, foam can perform several jobs at once. It can improve nipple coverage, smooth the outer shell, fill a lightly structured bust area, provide a base for a fashion corset shape, or help a thin fabric keep its intended contour. A relatively light foam layer may mainly provide modesty and surface control, while a firmer construction can become part of the dress’s structural system. That is why product teams should define the cup by function rather than by material name alone: coverage, shaping, lift, support, visual volume, or a combination of these.
The surrounding garment remains just as important as the foam itself. A soft cup integrated into a well-fitted corset can feel more secure than a rigid insert placed inside a loose strapless bodice because the corset’s underbust, waist, side panels, boning, and closure are doing much of the stabilizing work. For technical development, “foam cup” is therefore too vague on its own. A useful specification should identify the construction type, supplier or internal reference, intended cup geometry, firmness, color, attachment method, fixed or removable status, and the garment sizes in which that cup will be used.
What Is a Molded Cup?
A molded cup already has a three-dimensional bust shape before it is assembled into the dress. Instead of relying mainly on sewn shaping seams to create projection, the component is formed so that width, depth, apex position, upper edge, and underbust curve are largely established in advance. This is one reason molded cups are common in garments where the outer surface needs to look clean and continuous. Satin occasion dresses, simple bodycon bodices, strapless styles, and minimalist eveningwear can benefit from a pre-formed cup when the selected geometry matches the intended silhouette.
The strongest practical advantage is consistency of form. Once the right molded cup is selected, the development team has a stable three-dimensional reference that can be positioned repeatedly inside samples and bulk garments. The limitation is just as important: that shape cannot be changed as freely as a cut-and-sew cup. If a molded cup is too shallow, too tall, too wide, too narrow, or too closed at the upper edge, changing the surrounding seam allowance does not necessarily correct the missing geometry. Another molded shape or size may be required.
This is why molded cups should be judged on the body rather than by how neat they look on a table. A cup can appear beautifully symmetrical before sewing yet gap at the upper edge when worn, place the apex too far outward, or compress the wearer because the projection is insufficient. A molded cup is a useful production component, but its fixed geometry makes selection discipline more important, not less. The right cup allows the bodice pattern to work cleanly around it; the wrong one forces the pattern maker to compensate for a shape that never truly matches the intended fit.
Are Molded Cups Made From Foam?
Many molded cups used in fashion apparel are foam-based, so a molded cup can absolutely be a foam cup. The terminology becomes confusing because one word refers mainly to material while the other refers mainly to shape formation. In everyday development conversations, “foam cup versus molded cup” often really means a flexible or panel-built foam construction versus a pre-shaped molded foam cup. Clarifying that distinction early prevents a designer, pattern maker, and trim supplier from using the same words while imagining different internal structures.
The useful development categories are more specific: flat foam that will be cut and sewn, laminated foam, a pre-shaped molded cup, a softer pre-formed insert, a graduated or push-up cup, a removable insert, or a fixed built-in cup. A fashion corset with visible cup seams may benefit from panel-built foam because those seams contribute to the silhouette and can be adjusted through pattern work. A clean satin strapless dress may benefit from a molded cup because the priority is a smoother surface under the shell.
Specifications should therefore move beyond the phrase “molded cup.” The product team needs to know the width and height of the cup, how much projection it has, where its deepest point sits, how firm the edge feels, whether the lower cup contains extra volume, what the upper edge shape looks like, and whether the component is designed to be fixed or removable. Those details are far more useful during sample review than the generic material name, and they make it easier to reproduce an approved bust shape when the style moves from development into bulk production.
Is a Molded Cup the Same as a Padded Cup?
A molded cup is not automatically a padded cup. “Molded” describes how the three-dimensional form is created, while “padded” describes added thickness or volume. A molded cup can be relatively thin, moderately padded, or deliberately graduated with more material in the lower or side area. Likewise, a foam cup can be used mainly for coverage without creating an obvious push-up effect. Treating these terms as interchangeable is one of the fastest ways to receive a sample that has the right component category but the wrong bust silhouette.
This distinction matters because extra thickness changes more than comfort. It can increase apparent bust volume, move the outer shell farther away from the body, tighten a low neckline, make the cup edge easier to see, and alter how side-bust tension is distributed. If a designer asks for a “molded padded cup” without defining the visual target, one supplier may interpret that as light shaping while another may choose a pronounced push-up profile. Both may technically satisfy the wording, but only one may suit the dress.
During sample review, the correction should identify the location of the problem rather than using a vague instruction such as “make the padding thinner.” Upper-cup bulk, excessive lower-cup volume, a hard cup edge, incorrect projection, or outer fabric stretched too tightly can all create a bulky appearance for different reasons. The more precise the comment, the easier it is to decide whether the cup itself must change or whether the surrounding pattern, lining, or shell tension is the real cause.
| Term | What It Describes | Typical Dress Use | Main Development Question |
| Foam cup | Material or foam-based structure | Corset, bustier, strapless, bra-friendly dress | How much shape, coverage, or structure is needed? |
| Molded cup | Pre-formed 3D cup geometry | Smooth satin, bodycon, occasionwear | Does the existing cup shape match the bodice and fit model? |
| Cut-and-sew foam | Patterned foam panels joined by seams | Structured corset and fashion cup designs | Can seam geometry create the required projection and neckline? |
| Padded cup | Added thickness or volume | Party, evening, push-up silhouettes | How much apparent volume should be added, and where? |
| Removable cup | Detachable insert | Soft dresses and some casual styles | Will the cup stay correctly positioned during movement? |
| Built-in cup | Fixed internal component | Strapless, corset, bustier | How is the cup integrated with the complete support system? |
How Do Foam Cups and Molded Cups Differ?
Foam and molded cup systems differ mainly in how three-dimensional shape is created and how much adjustment remains during pattern development. Cut-and-sew foam can be reshaped through panel seams and pattern changes, while a molded cup arrives with a largely fixed profile. That difference affects fit flexibility, surface smoothness, seam visibility, sampling revisions, grading choices, and bulk-production consistency.

How Does Cup Construction Differ?
A cut-and-sew foam cup behaves much like a miniature garment pattern. Individual pieces are shaped, joined, and integrated into the bodice, so projection can be changed by adjusting seam curvature, panel width, apex position, or the balance between upper and lower cup sections. This gives the pattern maker a useful level of control when the fashion silhouette is unusual. Balconette lines, asymmetric necklines, strongly lifted corset cups, or designs with visible structural seams can often be tuned through pattern work rather than by searching for a completely different pre-formed component.
A molded cup shifts much of that shape creation upstream. Width, depth, height, apex location, and edge profile already exist before the component reaches the sewing line. The dress pattern then has to accommodate this three-dimensional object. That can simplify the cup surface and reduce some internal seams, but it also reduces the number of variables available during revisions. If the molded cup is fundamentally too shallow or too tall, adding or removing a few millimeters at the bodice seam may only disguise the issue rather than correct it.
The difference becomes obvious in sample correction. A panel-built foam cup can often gain projection by changing seam shape or redistributing volume between panels. A molded cup with insufficient projection usually requires another cup reference, another size, or a different mold profile. For brands running many fitted styles, this is a useful sourcing consideration: a supplier with a broad library of cup shapes gives the development team more options than a supplier that offers only a few generic rounded forms.
How Does Cup Shape Differ?
A molded cup has a predetermined three-dimensional profile, so the relationship between width, height, projection, apex, and upper edge is already built into the component. This can create a very consistent rounded contour when the geometry matches the fit model. Constructed foam offers more local control because seam placement can redistribute fullness toward the lower cup, center, side, or apex. That flexibility is useful when a designer wants a specific fashion shape rather than a standard rounded bust.
Cup size labels alone are not enough to describe these differences. Two components with similar overall volume can distribute that volume in completely different ways. One may be broad and shallow; another may be narrower with more forward projection. One may have a high closed upper edge; another may open more toward the neckline. On the body, these differences can determine whether the upper cup gaps, the side bust feels compressed, or the neckline sits cleanly.
For practical development, cup shape is easier to manage when the team records physical control points instead of relying on names such as “B cup” or “C cup” without context. Useful points include base width, cup height, deepest projection, apex location, upper-cup opening, center-front spacing, side-bust coverage, and underbust curve. Even when the final tech pack does not carry every measurement, thinking in these terms makes sample feedback more precise and helps explain whether the mismatch comes from garment sizing or from the cup’s own geometry.
How Does Cup Thickness Differ?
Thickness is an independent choice rather than a feature that automatically separates molded from non-molded cups. Molded cups can be thin, medium, graduated, or strongly padded, while flat or cut-and-sew foam can also be selected in different firmness and thickness levels. Extra material may improve coverage, help the cup hold its own shape, or increase apparent volume, but it can also make the perimeter more visible under lightweight shell fabrics and create a warmer, more rigid feel.
For smooth dresses, edge transition often matters more than maximum thickness at the center. A cup can have an attractive rounded surface yet create a visible ridge where the upper edge meets the body. Pale satin, stretch jersey, and other smooth materials can reveal that ridge in photographs even when it is difficult to see under soft fitting-room light. Lining choice and shell tension influence the result as much as the cup thickness itself.
When a sample looks bulky, the team should locate the bulk before changing the specification. Excessive upper-cup thickness, too much lower-cup padding, an abrupt hard edge, incorrect projection, insufficient lining, or a shell that has been stretched too tightly can all create similar visual symptoms. A comment such as “upper outer cup edge shows through satin under side light” is far more useful than “cup too thick,” because it points the technician toward the correct area of the system.
How Do Cup Seams Affect Appearance?
Cup seams can either support the design language or interfere with it. In a fashion corset, visible seam lines may be intentional because they reinforce a sculpted, lingerie-inspired look. In a minimalist satin mini dress, the same ridge may look like poor finishing. Molded cups reduce shaping seams across the main cup surface, which helps when the priority is an uninterrupted external curve, but they do not automatically make the internal structure invisible.
Cup edges, attachment stitches, lining folds, compressed foam, and placement errors can still show through a smooth outer shell. Constructed foam can also look clean when seam positions are designed to sit beneath visible style lines or are softened by ruching, lace, draping, or other surface treatment. The fabric decides how forgiving the construction can be. A textured lace overlay may hide a seam that would be obvious under plain stretch satin.
A simple visual inspection routine improves sample approval. View the bust from the front, three-quarter angle, and side; then repeat the check under stronger lateral light. Studio photography or a smartphone with directional lighting often reveals a cup edge that disappears in flat ambient light. The goal is not to eliminate every internal line at any cost, but to ensure that whatever remains visible looks intentional and consistent with the design.
| Visual Issue | Constructed Foam | Molded Cup | Best Sample Check |
| Cup seam ridge | Higher when seams sit under smooth shell | Usually lower across cup surface | Inspect front, 3/4 and side views under lateral light |
| Cup-edge outline | Medium; depends on finishing | Medium to high if edge is firm | Check upper and side edges with final shell and lining |
| Apex mismatch | Often pattern-adjustable | Usually requires another geometry or size | Compare apex position on body, not on table |
| Wrinkling over cup | Possible if seam or shell balance is off | Possible if shell tension fights molded shape | Review shell tension around apex and neckline |
| Left/right difference | Can come from sewing variation | Can come from placement or component mismatch | Measure placement and photograph both sides |
| Photo visibility | Strongly fabric dependent | Strongly fabric dependent | Test under ecommerce-style lighting before approval |
Which Cup Gives Better Shape, Support, and Fit?
Neither cup type is universally better. Molded cups usually provide a smoother predetermined contour, while constructed foam gives pattern makers more freedom to redistribute volume and tune the shape. Real support comes from the complete bodice system – cup fit, underbust control, lining, straps, boning, closures, back tension, and underwire when used – rather than from foam thickness alone.
Which Cup Gives a Smoother Shape?
When “smooth” means a continuous rounded external surface with little or no cup-seam visibility, a well-matched molded cup usually has a practical advantage. This is particularly useful beneath plain satin, smooth stretch woven fabric, clean bodycon shells, and minimalist strapless designs where any internal ridge can become visible. The benefit comes from the seamless cup surface, not from the assumption that every molded cup is automatically high quality or suitable for every bust.
Smoothness still has to be separated from fit. A molded cup can look perfectly even while being too shallow, too tall, or too closed at the upper edge. That may create compression at the apex, overflow toward the neckline, or a visible gap between the body and upper cup. The shell can therefore look technically smooth but still produce an unflattering silhouette. Constructed foam can perform better when its seam geometry matches the wearer and the seam itself is hidden by the dress design.
The fabric and styling also influence what “smooth” should mean. Ruching, lace, sequins, gathers, draping, and corset topstitching naturally break up the surface and can make a carefully constructed cup look completely appropriate. In those cases, removing all seams may not improve the garment. The better question is whether the internal structure produces the intended outer surface under the exact material, color, lighting, and styling that the customer will eventually see.
Which Cup Gives Better Bust Support?
A firm or molded cup can hold its own shape, but that does not mean it can hold the whole dress or support the bust by itself. In structured womenswear, support is distributed through several parts of the bodice. Underbust fit, waist fit, back tension, lining stability, straps or halter connections, boning, anti-slip elements, closures, and underwire when used all contribute. The cup shapes and contains the bust, but the garment architecture determines whether that shape remains correctly positioned during wear.
A strapless dress makes the principle easy to see. If the underbust and waist are loose, a beautifully shaped molded cup may slide downward with the rest of the bodice. Increasing foam thickness will not correct the missing anchoring. By contrast, a relatively soft cup inside a well-fitted corset can feel secure because the corset’s waist, side panels, boning, back closure, and lining are controlling movement and distributing pressure across a wider area.
Support should therefore be evaluated as several functions rather than one vague feeling. The garment needs vertical control against downward movement, side control so tissue does not spread beyond the intended silhouette, enough containment to avoid overflow or exposure, neckline stability during movement, and acceptable pressure so the wearer can sit and move comfortably. The best cup is the one that works with those functions without asking the foam to compensate for an under-engineered bodice.
Which Cup Fits More Bust Shapes?
Constructed foam generally gives a pattern maker more freedom to adapt to different bust shapes because volume can be redistributed through seam curvature and panel shape. Molded cups depend more heavily on whether an available mold already matches the target body. That does not make molded cups poor fitting; it means that a brand needs access to suitable geometries and must verify them on the intended fit model rather than assuming a nominal cup label describes every relevant dimension.
Busts with similar circumference can differ substantially in projection, base width, upper-bust fullness, center spacing, tissue distribution, and asymmetry. Those differences create familiar fitting symptoms. Upper-cup gaping often means the wearer does not fill the available upper volume. Apex compression can indicate insufficient projection. Side-bust overflow may point to a cup that is too narrow or positioned too far inward. Empty lower-cup space can come from cup placement, underbust curve, or a mismatch between the body and cup depth.
These issues become more important when a dress collection covers a broad size range. One molded cup reference may work well in the sample size but become proportionally too shallow or too narrow as the surrounding garment grows. Constructed systems also require careful grading, but more of the shape can be managed through the pattern. For either method, the safest approach is to define cup geometry and size allocation deliberately instead of assuming the same internal construction will scale automatically with the external dress size.
How Does Cup Fit Affect the Neckline?
Cup fit and neckline fit are closely connected because the cup occupies real three-dimensional volume inside the upper bodice. If a cup sits too high, the edge may appear inside a plunge, sweetheart, or low-cut neckline. If it is too shallow, tissue can be pushed upward or outward, changing cleavage and coverage. If it is too wide, the side of the bodice may look bulky or the armhole may be pushed outward even when the total bust measurement seems correct.
The relationship becomes especially sensitive in strapless, deep-V, halter, corset, and backless dresses because there is less fabric available to redistribute tension or hide a small mismatch. Cup placement that is only slightly low can create empty space at the bottom while the upper neckline still feels tight. A cup that is too closed at the top can cut into the bust even when the dress waist and underbust fit correctly.
Experienced fitting therefore treats the bust, upper bust, underbust, neckline depth, side coverage, strap position, lining, and cup as one system. The cup should not be approved while it is loose on the worktable or held against the body without the dress fully fastened. The useful question is what the cup does to the neckline after the garment is zipped, laced, or hooked and the wearer has moved naturally for several minutes.

Which Cup Works Best for Different Dresses?
Cup selection should follow the architecture of the dress. Corset and bustier styles can use molded or constructed foam depending on the intended cup line; strapless dresses need the cup to cooperate with bodice anchoring; backless and deep-V styles have fewer support points; satin and bodycon dresses add strong surface-visibility concerns. The right choice is style-specific, not universal.
Which Cup Is Better for Corset Dresses?
Corset dresses can use molded cups or constructed foam successfully because the surrounding bodice already contains structural elements that can help position and support the bust. A molded cup works well when the design calls for a clean, rounded surface and the available cup geometry closely matches the intended fit. A constructed foam cup is often more useful when the cup seam is part of the fashion language, when the neckline is unconventional, or when the pattern maker needs to tune projection and upper-cup shape more precisely.
The cup still has to cooperate with boning, waist tension, side-panel shape, lining, underbust seam, closures, and underwire when the design uses it. A cup that fits before the corset is fully fastened can shift once the waist and back are brought under tension. That is why a corset-cup fitting should be assessed with the actual closure engaged at the intended tightness rather than by holding a loose cup against the body.
Common sample problems include upper-cup gaping, a cup that sits too far outward, a lower cup that folds, uncomfortable bone positions, uneven left and right cup height, and a zipper or lace-up back that distorts because the bust and waist balance are wrong. These are not always cup defects. Sometimes the cup is correct but the bodice is pulling it out of position. Separating the component problem from the pattern problem is one of the most important skills in structured-dress development.
Which Cup Is Better for Strapless Dresses?
Strapless dresses place more responsibility on the bodice because there are no shoulder straps to resist downward movement. Molded cups are popular for this category because they can create a clean, defined bust contour, but their firmness does not prevent slipping on its own. The cup has to work with upper-bust contact, underbust fit, waist fit, side-panel tension, lining, boning, anti-slip treatment where appropriate, and a stable zipper or back closure.
Movement testing is more useful than a static fitting for this category. After the dress is positioned correctly, the wearer should raise both arms, rotate the torso, sit, stand, lean slightly forward, and return upright. Recheck neckline height, cup position, and upper-edge contact after those movements. If the cup remains stable but the whole dress drops, the anchoring system needs work. If the dress stays in place but the bust shifts inside the cup, the cup geometry or underbust relationship needs attention.
Strapless development also has very little tolerance for asymmetry. A few millimeters of difference in cup placement, boning length, anti-slip position, or neckline tension can become visible because the upper edge has no strap or sleeve to distract the eye. Production specifications should therefore include cup position references from stable seams, left-right comparison points, and an approved visual standard, not just a general instruction to insert the cup in the bust area.
Which Cup Works for Backless or Deep-V Dresses?
Backless and deep-V dresses are difficult because fabric has been removed from areas that normally help stabilize the bust. A molded cup may keep its own three-dimensional form, but the garment still needs enough front and side structure to hold that cup in the correct place. A softer constructed cup may conform more easily to an unusual neckline, yet it also needs a reliable tension path through the remaining bodice. Neither option can create support in a garment that has nowhere to anchor it.
Cup height is especially important in plunge designs. A standard molded cup that works under a full-coverage bodice may become visible when the center front is lowered. Trimming a molded cup is not always a clean solution because cutting through the edge can alter its shape and create a hard or unstable finish. Sometimes a lower-profile cup, a different mold, or a custom pattern-built cup is the more controlled answer.
Low backs create a similar problem from another direction. When rear tension is reduced, side panels, halter connections, underbust shaping, center-front reinforcement, internal lining, and carefully positioned boning become more important. Fit should be judged from the front, side, and back while the wearer moves. A cup that looks balanced in a front photograph can rotate outward or pull the neckline open once the torso turns, so movement should be part of approval rather than an afterthought.
Which Cup Works Under Satin or Bodycon Fabrics?
Satin and bodycon fabrics expose internal cup construction in different ways. Satin has a smooth reflective surface, so a small ridge can catch the light and appear more obvious in photography than in person. Stretch bodycon materials place the outer shell under tension, which can press tightly against cup edges, seam allowances, and changes in padding thickness. Molded cups often help when a smooth surface is the main goal, but only if their edges blend cleanly into the lining and shell.
A hard molded edge can be just as visible as a sewn cup seam, particularly under pale or lightweight satin. Constructed foam may actually perform better under ruching, gathers, lace overlays, draping, mesh layers, or other textures that naturally break up reflected light. The shell, lining, and cup need to be tested as one material stack rather than approved separately.
For ecommerce-led collections, photography should be part of cup approval. Inspect the sample in front, side, and three-quarter views under stronger directional lighting, then take close photographs of the bust surface. Look for cup-edge outlines, shell wrinkling around the apex, diagonal pull lines to the side seam, and left-right differences. The camera often reveals internal structure sooner than a fitting-room mirror, and fixing those details during sampling is much easier than correcting them after bulk sewing.
How Do Cups Affect Dress Development and Production?
Cups influence far more than the bust area. They affect the bodice pattern, fitting sequence, size grading, trim sourcing, sewing order, quality control, and the ability to reproduce the approved silhouette in bulk. A cup change made after the main pattern is approved can trigger further neckline, lining, and fit revisions, so the cup should be controlled like a structural component.
How Should Cup Size Match the Pattern?
Garment size and bra-cup size are not interchangeable systems. A dress marked S, M, L, US 6, or UK 10 contains a set of bust, waist, length, ease, and silhouette decisions, but those labels do not automatically define one universal internal cup geometry. The cup has to be matched to the actual bodice pattern and target fit. Useful control points include cup base width, height, projection, apex position, underbust curve, center-front spacing, upper-edge opening, side coverage, and the place where the cup meets the neckline.
Shell material adds another variable. A stretch satin bodice may compress the cup and pull its edge into the surface, while stable woven satin depends more heavily on exact pattern shaping. Mesh can reveal the cup visually, and a layered corset may use the cup mainly as part of a larger support system. The same internal cup can therefore behave differently when the shell or lining changes even though the nominal garment size remains identical.
A practical fitting approach is to change one system at a time. If the bust feels compressed, determine whether the cup lacks projection or the outer bodice is simply too tight. If the neckline gaps, determine whether the cup is too tall, the upper bodice is too loose, or the wearer does not fill the upper-cup geometry. Making both cup and pattern changes at the same time can hide the real cause and make the second sample harder to evaluate.
How Should Cups Be Tested in Samples?
Cup approval should happen on a completed or structurally representative sample because garment tension changes the component once it is worn. A loose cup on a worktable can confirm that the left and right pieces match, but it cannot show whether the cup works with the neckline, side seam, underbust, back tension, or the wearer’s movement. The fitting routine should be repeatable so comments from different team members describe the same control points instead of relying on impressions such as “the bust looks strange.”
A useful ten-point review is to align the dress correctly on the body; compare left and right cup height; check both apex positions; inspect the upper edge for gaping or cutting; examine the lower cup for folds or empty space; review center-front and side coverage; ask the wearer to raise the arms; sit and stand; photograph front, side, and three-quarter views; and finally recheck neckline position after movement. This sequence catches many problems before the team begins debating minor cosmetic details.
Sample comments should describe the location and direction of the problem. “Upper outer cup gaps while lower cup fit is correct” gives the pattern maker a clear starting point. “Left cup sits approximately higher than right after zipper is closed” suggests placement or assembly inconsistency. “Cup edge shows through shell under side light” points toward edge profile, lining, or shell tension. Specific observations shorten revision cycles because the technician can test a cause instead of guessing what the reviewer meant.
How Do Cups Affect Grading?
Cup grading is one of the areas where a beautiful sample-size fit can become unreliable in production. Garment patterns normally grade through predetermined increments, but molded cups exist as separate three-dimensional components whose width, height, and projection do not necessarily increase at exactly the same rate as the bodice. A development team therefore needs a cup-to-garment-size map rather than assuming that one internal cup will scale naturally with every external size.
Several adjacent garment sizes may sometimes share one internal cup reference while the bodice pattern provides part of the adjustment. At another point in the range, the product may need to move to a larger or differently shaped cup. The exact break points depend on the brand’s fit standard, intended bust proportion, cup library, and the way the dress is structured. Extended size ranges require even more care because increasing the cup opening without increasing projection or support in the right proportion can create a visibly shallow fit.
Before bulk production, the technical record should state which cup code or reference belongs to each garment size or defined size group. This is particularly important when multiple production lines or satellite factories may handle the same style because visual judgement is not a reliable substitution rule. A cup that appears to have a similar base width can still have a different apex, height, or projection and change the neckline once sewn into the garment.
How Do Cups Affect Cost, Lead Time, and QC?
The purchase price of the cup is only one part of its production impact. A special geometry can require extra sourcing, additional fitting rounds, pattern revisions, lining changes, or a different assembly sequence. A firmer or thicker component may need more careful handling to avoid crushing, while a delicate smooth shell may require additional inspection because dents and edges show more easily. For development planning, the relevant cost is the total effect on sampling, sewing, rework risk, and production consistency, not only the trim quotation.
Cup quality control should begin before the component is sewn into the dress. Incoming pieces should be checked for consistent geometry, pair matching, contamination, dents, creases, and obvious thickness differences. After assembly, inspectors need to verify placement, symmetry, attachment security, outer-surface appearance, and the relationship between the cup and neckline. A garment can pass flat measurements yet still fail visually if the two cups sit at different heights or one apex is rotated outward.
The most useful bulk standard combines measurements with approved visual references. Record the supplier or internal cup reference, the size allocation, color, padding level, placement from stable seams, attachment method, relationship to lining or boning, and photographs of the approved bust shape. Those records give sewing and QC teams something concrete to reproduce. They also make repeat orders easier because the cup system can be retrieved as part of the style specification instead of being sourced again from memory.
| Production Control | Specification to Lock | Main Risk if Uncontrolled |
| Cup reference | Approved supplier/internal code and geometry | Different projection or edge shape in bulk |
| Size allocation | Cup code by garment size or size group | Inconsistent fit across the size range |
| Padding level | Match approved sample profile | Changed bust volume or visible edge transition |
| Color | Match shell/lining requirement | Show-through in pale or sheer fabrics |
| Placement | Reference from stable bodice seams | Uneven bust height or center spacing |
| Attachment | Approved stitch, tack or integration method | Cup shifting, twisting or shell distortion |
| Pair symmetry | Left/right geometry and placement match | Visible uneven bust line |
| Surface condition | No crushing, dents or permanent creases | Marks telegraphing through smooth shell |
| Final fit | Compare against approved sample and movement check | Garment passes flat measurement but fails on body |
How Should You Choose Between Foam and Molded Cups?
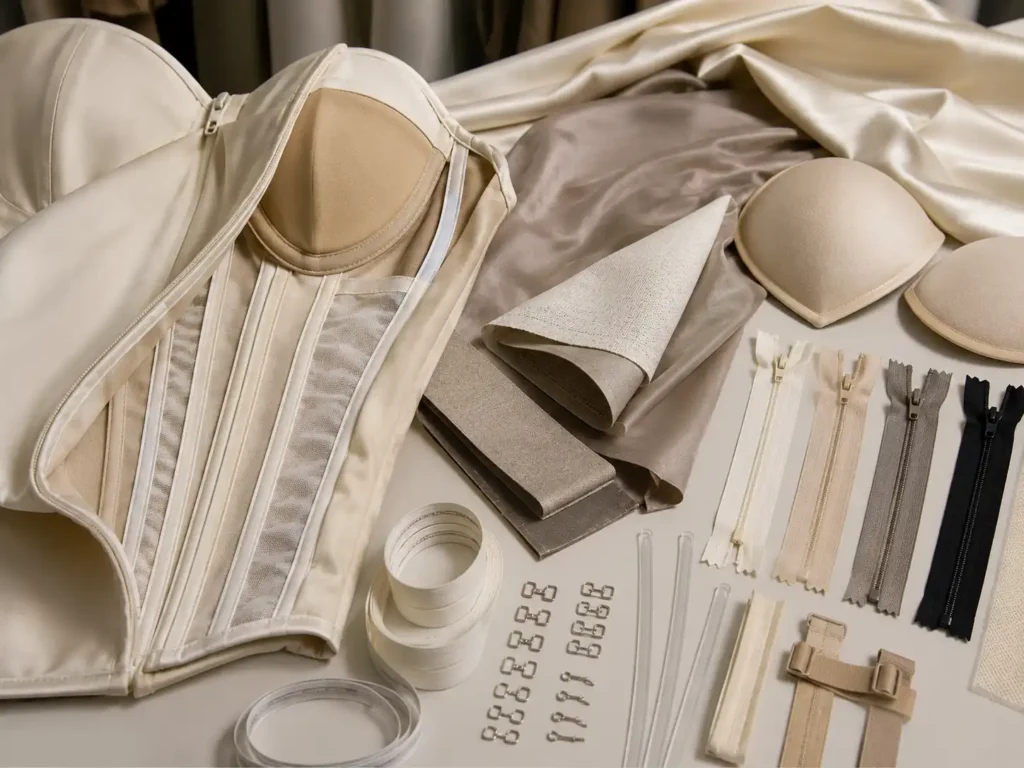
Choose the cup by working backward from the finished dress. Define the bust silhouette, neckline, available support structure, shell fabric, fit target, size range, and production requirements first. Molded cups are strong choices for many smooth, predefined shapes, while constructed foam offers greater pattern flexibility. The final decision should come from a fitted sample using the real materials, not from the cup name alone.
What Shape Does the Dress Need?
Cup selection should begin with the visible result. A designer may want a naturally rounded bust, a lifted balconette line, pronounced cleavage, a strong corset curve, subtle internal coverage, or almost invisible support under a minimalist shell. Those goals require different geometries even when all of the options are made from similar foam. Starting with the trim catalog often leads the team to choose what is available rather than what the garment actually needs.
A molded cup is efficient when an existing pre-formed shape closely matches the desired silhouette. A constructed foam cup becomes more attractive when the neckline is unusual, the cup seams are intentionally visible, projection has to be redistributed, or the designer wants a sculpted shape that is difficult to obtain from a standard mold. Reference images should also be interpreted carefully because the external look does not reveal the hidden combination of cups, boning, lining, underwire, tape, and bodice tension that produced it.
Translate the visual reference into technical questions before the first sample. Where should the apex sit? How much upper-bust coverage is acceptable? How open should the center front be? Should the bust look rounded, lifted, separated, or compressed? Does the outer surface need to be completely smooth? How much visible internal construction is acceptable? These questions turn a styling preference into a development brief and make it much easier to compare cup options objectively.
What Support Does the Bodice Provide?
The less support the dress architecture provides, the more carefully the cup has to interact with the remaining tension paths. A corset can use waist control, underbust shaping, boning, lining, and a strong back closure. A strapless dress loses shoulder support and depends heavily on underbust and torso anchoring. A low-back dress loses rear tension. A soft slip dress may not need strong support at all and may be better served by a light cup that improves coverage without making the garment feel stiff.
Think about where the dress resists gravity and movement. Is control coming from the underbust seam, waist, side panel, straps, halter, boning, back closure, or underwire? If the answer is unclear, selecting a firmer cup may simply add pressure without creating reliable support. One of the most common development mistakes is using a hard or thick cup to compensate for a bodice that does not anchor correctly.
This system view also improves comfort. A strong cup combined with a tight neckline, stiff boning, and insufficient underbust room can make the wearer feel compressed even if the dress looks secure in a static photograph. Good support spreads control through the garment so no single area has to carry all the load. The cup should shape and contain the bust while the rest of the bodice keeps that shape in the intended position.
What Fabric Covers the Cup?
The shell fabric changes how forgiving the cup construction can be. Smooth satin reveals internal transitions easily because reflected light picks up even small ridges. Lightweight mesh may show the cup itself and therefore requires careful color and coverage decisions. Stretch jersey or bodycon fabrics can pull tightly over edges, while lace, ruching, gathers, draping, or sequins can hide internal structure more effectively. Cup choice should therefore happen alongside fabric and lining review rather than as a separate trim decision.
Three questions help narrow the options quickly. First, how visually revealing is the fabric? Pale, glossy, smooth, and thin materials generally expose more internal detail. Second, how much mechanical pressure will the shell place on the cup? High-stretch materials can flatten the cup or make the perimeter show if the pattern is too tight. Third, does the shell contribute structure or depend on the internal cup and lining to create the bust shape? Stable corset fabrics behave very differently from soft mesh or light jersey.
Whenever possible, approve the cup under the real shell-and-lining combination. Temporary sample fabric is useful for early pattern work, but it can hide or exaggerate problems that disappear or become worse in production material. A cup that looks invisible under matte sample cloth may create a clear ridge under glossy satin. Treat the shell, lining, cup, and support structure as one material system because that is what the customer eventually wears.
Which Cup Should Be Approved for Bulk Production?
Bulk approval should lock the complete cup system rather than a vague instruction such as “use molded cup” or “use foam padding.” Record the approved supplier or internal reference, construction type, size allocation, padding level, color, cup position, center-front spacing where relevant, attachment method, relationship to lining and boning, approved neckline coverage, and the expected left-right symmetry. The goal is to make the sample reproducible by a production team that was not present during every fitting discussion.
Photographs of the approved sample are particularly useful when the standard is visual rather than purely dimensional. Front, side, three-quarter, and inside-construction images can show the bust line, apex position, edge blending, and internal placement more clearly than a measurement sheet alone. If a style moves to another production line or returns months later as a repeat order, those visual references reduce the chance that someone substitutes a cup that seems similar but has a different depth or upper-edge shape.
For brands developing corset, bustier, strapless, or other cup-built dresses, an experienced manufacturing team can also review cup choice together with the pattern, fabric, lining, and support structure during sampling. That is a more reliable route than asking the cup to solve every fit problem by itself. Jinfeng Apparel approaches these styles as complete garment systems, so consultation can focus on the actual sample result and production repeatability rather than simply choosing between two trim names.
Final Takeaway
Foam cups and molded cups are both useful tools, but they solve different development problems. Molded cups are valuable when the dress needs a smooth, repeatable three-dimensional contour and an available cup geometry already suits the pattern. Constructed foam is valuable when the design needs more local shape control, visible corset seaming, or a neckline that cannot be served well by a standard pre-formed cup. In both cases, the cup works only as well as the bodice around it. Fit, underbust control, fabric tension, lining, boning, straps, closures, grading, and movement all influence the final result. The most reliable decision is therefore made on a fitted sample using the actual shell and lining, then locked into a clear bulk specification. A cup that survives pattern review, fitting, movement, photography, grading, and QC is far more valuable than one that simply looks attractive in a supplier catalog.