Skip to content

How to Develop a Drop-Waist Dress Pattern: From Base Block to Production-Ready Fit

Your trusted Women’s Apparel Manufacturer from China

A drop-waist dress often looks straightforward in a fashion sketch: extend the torso, lower the seam, attach the skirt, and the silhouette is finished. On a real body, however, those few lines interact with the natural waist, high hip, full hip, abdomen, seat, fabric stretch, skirt weight, and overall leg-to-torso proportion. A pattern can look perfectly reasonable on paper and still create pulling, twisting, an uneven waist seam, or an unexpectedly wide-looking hip once the first sample is fitted.
Developing a drop-waist dress pattern starts with a proven torso or dress block, places the new waist seam below the natural waist, reshapes the upper pattern through the hip, redistributes darts or panel shaping, and develops the skirt from the new seam. The pattern must then be tested in representative fabric, fitted, corrected, graded, and checked again before it can be considered ready for repeatable production.
The most useful way to think about a drop waist is not as a lowered decorative seam but as a proportion decision that changes the whole garment. A few centimeters can determine whether a dress feels modern and elongated or heavy around the hips. The difference often becomes obvious only when a model walks, sits, turns sideways, or wears the finished skirt weight for several hours. That is where careful pattern development earns its value.
What Defines a Drop-Waist Pattern?
A drop-waist pattern extends the upper section below the natural waist and controls the garment through the high hip or full hip before the skirt begins. The important variables are the drop position, torso length, waist-to-hip shaping, hip ease, side-seam balance, fabric behavior, and skirt proportion. A successful pattern keeps those elements working together rather than treating the lowered seam as an isolated style line.
Waist Placement
The natural waist is usually the narrowest part of the torso, while a drop waist sits somewhere below it. For pattern development, however, “below the waist” is not precise enough. The position should be established from a measurable body or block reference and then checked visually on the intended fit model. A difference of only a few centimeters can noticeably change the perceived length of the torso and legs.
As a practical development reference, many low-waist styles begin somewhere around 5–15 cm below the natural waist, although this is not a universal standard. A shallow drop may simply lengthen the bodice, while a deeper drop approaching the high hip creates the stronger low-waist silhouette associated with contemporary partywear, Y2K-inspired dresses, fitted minis, and some relaxed resort styles. The correct position depends on the design, body proportions, fabric, and target size range.
The same numerical drop does not produce the same visual result on every body. A 10 cm drop can look balanced on a longer torso but overly low on a shorter fit model. Bust projection, abdomen shape, and seat volume can also change how a supposedly horizontal seam appears when worn. For that reason, center-front, side-seam, and center-back positions should be checked separately during fitting rather than assuming the seam will automatically sit level around the body.
Waist-to-Hip Shape
The main technical difference between a conventional waist-seam dress and a drop-waist dress is that the upper pattern must travel into an area where the body normally becomes wider. A standard bodice may finish at the natural waist, but the drop-waist section continues toward the high hip and sometimes close to the full hip. That extra length requires real shaping rather than simply extending the existing side seam downward.
When the pattern does not provide enough width through the lower torso, the sample may develop horizontal drag lines, rise above the intended seam position, twist at the side seam, or feel uncomfortable when the wearer sits. Adding too much width creates the opposite problem: the torso can look boxy, and the clean elongated line that makes a drop-waist dress attractive can disappear. The shape therefore needs to increase gradually through the body rather than suddenly expanding at one point.
A useful starting framework is to compare vertical body landmarks with the finished garment rather than rely on one waist-drop measurement alone.
Pattern Point | Practical Development Reference | Main Risk if Incorrect |
Natural waist | Original block reference | Incorrect starting level |
Drop waist | Often about 5–15 cm below natural waist, depending on design | Poor proportion |
High hip | Commonly checked about 8–12 cm below waist on many adult blocks | Tight upper hip |
Full hip | Often around 18–23 cm below waist, depending on body standard | Riding and restricted movement |
Front length | Measure independently to the new seam | Seam dropping at front |
Back length | Measure independently to the new seam | Seam rising over the seat |
Side seam | Compare front and back balance | Twisting or uneven waistline |
These ranges are working references rather than fixed apparel standards. A brand’s approved body chart, fit model, and established master blocks should always take priority because commercial sizing and body proportions vary considerably between markets and customer groups.
Proportion and Silhouette
A pattern can meet every circumference measurement and still look wrong if the visual proportion is poorly balanced. Lowering the skirt start lengthens the apparent upper body, which is often the reason designers choose the silhouette. The same adjustment, taken too far, can make the legs look shorter or visually emphasize the hip. Pattern development therefore needs to judge the effect from shoulder to hem rather than looking only at the waist seam.
Skirt shape has a major influence on the outcome. A fitted skirt that continues closely over the hip creates a long, narrow line. A gathered skirt creates an immediate volume change below the lowered seam, while pleats can add controlled structure. An A-line or flared mini changes the relationship again because the widening hem can make the upper torso appear narrower. These differences are often much stronger on the body than they appear in a flat sketch.
One practical method is to fit the extended torso first and temporarily pin different skirt volumes to the intended seam. This quickly shows whether the planned fullness supports the design or makes the hip look heavier. The final silhouette should feel deliberate: neckline, torso length, hip shape, skirt volume, and finished length should look as though they were developed as one garment rather than assembled as separate parts.
Which Base Block Should You Use?
A torso or dress block that already extends through the hip is usually the strongest starting point for a fitted drop-waist dress. A conventional bodice block can also be used, but it must first be extended and reshaped through the high and full hip. The best base is a proven block that already matches the intended fabric behavior, fit level, size range, and customer profile.
Bodice or Torso Block
A standard bodice block is valuable for controlling bust shape, shoulder balance, armholes, neckline, waist suppression, and upper-body length. Its limitation is that many bodice blocks stop at the natural waist. That means they contain little or no information about the body volume that appears immediately below the waist, which is exactly the area a drop-waist dress needs to control.
If only a bodice block is available, the pattern maker should extend center front, center back, grainlines, darts, and side seams at least through the required hip level before styling the new waist seam. High-hip and full-hip lines should be marked, and their pattern circumferences should be compared with the intended finished garment measurements. Extending the original side seam vertically without this step often creates a lower torso that is either too narrow or incorrectly shaped.
A torso block is usually more efficient because the body information is already built in. It provides established relationships among the bust, natural waist, high hip, full hip, front length, back length, darts, and side seams. For fitted woven dresses, structured occasionwear, and many close-fitting minis, starting from that tested geometry reduces unnecessary corrections during sampling.
The practical rule is simple: choose the block with the most relevant proven fit information, not the block whose outline happens to resemble the fashion sketch. An existing dress block that has performed well for the brand’s customer can be more valuable than a technically clean master block that has never been tested in the intended market.
Match the Fabric Category
The starting block should be compatible with the fabric category planned for the finished dress. A ponte drop-waist mini and a satin drop-waist cocktail dress can look almost identical in an illustration while requiring very different amounts of ease, different seam control, and different assumptions about how closely the garment can follow the hip.
Stable knits such as ponte or Roma may support close fitting because the fabric provides controlled stretch and recovery. Lightweight jersey can fit even closer but may grow vertically or horizontally during wear. Traditional satin, crepe, denim, and many cotton blends provide less usable stretch, so the pattern must supply enough physical room for the wearer to walk and sit comfortably rather than expecting the textile to compensate.
Before choosing the block, examine horizontal stretch, vertical stretch, recovery, weight, drape, and whether a lining or internal support layer will be used. A stretch shell paired with a firm woven lining may behave like a much less elastic garment. Similarly, a heavy skirt attached to a soft knit bodice can pull the lowered waistline farther down than expected, making the original block length unsuitable even when the circumference appears correct.
Start With a Proven Fit
Commercial brands benefit enormously from keeping reliable master blocks because every approved block represents accumulated knowledge about their customer. Two labels may both sell a garment called “Size M,” yet use noticeably different bust, waist, hip, torso-length, and ease assumptions. Developing from a generic block can therefore introduce problems that are unrelated to the drop-waist design itself.
Before changing the waistline, confirm that the base pattern already performs correctly at the bust, shoulder, armhole, natural waist, high hip, and side seam. Check front and back length, dart placement, intended ease, and grain direction. If the starting pattern contains a known imbalance, correct it first. Extending a slightly distorted side seam another 15 or 20 cm toward the hip can turn a minor imperfection into a highly visible twist.
An approved existing garment can also provide valuable fit information. Even if the new drop-waist style looks completely different, a successful dress from the same brand may reveal the preferred bust ease, hip ease, torso length, shoulder position, and overall body relationship. Using that information keeps the new silhouette connected to the established customer rather than developing the style in isolation.
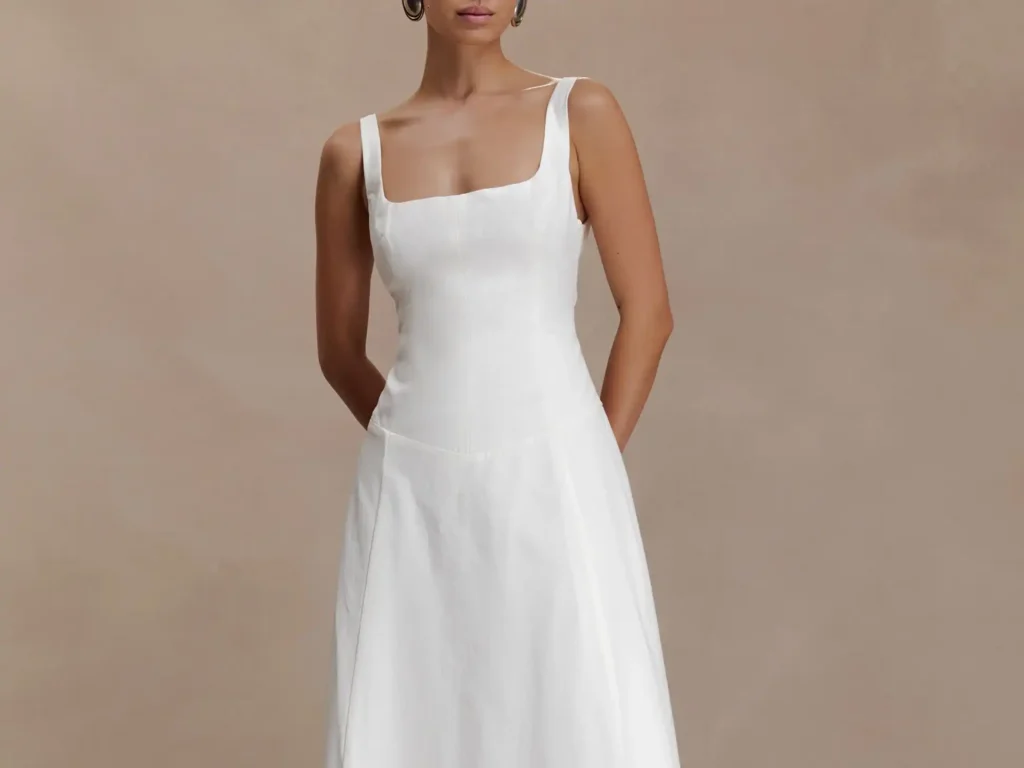
How Do You Draft the Drop Waist?
Draft the drop waist by marking the new seam position on a tested torso block, extending and reshaping the pattern through the hip, redistributing darts or panel shaping, and developing the skirt from the final lowered seam measurement. After each alteration, walk and true the seams, add accurate balance notches, confirm grainlines, and test the pattern in representative fabric before treating the draft as finished.
Lower the Waistline
Begin with the natural waist clearly marked on the front and back pattern pieces. Measure downward to the intended position at center front, side seam, and center back rather than drawing one arbitrary horizontal line. For curved, V-shaped, or asymmetric designs, add additional control points so the seam can be reproduced accurately in sampling and later grading.
Do not immediately cut the pattern apart along the new line. First compare the proposed placement with the high hip, full hip, skirt length, and overall body proportion. A reference photograph can help communicate visual intent, but photographs should not be treated as measurement documents. Camera angle, model pose, image cropping, styling, and fabric movement can all make a waistline appear higher or lower than it is in the real garment.
Closures should also be considered at this stage. A close-fitting woven dress extending over the hip may need a sufficiently long zipper so the garment can pass over the body. If the zipper ends too high or the opening is too short, a correctly fitted finished circumference can still make the dress difficult to put on. Construction requirements and pattern shape need to be developed together rather than one after the other.
Shape the Hip
Once the upper pattern reaches the high hip, compare its finished circumference with the required body measurement plus planned ease. If the body hip measures 96 cm and a woven design is intended to finish around 100 cm, the pattern needs approximately 4 cm of total positive hip ease. That additional width should be distributed according to the body and seam structure rather than simply added in equal amounts at both side seams.
Possible adjustment points include front and back side seams, princess seams, panel seams, or darts. Front and back distribution does not always need to be equal because abdomen and seat projection create different shaping demands. A fit model with stronger seat projection may require additional back width or length even when the total hip circumference appears correct on paper.
After width is added, redraw the waist-to-hip transition as one smooth line. A sharp increase near the high hip usually becomes even more obvious once sewn. Walk the front and back side seams together and compare their lengths from a shared balance point. Any intentional easing should be identified clearly rather than left as an unexplained mismatch that a sample machinist has to interpret.
Control Darts and Seams
Waist darts often need to change once the bodice extends farther down the body. A dart developed to suppress fabric between the bust and natural waist may continue into the upper hip, but its lower leg should normally taper gradually rather than stop abruptly. Poor dart termination can create a visible point, hollow, or bubble that becomes especially noticeable in satin and other reflective fabrics.
Depending on the design, some or all of the dart intake can be redistributed into princess seams, side panels, diagonal seams, pleats, or controlled gathering. The shaping requirement does not disappear when a dart is rotated; it simply moves to a different construction line. After each manipulation, total waist and hip circumferences should be rechecked so the visual redesign does not accidentally change the intended fit.
Every changed seam should then be trued. Close darts temporarily and redraw the seam passing through them, verify that intersecting corners meet cleanly, and check that panel seams contain enough notches to control assembly. Grainlines, cut quantities, left-and-right identification, lining pieces, and closure locations should also be updated before the pattern reaches the sample room. Good pattern communication reduces sewing variation long before formal quality inspection begins.
Build the Skirt
The skirt should be developed from the finished measurement of the actual drop-waist seam, not from the original natural-waist circumference. Measure the upper section along the sewing line after darts and shaping have been completed, then build the skirt opening to match the chosen construction. A fitted skirt may continue almost directly from the hip, while A-line, gathered, pleated, and circular skirts require additional width in very different ways.
Gathering ratios depend heavily on the visual effect and fabric. A lightweight woven skirt might use roughly 1.5 to 2 times the seam length for noticeable fullness, while a heavier satin or dense fabric may need considerably less to avoid a bulky ridge around the hip. Pleats should be calculated from exact pleat intake so the finished upper edge matches the bodice seam rather than being adjusted informally at the sewing machine.
Bias and circular skirt sections require particular care because their upper edges can grow during handling. Stabilization may be needed before joining them to the more stable torso seam. Mark center front, center back, side seams, and major panel positions clearly. A long drop-waist join without sufficient notches is difficult to control consistently in sampling and even harder to reproduce across a production run.
How Do Fabric and Ease Change the Pattern?
Fabric determines how closely a drop-waist pattern can follow the body and how stable the lowered seam remains during wear. Stretch percentage, recovery, drape, weight, lining, and skirt construction all affect ease. Close-fitting knits may need little or even negative ease, while stable woven fabrics usually require positive hip ease and enough movement room because the extended torso covers the body’s widening hip area.
Stretch and Recovery
Stretch percentage is useful, but it does not describe the whole behavior of a fabric. Recovery is equally important because a textile that stretches easily but does not return to its original dimensions can gradually distort the silhouette. In a fitted drop-waist dress, weak recovery may allow the hip area to grow, side seams to sag, or the skirt seam to sit lower after several hours of wear.
A simple preliminary test is to mark a 10 cm crosswise section of fabric and stretch it comfortably rather than to its absolute limit. If the marked distance reaches 12 cm, the fabric has approximately 20% stretch under that test. After release, observe whether the mark returns to 10 cm. If it remains at 10.5 cm or longer, the material has shown measurable growth and should be treated more cautiously in close-fitting patterns.
Vertical stretch deserves equal attention because the skirt hangs from the extended torso. Soft jersey, mesh, and some stretch satins can lengthen under their own weight, especially when paired with a long, gathered, layered, or embellished skirt. A sample should therefore be allowed to hang before final waist placement and garment length are approved. The pattern that looked correct immediately after sewing may settle differently several hours later.
Hip Ease by Fabric
There is no single hip-ease number that works for every drop-waist dress. The starting value depends on whether the fabric is stable or elastic, whether the garment is lined, and whether the desired silhouette is compressed, fitted, semi-fitted, or relaxed. Ease also needs to support normal movement, not merely produce a correct standing measurement.
Fabric / Construction | Approximate Starting Hip Ease | Main Development Concern |
Stable woven satin or crepe | +4 to +8 cm | Sitting and movement |
Stretch woven | +2 to +5 cm | Actual usable stretch |
Ponte or Roma | 0 to +3 cm | Compression and recovery |
Stable jersey | -2 to +2 cm | Growth during wear |
Stretch mesh with lining | 0 to +3 cm | Lining may control fit |
Denim or firm cotton blend | +4 to +8 cm | Limited flexibility |
These values are development references rather than universal specifications. Negative ease should only be used when the fabric’s stretch and recovery have been tested because a garment that is intentionally smaller than the body depends on the textile to supply the missing circumference.
Sitting tests are especially important for woven dresses. The abdomen, hip, and seat change shape when the wearer sits, and insufficient ease often causes the low-waist seam to rise. Lowering the seam farther on the paper pattern does not solve this problem if the real cause is insufficient width. Fit diagnosis should separate vertical placement from horizontal restriction before any correction is made.
Lining and Structure
The lining can become the tightest layer of a garment even when the shell appears to have adequate ease. This commonly happens in fitted occasionwear when a stretch satin shell is combined with a more stable woven lining. The outer fabric can expand around the body, but the inner layer stops it, so the wearer experiences the fit of the lining rather than the apparent flexibility of the shell.
Mesh dresses create similar challenges. The outer layer may stretch generously while the lining, modesty layer, or internal support fabric behaves differently. Corset-inspired constructions add another level of control because boning, fusible support, seam tape, cups, or stabilizers reduce effective flexibility even when the visible fabric contains elastane. Testing only the shell therefore gives an incomplete picture of the finished fit.
The complete garment build should be defined early enough for meaningful pattern decisions: shell, lining, interfacing, support layers, zipper, trims, and skirt construction. A pattern that fits perfectly before the lining is added can become restrictive later, leading to unnecessary late-stage revisions. Material selection and pattern development work best when they happen together rather than as separate departments making independent decisions.
Skirt Weight
Skirt weight can move the very seam the pattern maker spent hours positioning. A short lightweight mini adds relatively little downward load, while a long satin skirt, dense pleating, multilayer mesh, sequins, beading, or other embellishment can pull noticeably on the upper section. The effect is strongest when the torso fabric has vertical stretch or limited recovery.
For that reason, a partial toile should not be treated as final approval when the production design carries significant skirt weight. Whenever possible, the fit sample should reproduce the approximate weight and drape of the finished garment. If the final textile is not yet available, development teams can at least simulate the load rather than evaluating the bodice with an unrealistically light substitute.
After a complete sample is sewn, allow it to hang and remeasure the drop-waist position and total garment length. If the seam migrates downward, the solution may involve a more stable lining, clear elastic, stay tape, internal support, or revised pattern length. The goal is not to make the garment rigid but to ensure the design line remains predictable after real wear and handling.

How Do You Fit and Grade the Pattern?
Fit a drop-waist dress by checking the seam position, torso balance, hip ease, front and back length, side seams, and movement before focusing on small cosmetic details. Once the base size is approved, grading must preserve the relationship among natural waist, low waist, high hip, full hip, and skirt start. Enlarging every area evenly can distort the silhouette at both ends of the size range.
First Fit
Marking reference lines directly on the first sample makes the fitting far more objective. Useful lines include the natural waist, intended drop waist, high hip, full hip, center front, center back, and side seam. These markings reveal whether the garment is actually sitting where the pattern intended or whether body shape and fabric behavior have shifted it.
Begin at the upper torso because a neckline, bust, shoulder, or strap imbalance can affect everything below. Once the top is reasonably stable, evaluate the low-waist line from the front, side, and back. A seam rising over the seat may indicate insufficient back length or hip room, while a center-front section sitting unusually low can point toward excess front length or a bust-balance issue.
The side seam is one of the most useful diagnostic features. It should remain controlled rather than swinging strongly toward the front or back. Ask the fit model to walk, sit, turn, raise the arms, and bend slightly. A garment that looks excellent during a still fitting can behave very differently during normal movement, particularly when the lowered torso extends across the hip.
Common Fit Problems
A drop-waist seam that looks too low should not automatically be corrected by shortening the whole torso. First determine whether the problem occurs equally around the body. If center front, side, and center back all sit too low, the overall extension may genuinely be excessive. If only the back rises or only the front drops, the pattern is dealing with a balance or volume problem rather than a simple length error.
Tight hips often reveal themselves through horizontal tension lines, zipper strain, side seams shifting out of position, fabric collecting above the hip, or a skirt seam rising during sitting. Excess width produces vertical folds and a weak waist-to-hip line instead. The correction depends on diagnosing the type and location of excess or shortage rather than making a general “looser” or “tighter” adjustment.
Mini dresses require another level of attention because moving the skirt start downward leaves less skirt length below the seam. A garment that provides acceptable coverage when standing may become noticeably shorter when the model walks or sits. Fit review therefore needs to include both aesthetic proportion and wearing security, especially for body-hugging, flared, or partywear silhouettes.
Grade the Proportion
The base-size sample can be excellent and still produce inconsistent larger or smaller sizes if the grade does not preserve the intended body landmarks. Drop-waist styles are particularly sensitive because their visual identity depends on a sequence of relationships: natural waist, low waist, high hip, full hip, and skirt start. Circumference and vertical length need to grow according to the brand’s established grade rules rather than one uniform enlargement.
Overlaying nested graded sizes is a useful way to inspect the result before sampling. Side-seam curves should remain smooth, darts should shift logically, hip shaping should expand in a controlled way, skirt openings should continue to match their upper sections, and grainlines should remain stable. A mathematically correct grade can still produce an unattractive silhouette if the proportion is not reviewed visually.
Extended size ranges may require additional refinement instead of simply continuing core-size increments indefinitely. Seat projection, abdomen shape, bust relationship, and body length can change enough to make the original grade assumptions less effective. Selected size-set samples therefore provide stronger evidence than approving only the middle size and assuming the entire range will behave the same way.
Fit Across Markets
Size labels do not provide enough information to develop reliable commercial fit. US, UK, EU, and Australian brands can use different body charts, garment measurements, length standards, and grade rules even when their nominal size names appear similar. A “Medium” developed for one brand’s close-fitting online customer may be quite different from a “Medium” used by an occasionwear label with a more relaxed fit philosophy.
A useful technical package identifies the target market, approved body chart, finished garment chart, base sample size, fit-model measurements, grade increments, and any petite, tall, extended, or plus-size requirements. Without those references, the pattern maker is forced to make assumptions that may have little to do with the brand’s established customer.
An approved existing garment can be extremely useful when developing a new silhouette. Its bust, waist, hip, shoulder position, torso length, and ease show how the brand already fits real customers. A new drop-waist style does not need to copy the old garment visually, but using familiar fit relationships can help the collection feel consistent instead of making each new design start from a different sizing philosophy.
How Is the Pattern Prepared for Production?
A production-ready drop-waist pattern must reproduce the approved sample consistently rather than simply fit one garment. The final file should contain confirmed measurements, seam allowances, notches, grainlines, lining and closure details, graded sizes, and revision history. Before bulk cutting, the development team should confirm the PP sample and the measurements controlling waist height, hip ease, side-seam balance, and finished garment length.
Revision Control
Pattern corrections should never remain only in messages, handwritten notes, or someone’s memory. Every meaningful fitting change needs to become a documented pattern action. A comment such as “raise the waist slightly” is difficult to verify later, while an instruction such as “raise the side low-waist seam 1 cm and blend to 0.5 cm at center front” gives the pattern maker, sample room, and production team something measurable.
A useful revision record identifies the area changed, the original problem, the exact dimensional adjustment, the pieces affected, the sample version, and whether the correction changes material consumption or construction. When several styles are being developed simultaneously, this discipline becomes even more important because visually similar pieces can easily be confused if their revision histories are not controlled carefully.
Pattern version names should also distinguish first sample, revised sample, photo sample, and PP versions. An outdated pattern accidentally entering the cutting room can undo weeks of fit work. Jinfeng Apparel’s documented development system uses dedicated pattern and sample teams to manage bust, waist, low-waist, hip, length, and related fit corrections before bulk production, supported by 7+ senior pattern makers, two sample rooms, and 20+ sample machinists.
PP and Golden Samples
A pre-production sample should answer a commercial question that is more important than whether the dress looks attractive: can the approved product now be repeated reliably? For a drop-waist style, that means confirming the exact low-waist position, hip ease, skirt level, total length, closure, lining, trims, construction, fabric behavior, and critical measurements using materials that are as close to production intent as possible.
Sample Stage | Primary Purpose | Critical Drop-Waist Check |
First sample | Test design and construction | General seam position and silhouette |
Fit sample | Correct body balance | Torso length, hip ease, side seams |
Revised sample | Verify corrections | Confirm original problems are solved |
Photo sample | Confirm visual presentation | Proportion and camera appearance |
PP sample | Approve production standard | Measurements, construction, materials |
Golden sample | Preserve final benchmark | Bulk and repeat-order comparison |
Not every project needs every possible sample stage, but complex fitted dresses benefit from separating development functions. A photo sample may need to look polished for campaign use, while a fit sample exists to expose technical problems. A PP sample has a different job again: it should represent what production is expected to reproduce, not merely what looks good on one model.
A golden sample becomes particularly useful for repeat orders because future production can be compared against a physical approved reference as well as technical documents. Measurements, fabric hand, seam construction, pressing, lining position, and overall proportions can all be checked directly instead of relying on photographs or memory months after the original development cycle.
Production Pattern Checks
Before bulk cutting, every pattern piece should be checked within the context of the complete garment. Confirm the version number, size range, grainline, cut quantity, seam allowance, notches, dart intake, center-front and center-back markings, low-waist match points, zipper position, lining pieces, interfacing pieces, pleat or gather markings, and hem allowance. Small omissions at this stage often become repeated production variation later.
Walk the entire low-waist seam again after all darts, pleats, and seam allowances have been finalized. The skirt and upper section should match according to the planned construction rather than being forced together during sewing. Directional fabrics also need attention. Satin sheen, velvet nap, sequins, prints, and directional lace may require one-way cutting, which affects both marker efficiency and material consumption.
Any late change to hip circumference, torso length, skirt opening, or panel shape should therefore be reviewed not only for fit but also for cutting efficiency and costing. Pattern development and commercial production are connected; an apparently small correction can alter fabric yield, sewing operations, or trim placement enough to affect the final production plan.
Bulk Fit QC
Bulk quality control should focus strongly on the measurements that define the drop-waist silhouette. A garment can be sewn neatly and still look noticeably different from the approved sample if the low-waist seam sits too high, the hip is too tight, or the front and back lengths have shifted. Critical points commonly include drop-waist height, bust, waist, hip, front body length, back body length, side seam, skirt length, total length, zipper placement, and lining position.
Measurement tolerances should come from the approved specification and the visual importance of each point rather than from one generic tolerance applied to every dimension. A small variation in a full skirt’s sweep may be visually harmless, while a similar variation in low-waist height can change the entire proportion of the dress. Pattern risk determines which measurements deserve the tightest control.
Stretch garments should be allowed to relax after sewing and pressing before final measurement because handling can temporarily distort dimensions. Selected garments can also be compared on a mannequin or directly against the approved sample. Three-dimensional review often reveals side-seam twisting, skirt imbalance, and waist-position changes that are difficult to judge accurately from a flat measurement table alone.

Conclusion
Developing a successful drop-waist dress is not a matter of moving one line downward on a basic bodice. The pattern has to manage the body through a longer torso, shape naturally over the high and full hip, maintain enough movement room for the selected fabric, support the intended skirt, and preserve its proportions after grading. Those decisions are closely connected, which is why apparently small pattern errors often become obvious only after a complete sample is worn.
The most reliable process begins with a proven block, defines the low-waist position from real body landmarks, develops the waist-to-hip transition carefully, and tests the design in fabric that behaves like the final material. Fit comments should become measurable pattern corrections, and the approved pattern should be checked again through PP sampling, grading, and bulk quality control before the style is released for production.
For fashion brands developing fitted minis, occasion dresses, party styles, resort dresses, or contemporary low-waist collections, investing more attention during pattern development can reduce expensive changes later. A sketch or reference image starts the conversation, but the pattern determines whether the design can become a comfortable, repeatable, and commercially consistent garment. When a project requires support beyond an internal design team, working with an experienced womenswear development and manufacturing partner can also help connect pattern decisions with fabric sourcing, sampling, grading, and production realities.
Share This Article :

Jerry Lee
Categories

Latest blogs
Table of Contents
Here, developing your OEM/ODM private label clothing collection is no longer a challenge—it’s an excellent opportunity to bring your creative vision to life.