 Skip to content
Corset Dress Internal Construction Explained: What Is Inside and How Does It Work?

Your trusted Women’s Apparel Manufacturer from China

A corset dress can look almost effortless from the outside: a clean satin surface, a sculpted neckline, a narrow waist and perhaps a few visible seam lines. Inside, however, the garment may contain several layers and small components that determine whether that polished shape survives real movement. The difference between a dress that photographs well for five minutes and one that still feels secure after hours of sitting, walking and dancing usually comes down to how those hidden parts share tension across the bust, waist, side seams and closure.
A corset dress is not supported by boning alone. Its shape comes from the relationship between the bodice pattern, outer fabric, structural layer, bra cups, boning, lining, closure and waist fit. Boning stabilizes the shape already created by the pattern, cups organize bust volume, internal layers distribute tension, and the closure keeps the fitted circumference secure. When one element is wrong, simply adding stiffer boning rarely fixes the real problem.
That is why experienced dress teams often learn more from a failed sample than from a perfect-looking sketch. A cup that floats, a zipper that bows, a neckline that opens or a bone that digs into the waist is giving a mechanical clue about the structure underneath. Once those clues are read correctly, corset construction becomes much easier to understand: the garment is a coordinated support system, not a collection of decorative corset details. The sections below take that system apart piece by piece and show how it behaves in real development and production.
What Is Inside a Corset Dress?
A corset dress usually combines a shaped bodice pattern with boning, bra cups, lining, reinforcement and a secure closure. Some styles use only light support, while others contain a fuller internal foundation. The key is not how many parts are present, but whether the pattern, cups, waist, boning and closure work together to control shape without creating pressure, gaping or distortion.
Corset Structure
In modern fashion, a corset structure is best understood as a fitted bodice whose pattern and internal components are designed to hold a controlled three-dimensional shape around the torso. The structure may be relatively soft in a stretch-mesh mini dress or considerably firmer in a strapless satin evening style. In both cases, the pattern sets the bust, underbust, waist and body length first; support components then help that shape resist collapse during wear. This is different from a purely decorative corset look. Exposed channels, curved cup seams, contrast topstitching and a lace-up back can create a strong visual corset reference while providing only moderate support. The reverse also happens: a smooth satin bodice may hide most of its engineering between the shell and lining. When evaluating a design, the useful question is not whether it looks corseted, but which internal parts are carrying tension, which areas are anchoring the garment, and whether the wearer can move without forcing one component to do all the work.
Boned Bodice or Corset?
A boned bodice is not automatically a complete corset structure. Boning can be used simply to keep a long seam straight, prevent a soft side panel from folding or support a neckline. A more developed corset dress normally combines shaped panels, cup control, a close waist relationship, internal stabilization and a closure that can carry the tension of a fitted torso. The difference becomes obvious in fitting. If the torso is 15-20 mm too long, a harder bone does not remove that excess length; it often pushes downward into the waist or creates a stronger horizontal fold. If the cup volume is wrong, stronger side boning cannot move the bust apex to the correct location. Boning preserves a shape that the pattern has already created. Experienced pattern teams therefore define the support target first – light shape control, moderate bust support, strapless security or stronger waist definition – and then build only the internal structure needed for that performance. In practice, a few well-chosen structural elements usually outperform unnecessary stiffness.
Hidden Components
Most corset components are small, but they have very specific jobs. Bra cups establish three-dimensional bust volume. Boning helps panels stay vertical. Underwire, where used, supports the lower cup edge. Anti-slip material can improve contact along a strapless neckline. Hooks can secure a high-tension point before the main zipper is closed, while lining protects the skin from channels, seam allowances and reinforcement. The exact combination should follow the design rather than a fixed recipe. A power-mesh club dress and a woven satin occasion dress may both use cups and boning, yet the required rigidity, lining behavior and closure support can be very different. Backless styles create another limitation because there is less material available to connect the front and back structures. The practical test is simple: every hidden part should solve a defined fit, support, comfort or production problem. If a component is added only because corset dresses are expected to contain it, it can increase cost and stiffness without improving the garment.
Internal Component | Main Function | Useful Specification Fields | Common Failure |
Boning | Controls vertical collapse and panel shape | Material, width, length, position | Buckling, pressure, visible ridges |
Bra cup | Defines bust volume and contour | Cup type, size, depth, apex position | Gaping, flattening, asymmetry |
Underwire | Supports lower cup where required | Wire size, curve, channel position | Digging, shifting, wrong curve |
Structural lining | Stabilizes bodice and channels | Composition, stretch, grain direction | Distortion, excessive stretch |
Anti-slip tape | Improves upper-edge grip | Width, placement, coverage | Rolling, weak grip, discomfort |
Zipper / hooks | Secures fitted circumference | Type, length, spacing, reinforcement | Bulging, opening, twisting |
Which Layers Build the Bodice?
A corset bodice works best when its layers have separate jobs. The outer fabric creates the visible surface, a stable inner layer carries much of the structural tension, localized reinforcement supports high-stress areas, and the lining provides a clean, wearable inside. More layers are not automatically better; the right combination should control shape while preserving movement, comfort and the intended hand feel of the dress.
Outer Fabric
The shell fabric does more than determine color and texture. It sets practical limits on how much structural tension can be carried visibly without puckering, stretching or marking. Satin is unforgiving because small differences in seam tension can appear as ripples around the cups and zipper. Mesh may stretch beyond the pattern shape and can reveal internal components through the surface. Lace introduces motif placement and seam-bulk issues, while velvet adds pile direction and pressing sensitivity. A delicate shell should therefore not be expected to absorb every force created by a fitted waist and structured bust. In many successful corset dresses, the visible fabric is allowed to remain comparatively clean because a more stable internal layer carries part of the load. Fabric stretch also needs to be measured in the direction in which the bodice will be cut. Even a modest difference between lengthwise and crosswise stretch can change how the neckline, side seam and waist behave. The same pattern can feel substantially different in stretch satin, power mesh and a stable woven satin.
Structural Layer
The structural layer is often the least visible but most useful part of a refined corset bodice. It gives boning channels, cups and closure seams a stable base so the fashion fabric does not have to manage every tension point alone. Consider a strapless satin dress: the waist is fitted, the cups project forward and the back zipper pulls the two sides together. If all that force is transferred directly into a lightweight satin shell, diagonal drag lines or zipper waviness may appear even when the seams are technically strong. A stable inner layer distributes the load more evenly and can keep the outer surface smoother. The material still needs to match the product. An excessively rigid foundation can make a party dress feel like protective equipment, while a very stretchy layer offers little structural benefit. The best result normally comes from balancing shell weight, stretch, neckline exposure, support level and expected movement rather than specifying one standard foundation for every corset style.
Targeted Reinforcement
Interlining and reinforcement are most effective when used selectively. Necklines, cup edges, zipper seams, hook positions and narrow back panels often experience more concentrated stress than the rest of the bodice. Strengthening those areas can control stretching without turning the entire garment into a stiff shell. Placement matters as much as material. A reinforcement strip that is too narrow can create a visible hard edge under satin; one that is too heavy can make the reinforced zone behave differently from the surrounding panel. Around a zipper, inconsistent reinforcement from left to right can create asymmetrical waviness when the garment is closed. Technical records should therefore identify which pattern piece receives reinforcement, the exact area covered and the application method. That information becomes important when a design moves from one skilled sample machinist to a production line. “Add interfacing” is not a repeatable instruction; a defined shape, material and location are. Controlled reinforcement is one of the quiet differences between a clean structured bodice and one that looks overworked.
Lining Behavior
Lining is commonly treated as a cosmetic finishing layer, yet in a close-fitting corset dress it can influence fit. If the lining is smaller than the shell, it may pull the neckline inward or create unexpected tension around the zipper. If it is too large, it can bag, roll or become visible at the upper edge. Stretch behavior matters too: a very elastic lining paired with a stable foundation can move at a different rate from the outer bodice when the wearer sits or bends. Comfort is another reason to take lining seriously. Boning channels, cup edges, reinforcement and seam allowances should not create rough contact points against the skin, especially in party and occasion dresses that may be worn for several hours. During sample review, lining should therefore be checked on the body, not only from the inside of a garment lying flat. If the shell looks correct but the lining twists, pulls or creeps upward, the structure is not fully resolved because the inside and outside are still fighting each other.
How Do Boning and Cups Work?
Boning stabilizes the shape created by the pattern, while cups organize bust volume and position. Neither component works well alone. The pattern determines where the body should sit, the cups provide three-dimensional space, and the bones help surrounding panels resist folding. Reliable support comes from matching cup geometry, bone placement, torso length and waist fit instead of simply increasing stiffness or adding more bones.
Boning and Shape Control
Boning mainly resists folding and vertical collapse. In a fitted bodice, the shell naturally wants to wrinkle or compress when the wearer bends and when bust and waist tension pull in different directions. A correctly positioned bone spreads some of that force along its length, helping the panel remain smoother and preventing a single seam from doing all the work. Rigidity should match the intended product. A fashion corset for normal movement does not always benefit from the hardest available bone. Too much stiffness can transfer pressure to the top or bottom of the channel and make sitting uncomfortable. Length is equally important. A bone that extends too low may press into the waist or hip crease when the wearer sits; one that ends too high may allow the lower bodice to collapse. During fitting, teams should record where each bone starts and ends relative to seam landmarks rather than simply noting the total number of bones. Position, usable length and flexibility are usually more informative than bone count alone.
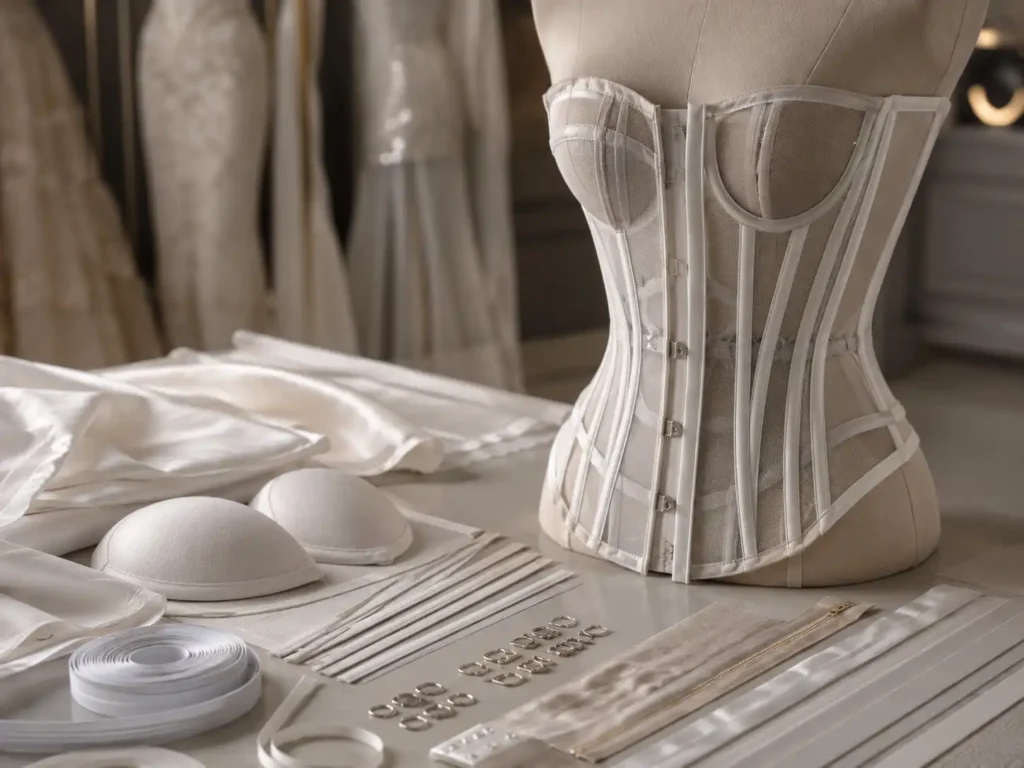
Boning Placement
Boning normally follows the architecture of the pattern. Common positions include center-front areas, side-front seams, princess-style seams, side seams, side-back panels and locations near a closure. The number depends on panel shape, shell stability, bust construction and the level of support required. More bones can actually make a short bodice worse if several rigid channels are crowded into a small area while another section remains unsupported. Placement should also be reviewed against body movement. A very stiff side bone can feel fine while standing but become uncomfortable near the underarm once the wearer reaches forward. Curved seams already influence how fabric wraps around the bust and waist, so bones placed on or near those seams tend to reinforce the existing geometry. If that geometry is wrong, the bone can make the error more visible. Pattern correction should therefore come before rigidity. The goal is an even transition between supported and flexible areas, not the highest possible density of vertical plastic or steel.
Cup Shape and Bust Support
A bra cup is a three-dimensional component, so bust circumference alone cannot tell whether it will fit. Two dresses can share the same total bust measurement while one uses a shallow, wide cup and the other a narrower, deeper shape. Cup width, depth, spacing, lower-edge position and apex height all influence the finished silhouette. If the apex sits too high, the lower cup may feel empty while the upper edge cuts into the body. If cups are placed too far apart, the center-front area can look flat even though the overall circumference is correct. Development comments are more useful when they describe the exact behavior rather than saying only “cup too big.” Notes such as “empty at upper cup,” “apex approximately 10 mm high,” or “cup edge floating at center front” point the pattern team toward the real correction. Structured-dress sample records commonly track empty cups, tight bust circumference, low coverage and cup asymmetry separately because those issues can require completely different changes.
Underwire Integration
Underwire can add lower-cup definition and support, but it is not mandatory in every corset dress. Some designs achieve the intended shape through molded cups, shaped seams, boning and a secure underbust or waist fit. Others, especially lingerie-influenced styles, benefit from a wire that defines the lower cup edge. The critical point is matching the wire curve to both the cup and the target body. A wire that is too narrow can press into breast tissue or pull the cup inward, while one that is too wide may sit on the torso without supporting the desired shape. The channel also needs enough allowance and a safe finish at both ends so the wire does not migrate or create pressure. Cup, wire and boning should be fitted together rather than approved separately from a trim board. The cup creates volume, the wire can define its lower boundary, and surrounding bones help the torso panels stay stable. When the underlying pattern is correct, each component can do a moderate, controlled amount of work.
How Do Closures Keep the Dress Stable?
Zippers, lacing and hooks are structural parts of a fitted corset dress because they hold the garment’s circumference under tension. A closure stays flat only when the surrounding pattern, reinforcement and lining are balanced. Bulging zippers, distorted lacing or opening hooks often point to excess body length, unstable seams or uneven tension rather than a defective closure alone.
Zipper Stability
An invisible zipper gives a clean finish, but it can expose structural problems quickly. In a loose dress, the zipper may simply open and close. In a fitted corset, the zipper seam often carries continuous horizontal tension from the bust and waist. If the back pattern is too long, the seam stretches during sewing or the shell and lining pull differently, the zipper can bow away from the body even though the teeth and slider are perfectly functional. That is why replacing the zipper is rarely the first useful correction. Teams should check back length, seam stabilization, seam allowance, pressing and layer tension before blaming the hardware. The zipper also needs to be evaluated under real fit conditions. It may lie flat on a table but develop waves once the garment is zipped around a body. In practical QC, “zipper flatness” is more informative than “zipper works” because the closure has two jobs: it must operate smoothly and it must preserve the intended body line without creating a raised center-back ridge.
Lace-Up Closures
A lace-up back introduces adjustment, but it does not make a corset dress universally sized. Lacing changes how circumference is distributed across the back opening and can accommodate a limited range around the intended fit. It cannot solve a cup that is too shallow, a waistline positioned incorrectly or a bodice that is too long through the torso. The back edges also need enough stability to tolerate repeated pulling. Loops or eyelets receive concentrated force, especially near the waist, and weak reinforcement can allow the opening to widen unevenly or twist. Brands should define how the lacing gap is supposed to look in the approved size. If the design calls for a narrow, nearly parallel opening, that relationship should remain controlled during grading. If a wider exposed gap is part of the look, it should be intentional rather than the result of a bodice that is too small. Lacing works best when it provides refinement and limited adjustment within a correctly developed pattern.
Hooks and Anti-Slip Control
Hooks and anti-slip materials are small components, but they can reduce stress at specific points. A hook above an invisible zipper can hold the upper edges together before the slider is pulled, which reduces the chance of forcing the zipper under peak tension. Anti-slip tape or elasticized grip can improve contact along the upper edge of a strapless bodice. Neither should compensate for poor anchoring elsewhere. If the waist and underbust are too loose, increasing friction at the neckline may simply create discomfort while the dress continues to slide. Placement and width should be tested on the actual sample because an aggressive grip material can roll, show through lightweight fabric or irritate the skin after several hours. The best strapless structures usually distribute control across several moderate elements: correct waist fit, appropriate upper-edge tension, stable side seams, cups, boning, anti-slip material and a reliable closure. When one small trim is being asked to hold the entire dress in place, another part of the structure usually needs attention.
Waist Anchoring
The waist is one of the most useful anchoring areas in a corset dress because it allows part of the garment’s weight and tension to be supported by the torso instead of concentrating everything at the neckline. This becomes particularly important in strapless styles. If the waist is too loose, the bodice may slide until the bust or upper edge physically stops it. Tightening the neckline can hide the symptom for a short fitting but often makes the garment less comfortable. Vertical body length also affects anchoring. A waist seam positioned below the wearer’s natural bend point can cause the bodice to ride upward or form horizontal folds; a waist that sits too high can pull the cups downward. Bust, underbust, waist and torso length should therefore be reviewed together. A stable corset does not stay up because one area is extremely tight. It stays up because the pattern distributes moderate tension over the correct parts of the body and the closure preserves that relationship during movement.
How Does Construction Affect Fit?
Corset construction makes small fit errors easy to see because the bodice sits close to the body and contains reinforcement. Cup gaping, neckline opening, waist wrinkles, boning pressure and zipper distortion usually have identifiable mechanical causes. Accurate correction starts by locating where the problem begins and checking the related measurements, pattern balance, component placement and fabric behavior instead of tightening the entire dress.
Cup and Neckline Gaping
A gaping cup does not automatically mean the total bust measurement is too large. The cup may have excess volume only at the upper edge while remaining tight at the lower cup. The apex may sit too high, the cups may be spaced too far apart or the surrounding bodice may not be pulling the cup toward the body correctly. Neckline gaping can have an equally broad set of causes. The upper edge may stretch during sewing, upper-bust circumference may be too generous, or the front and back body lengths may be unbalanced. Strapless dresses show these errors very clearly because there is no shoulder strap helping the upper bodice stay in contact with the body. Fit comments should identify the location of the gap: center front, above the cup, near the underarm or across the full neckline. That information narrows the likely causes. A general note such as “make top tighter” often leads to over-correction, while a precise location allows the pattern team to change only the part that is actually wrong.
Boning Pressure and Waist Wrinkles
Boning discomfort usually appears when the bone and the body are trying to bend at different points. A bone that extends below the natural waist can feel acceptable while standing but press sharply when the wearer sits. A side bone that is too long may irritate the underarm during arm movement. Horizontal waist wrinkles often indicate excess vertical length rather than insufficient tightness. If the garment contains more length from bust to waist than the wearer can accommodate, the extra material has to fold somewhere. In a soft bodice, the wrinkle may look gentle; between rigid boning channels it can become a pronounced horizontal crease. Tightening the waist may make the problem worse because the circumference becomes smaller while the extra body length remains. Experienced fitting therefore compares front length, side length, back length and waist position while looking at the garment from several angles. Structured dresses are unforgiving, but that is useful: they reveal pattern-balance errors that softer garments can temporarily hide.
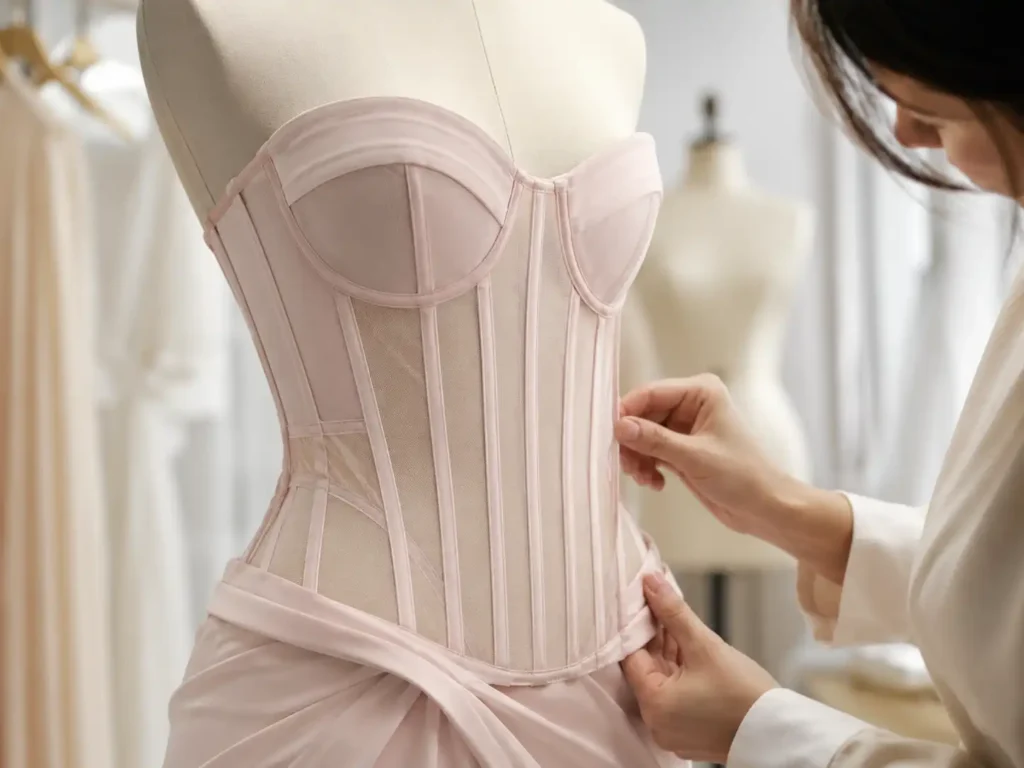
Practical Fit Diagnosis
Several visible defects can come from different sources, so corset fitting benefits from a cause-and-check process rather than trial-and-error alterations. A zipper bulge may result from excess back length, stretch during zipper installation or lining tension. Cup flattening may come from a cup that is too shallow or from insufficient circumference in the surrounding pattern. Lining exposure can reflect a lining pattern that is too large, but it can also appear when the shell stretches more than expected. The first inspection should therefore ask where the symptom begins, when it appears and whether it changes during movement. Compare the flat measurement with the on-body behavior, then isolate the relevant pattern piece or component. This approach reduces the temptation to fix every issue by taking in a side seam. Side-seam reduction can make a dress feel tighter while leaving cup depth, torso length or neckline geometry unchanged. A controlled diagnosis may take a few more minutes during sampling, but it usually saves an entire additional sample round.
Size Grading
Corset dresses are sensitive to grading because the garment contains three-dimensional elements that do not simply increase at the same rate as circumference. Bust volume, underbust, waist, torso length, cup spacing and panel shape all change across a size range, and the approved sample size should not be treated as proof that every graded size will behave identically. Cup selection is a common pressure point. If one physical cup is used across too many sizes, the outer bodice can become larger while internal bust volume barely changes. Boning needs review as well because its position relative to the apex, underarm and waist can shift after grading. In established development systems, the pattern team tracks bust, upper bust, underbust, waist, front length, back length and neckline relationships through the size range rather than enlarging the entire outline mechanically. For brands selling across US, UK, EU or AU size systems, the important question is not simply whether grading is available, but whether the structural relationships are checked after grading and before bulk cutting.
Fit Symptom | Likely Causes | Check First | Typical Correction Direction |
Cup gaping | Excess upper volume, wrong apex, cup too wide | Cup edge, apex, upper bust | Reshape or reposition cup/pattern |
Cup flattening | Cup too shallow, bust too tight | Cup depth, lower cup, bust circumference | Increase usable bust volume |
Neckline opening | Stretched edge, upper-bust excess, balance issue | Neckline length, upper bust, body balance | Stabilize edge or correct pattern |
Boning pressure | Bone too long, poor position, excess rigidity | Bone endpoints, torso length, movement | Shorten, reposition or change rigidity |
Waist wrinkles | Excess torso length, misplaced waist | Front/side/back length, waist level | Rebalance vertical pattern |
Zipper bulging | Back length, sewing stretch, weak stabilization | Zipper seam, back length, lining tension | Correct length and seam support |
Dress sliding | Loose waist/underbust, weak anchoring | Waist, underbust, upper edge | Improve lower-body anchoring |
How Do Factories Control Corset Construction?
Factories control corset construction by converting the approved sample into measurable, repeatable instructions. The approved pattern, cup position, boning layout, lining, reinforcement and closure details must carry into bulk production through technical records and QC checkpoints. The real test is not whether one sample looks impressive, but whether the same support, comfort and appearance can be reproduced across sizes, colors and production batches.
Sample Approval
A corset sample should be reviewed on a body or suitable fit form because flat measurements cannot reveal the whole structure. Bust and waist measurements can be within tolerance while the cup still floats away from the body. A zipper may be the correct length and still bow outward once the bodice is placed under tension. A useful approval routine checks front, side and back views, then observes the garment during normal movement. Sitting can reveal excessive bone length or waist pressure; raising the arms can expose underarm restriction; walking can show whether the bodice shifts relative to the skirt. Symmetry deserves its own check. Cup height, cup spacing, bone position, neckline level and side seams should be compared left to right, especially on plain satin where small differences are easy to see. A practical corset checklist therefore includes bust, waist, cup shape, boning position, zipper flatness, anti-slip performance, lining, hooks, symmetry, coverage and comfort. Passing measurement inspection alone is not enough for a fitted structured bodice.
Tech Pack Control
A useful corset tech pack goes beyond an exterior fashion sketch. If the inside contains important structure, those details should be defined clearly enough that the sample room and production line do not have to guess. Cup information may include type, position and reference size. Boning should be identified by material or approved reference, location and usable length. The file should also define lining, reinforcement zones, closure type, zipper length, hook positions and any anti-slip components. Critical measurements should reflect the design: bust, upper bust, underbust, waist and relevant vertical body lengths are often more useful than a single chest measurement. Approved sample changes need to be transferred into the technical record rather than remaining only in email comments. If Sample 1 showed a zipper bulge and the correction involved reducing back length and stabilizing the zipper seam, the next sample and the bulk line should both use that updated instruction. Traceability is what turns fitting knowledge into production knowledge.
Sample-to-Bulk Control
A beautiful development sample does not prove that a style is ready for bulk production. Sample machinists often make small hand adjustments as they work, and those adjustments may be difficult to reproduce consistently on a production line unless they are identified and documented. The factory needs to preserve the conditions that made the approved sample successful: the pattern version, fabric, cup, boning, lining, reinforcement, closure and sewing sequence. In-line inspection is useful because several structural defects are easier to correct before the lining is fully closed. Cup placement, bone length, zipper alignment and seam symmetry can be checked while access is still available. Final inspection then confirms the finished appearance, measurements and closure behavior. When approved construction changes are converted into sewing instructions and QC checkpoints, repeat orders become more predictable because the method does not depend on one machinist remembering what happened months earlier. This is particularly important for multi-color and multi-size orders, where small material or grading differences can multiply quickly across a production run.
Production-Ready Structure
A corset dress is production-ready when the factory can explain and reproduce the relationship between its pattern, cups, boning, internal layers, waist anchoring and closure. Repeatability matters even more when the style is offered in several fabrics or colors. Black stretch satin may tolerate slight tension differently from a pale woven satin; a lace overlay can increase seam bulk; a mesh panel can alter stretch around the bust. Each variation should therefore be compared with the approved structural standard rather than treated as a simple color change. Jinfeng Apparel’s documented development system includes 7+ senior womenswear pattern makers, two sample rooms and 20+ sample machinists, with structured-dress control points covering cups, boning, lining, anti-slip elements, zippers and fit. That type of development depth is most useful when it is used quietly: diagnose the real cause of cup gaping or zipper distortion, record the correction, then reproduce it in bulk. For a brand starting a new corset program, that process is usually more valuable than a long list of factory claims.
Production Stage | Main Control Point | Practical Check | Record to Keep |
Pattern development | Bust, waist, torso balance | Compare pattern with approved measurements | Approved pattern version |
Sampling | Cup and bone placement | Front, side and back fit review | Fit comments and revision notes |
PP sample | Complete construction | Confirm materials, fit and workmanship | Approved PP / reference sample |
Cutting | Panel accuracy and reinforcement | Grain, pair symmetry, reinforcement pieces | Cutting instructions |
Sewing | Cup, boning, zipper, lining | Placement and seam consistency | Operation sheet |
In-line QC | Structure before finishing | Measurements, symmetry, closure behavior | Inspection record |
Final QC | Finished fit and appearance | Zipper flatness, lining, cup shape, comfort | Final QC checklist |
Repeat order | Previous approved standard | Compare component and pattern versions | Historical specification file |

Conclusion.
A well-made corset dress does not depend on the hardest boning, the thickest lining or the greatest number of hidden parts. It depends on coordination. The pattern establishes the body shape, the cups manage bust volume, the bones keep the panels controlled, the internal layers spread tension, the waist provides anchoring and the closure preserves the fitted circumference. When a sample develops cup gaping, zipper distortion, pressure points or waist wrinkles, those defects are useful clues rather than random sewing problems. Reading them correctly allows the team to change the part that is actually responsible instead of making the entire garment tighter or stiffer. For brands developing structured dresses, the most useful manufacturing partner is therefore one that can explain the cause of a fit problem, record the correction and reproduce the approved solution across sizes and bulk orders. That is the point at which corset construction stops being a visual trend and becomes reliable garment engineering.
Share This Article :

Jerry Lee
Categories

Latest blogs


Table of Contents
Here, developing your OEM/ODM private label clothing collection is no longer a challenge—it’s an excellent opportunity to bring your creative vision to life.

