Skip to content
Sleeves may seem like a minor detail—but in dress design, they shape the entire silhouette, affect comfort, and influence how a garment moves and feels on the body.
From minimal straps to voluminous bishop sleeves, dress sleeve types range widely in style and structure. Each type offers different advantages depending on fabric, fit, and customer needs.
Understanding sleeve types isn’t just for designers—it helps buyers make smarter sourcing decisions and create more aligned collections.
How do different sleeve styles influence design and functionality?
Every sleeve type has a specific purpose—whether to emphasize movement, add volume, create drama, or improve comfort. Choosing the right sleeve is as important as selecting the right neckline or hemline.
Sleeves influence visual balance, comfort, and garment movement. From fitted to flared, each style serves different design goals and must be chosen with the overall silhouette and fabric behavior in mind.
Let’s explore how different sleeve styles perform in real production and styling scenarios.
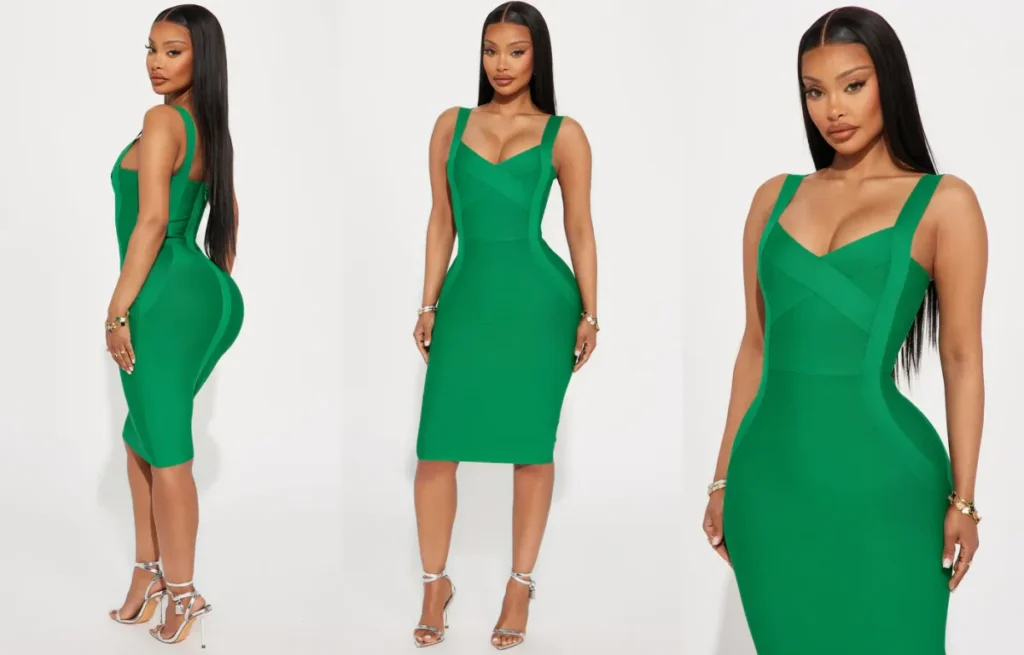
Sleeveless
Why are sleeveless dresses so popular in modern fashion?
Sleeveless dresses are clean, simple, and sexy. They also allow for easy layering, making them versatile across seasons.
Sleeveless dresses highlight the shoulders and arms, offering a minimalistic look that works well for casual wear, summer collections, and layered outfits.
But there’s more behind the trend than just cut-outs on the shoulders.
Sleeveless isn’t just about heat—it’s about freedom of design
Sleeveless styles have become a staple in women’s fashion, especially for Gen Z and Millennial audiences. Here’s why:
- Visual Impact: Sleeveless cuts create a sleek line that accentuates the neck and collarbone.
- Styling Versatility: Customers layer sleeveless dresses with blazers, cardigans, or turtlenecks depending on the season.
- Fabric Freedom: Without sleeves, designers can use lighter fabrics or stretch knits that move well on the body.
- Production Efficiency: No sleeves often mean faster production, lower costs, and fewer fitting complications.
Here’s how different sleeveless styles vary:
| Type of Sleeveless Cut | Description | Best For |
|---|---|---|
| Tank Style | Thick shoulder straps | Everyday casual |
| Spaghetti Straps | Thin, delicate straps | Summer & party dresses |
| Halter Neck | Ties or connects behind the neck | Formal looks or beachwear |
| Racerback | Shoulders are cut inward | Sporty or youthful looks |
Common Mistakes When Designing or Sourcing Sleeveless Styles
- Ignoring Bra Compatibility: Customers complain if they can’t wear regular bras underneath.
- Overlooking Fit Around the Armhole: Too loose or too tight makes the style uncomfortable.
- Not Adapting for Market Preferences: Some regions prefer more modest styles; others love bolder cuts.
In my factory, we often help clients adjust armhole depth and neckline width to match market preferences. Emily, one of our Australian clients, once asked us to redesign a whole collection after receiving customer feedback that the straps were too thin and not supportive. Lesson learned—get your sample feedback early.
Halter Neck
What makes halter neck sleeves a standout choice in women’s fashion?
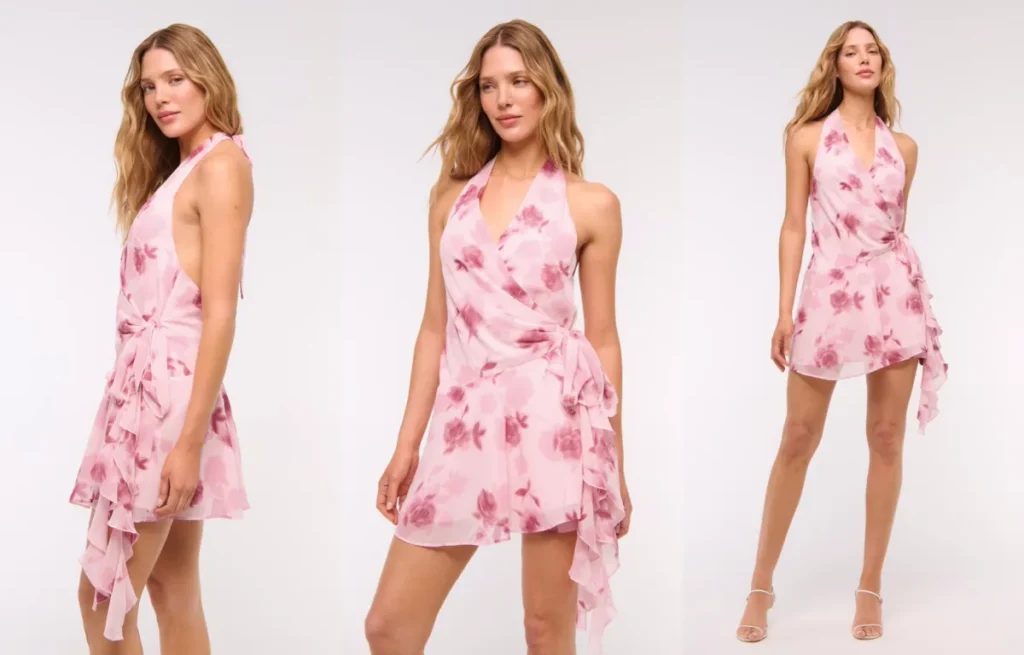
Halter necks expose the shoulders and define the upper back. They’re bold, flattering, and tied closely to modern femininity.
Halter neck styles are characterized by straps or fabric that wrap or tie behind the neck, creating a backless or semi-backless look ideal for summer, evening, and resort wear.
Their versatility isn’t just about the shape—it’s about the story they tell.
Halter necks create confidence and elegance at once
Unlike other sleeveless styles, halter necks have a specific silhouette—fitted bust, open back, and defined shoulders. Here’s why they continue to trend in global markets:
- Enhanced Shoulder Line: Halters bring focus to the collarbone and upper body. This creates a lengthening effect.
- Minimal Support with Maximum Impact: Most halters avoid sleeves entirely, offering a clean and elegant profile with minimal fabric.
- Event Versatility: From beach dresses to red-carpet gowns, halters show up everywhere.
- Youthful, Trend-Forward Appeal: Halters are especially popular among Gen Z consumers who embrace Y2K and ’90s silhouettes.
Here’s a breakdown of common halter styles:
| Halter Style | Description | Use Case |
|---|---|---|
| Tie-Back Halter | Fabric ties behind neck | Casual, boho, or resort wear |
| High Neck Halter | Extended neckline with button or clasp | Formal or minimalist styles |
| Plunge Halter | Deep V-neck with halter support | Club, evening, or party wear |
| Wrap Halter | Fabric crosses or drapes in the front | Statement fashion or gowns |
Technical Challenges with Halter Designs
Working with halter necks in production often raises specific issues:
- Support Without Structure
Halters lack traditional shoulder coverage, so bust support must come from the garment’s body. For busty consumers, that means built-in cups, reinforced lining, or a secure under-bust seam. - Back Closure and Adjustability
Since the back is open or partially open, closures must be secure but subtle. Tie-back styles need enough length for different neck sizes, while buttoned halters need stable interfacing at the neckline. - Neck Comfort and Strain
Poor halter designs pull on the neck, causing discomfort. We always test our halter straps for weight distribution during sampling. A mistake here results in high return rates. - Size Grading Sensitivity
Unlike standard sleeves, halter necklines shift dramatically with body proportions. A few centimeters off can cause side-boob exposure or back gaping. Accurate grading is crucial. - Market Variation in Acceptance
Some markets, especially in conservative regions, avoid halters due to the exposed upper back. Brands must know their audience. We once had a UK client remove halters from her winter collection after realizing they weren’t resonating with her local shoppers.
Insider Tips From Our Factory:
- Always request two prototypes of halter designs—one for fit testing, one for stress testing the neckline.
- When using stretch fabric, consider stabilizing the halter strap with non-stretch tape to avoid distortion.
- Offer optional built-in bras for halter dresses sold to markets like Australia and the U.S.
Halter necks are more than a cut—they’re a commitment to both boldness and precision in design.
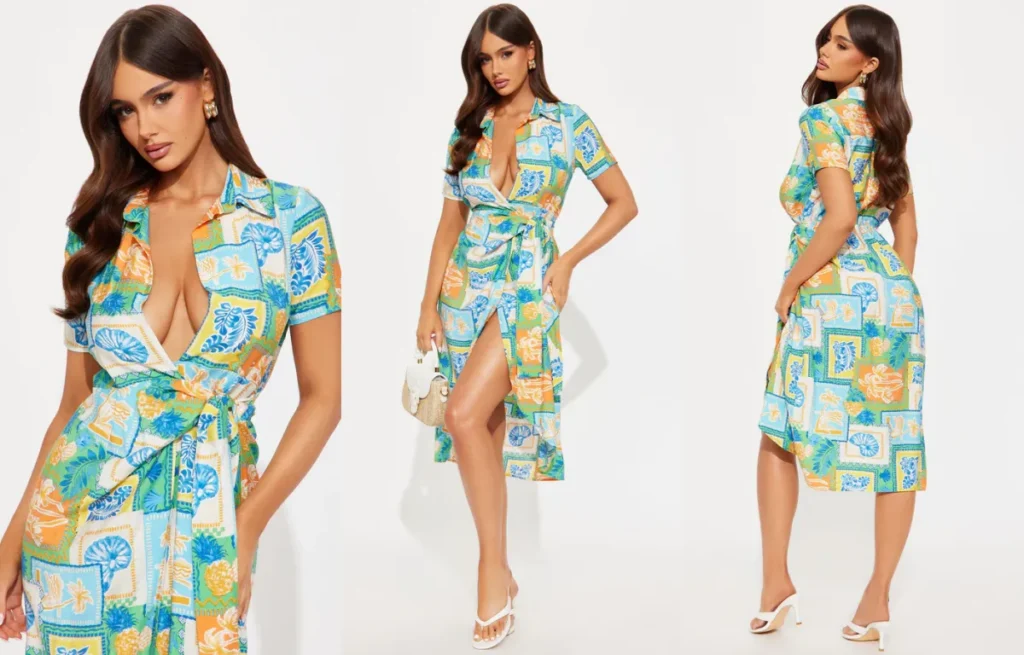
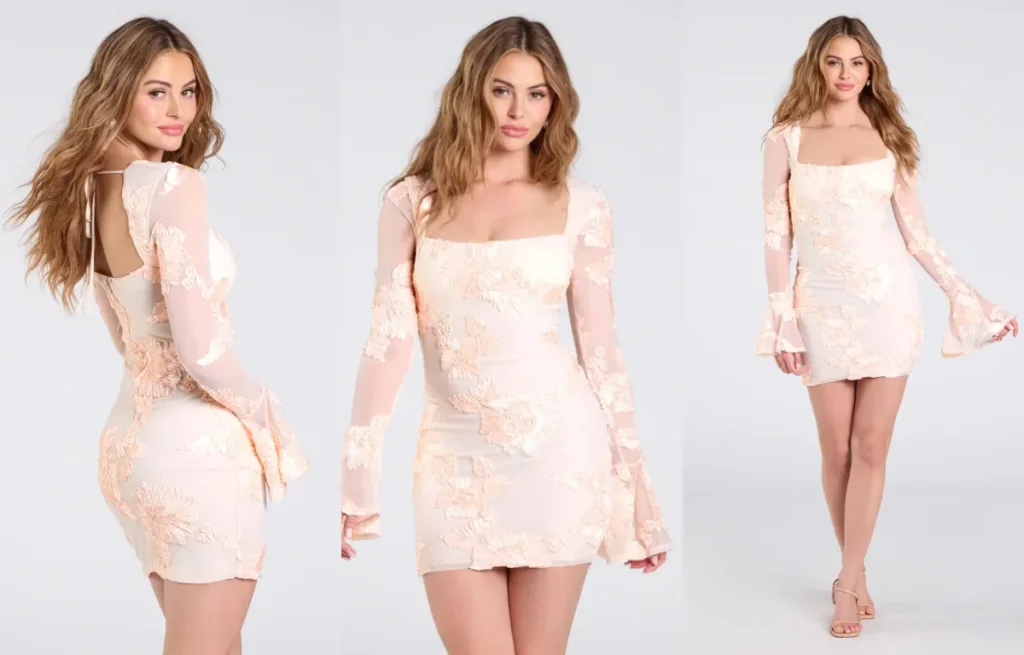
Strap Sleeve
What makes strap sleeves a core choice in women’s dress design?
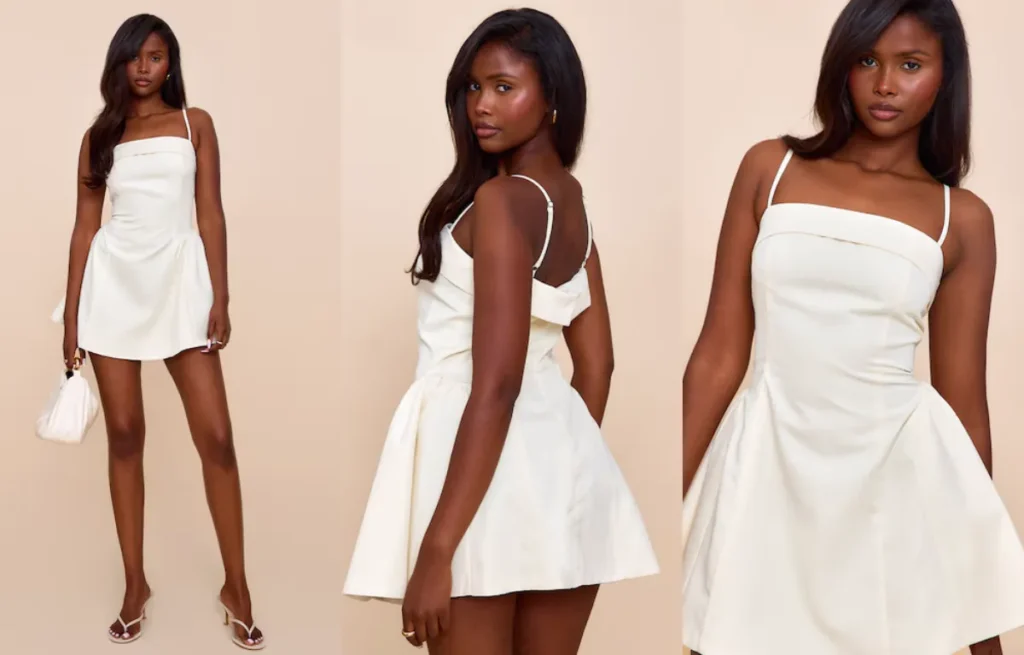
Strap sleeves offer minimal coverage with maximum flexibility. They’re lightweight, breathable, and timeless.
Strap sleeves refer to thin shoulder straps that hold up the dress, typically leaving the arms and shoulders fully exposed. This style works well for layering, summer collections, and evening wear.
They may seem simple—but there’s a lot more going on in their construction.
Strap sleeves balance delicacy and function
From basic tank straps to ultra-thin spaghetti versions, strap sleeves give designers room to play. They can frame the neckline, add structure, or simply disappear into the background for a clean silhouette.
Here’s a quick breakdown of common strap styles:
| Strap Style | Description | Best Use Case |
|---|---|---|
| Spaghetti Strap | Very thin, often 0.5cm or less | Cocktail dresses, camisoles |
| Tank Strap | Wider, like a tank top | Casual or everyday dresses |
| Adjustable Strap | Includes sliders for length control | Multi-size market garments |
| Criss-Cross Strap | Straps cross over at the back | Youthful or athletic styles |
| Embellished Strap | Features beads, sequins, or lace | Statement or bridal wear |
Key design benefits of strap sleeves:
- Lightweight Appeal: Ideal for hot climates and vacation wear.
- Easy Layering: Works with cardigans, blazers, and shawls.
- Neckline Freedom: Pairs well with V-necks, square necks, or cowl necks.
- Fabric Focus: With less coverage, the fabric of the bodice gets full attention.
Technical considerations for manufacturing strap sleeves
Strap sleeves may look simple—but they’re one of the most sensitive areas in garment construction. Here’s why:
- Support vs. Aesthetics
Spaghetti straps look delicate but must hold the weight of the dress. This is especially critical in dresses with built-in padding or structured bodices. We often reinforce strap joins with extra stitching or bar-tacks at the shoulder seam. - Adjustability and Sizing
Strap length can vary significantly between body types. Adjustable straps reduce returns and allow better customer satisfaction across sizes. We suggest including sliders for global collections. - Strap Placement
A few centimeters off can lead to gaping at the armhole or misaligned bust darts. Strap position affects both comfort and visual symmetry. - Seam Tension and Reinforcement
Because straps bear direct stress during wear (especially during movement), their seams must be reinforced. We often double-stitch and add a clean finish inside to avoid fraying. - Material Selection for Straps
Thin straps need specific fabrics. Lightweight woven straps should be cut on bias for stretch and strength. Knit straps require interfacing or elastic to prevent rolling. Velvet or embellished straps demand hand-finishing.
Factory Case Example
One of our Australian clients, Emily, requested a minimalist strap-sleeve midi dress for her summer line. The first sample looked beautiful—but after a wear test, the straps stretched out and caused the neckline to drop too low. We solved it by lining the straps with a woven tape and switching to a denser knit. It added $0.15 in cost per unit—but saved the entire production run.
Best practices I recommend to all buyers:
- Test strap stress with mannequin arm movement.
- If using stretch fabric, shorten the strap slightly to account for give.
- Always confirm whether the end consumer prefers adjustable or fixed straps.
Strap sleeves may seem like a minor detail—but they’re often the difference between a best-seller and a clearance item.
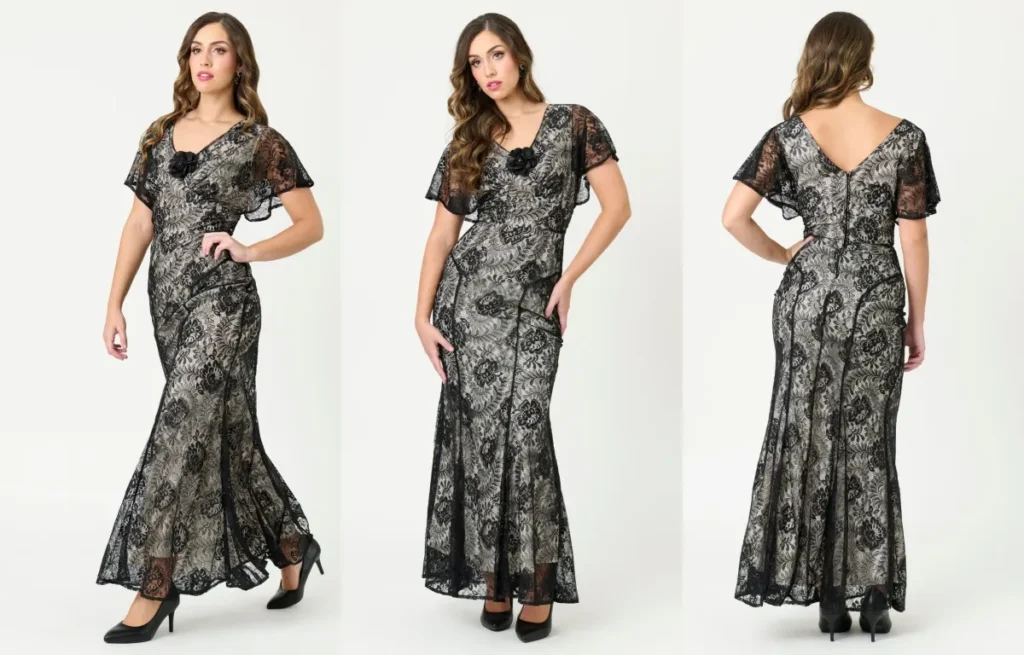
Cap Sleeve
Why are cap sleeves a timeless choice for women’s dresses?
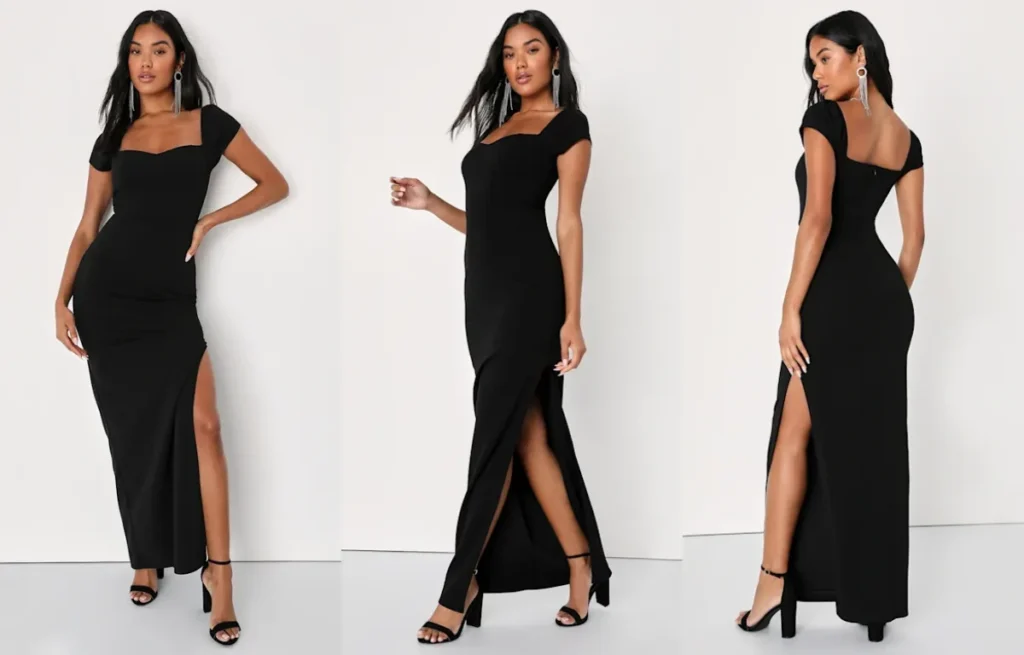
Cap sleeves offer just enough coverage to flatter the upper arm while keeping a soft, feminine silhouette.
Cap sleeves are very short sleeves that sit just over the shoulder without extending under the arm, creating a delicate, structured look that works well in both casual and formal designs.
They may look simple, but getting them right requires precision in both design and construction.
Cap sleeves create balance in silhouettes
Cap sleeves work particularly well when you want to soften the upper body line without fully covering the arm. They’re often used to bring elegance to necklines or to provide subtle coverage for women who avoid sleeveless styles.
Common cap sleeve design variations:
| Type | Description | Common Usage |
|---|---|---|
| Fitted Cap Sleeve | Slightly hugs the shoulder | Formal, elegant dresses |
| Flared Cap Sleeve | Looser, with outward drape | Feminine, romantic silhouettes |
| Pleated Cap Sleeve | Has small gathers or pleats | Adds volume and structure |
| Lace Cap Sleeve | Made from lace or mesh overlay | Bridal or evening wear |
Cap sleeves work best when:
- You want to enhance the shoulders without bulk
- Your customer prefers modesty but dislikes full sleeves
- You’re working with tailored or structured bodices
Technical deep dive: the complexity behind cap sleeves
Even though cap sleeves look minimal, their fit and construction can be surprisingly tricky. Here’s what I always consider when producing them in our factory:
- Armhole Shape Must Be Perfect
Cap sleeves don’t extend under the arm, so the armhole must contour cleanly around the upper bust and shoulder. If the curve is off, it causes gaping or tightness. - Balance Between Sleeve and Bodice
Cap sleeves are often part of the bodice pattern—not separate pieces. This requires seamless integration in the pattern-making stage. We use 3D modeling to preview the angle and length before cutting. - Fabric Selection Matters
Structured fabrics like cotton poplin hold the cap shape well, while softer materials like rayon may need interfacing or lining to avoid drooping. - Shoulder Slope Sensitivity
Because cap sleeves sit right on the shoulder tip, any variation in shoulder slope among wearers affects the sleeve’s appearance. We adjust the shoulder seam angle depending on the target region’s average body shape. - Pattern Grading Must Be Precise
A mistake of even 0.5 cm in cap sleeve grading between sizes can ruin the fit. We test each size during sampling to confirm consistency in sleeve fall. - Hem Finish Requires Attention
Due to the sleeve’s small size, finishing becomes more visible. Rolled hems, binding, or lace edge finishes are commonly used, depending on the final price point.
Client Story: Adapting Cap Sleeves for Market Fit
One UK-based client wanted cap-sleeved dresses for a spring capsule. But their customers complained about tight armholes. After reviewing returns, we found the sleeve curve was too shallow. We deepened the armhole by 1cm and shifted the sleeve cap by 0.5cm outward—returns dropped by 80% in the next batch.
Best practices to ensure cap sleeves work well:
- Always test armhole movement—raise and lower arms in sampling
- Pair with structured bodices to maintain shoulder shape
- Choose fabrics with medium body for best silhouette control
- Consider layering compatibility if targeting colder seasons
Cap sleeves are often chosen for their simplicity—but designing them properly takes technical finesse and thoughtful customer alignment.
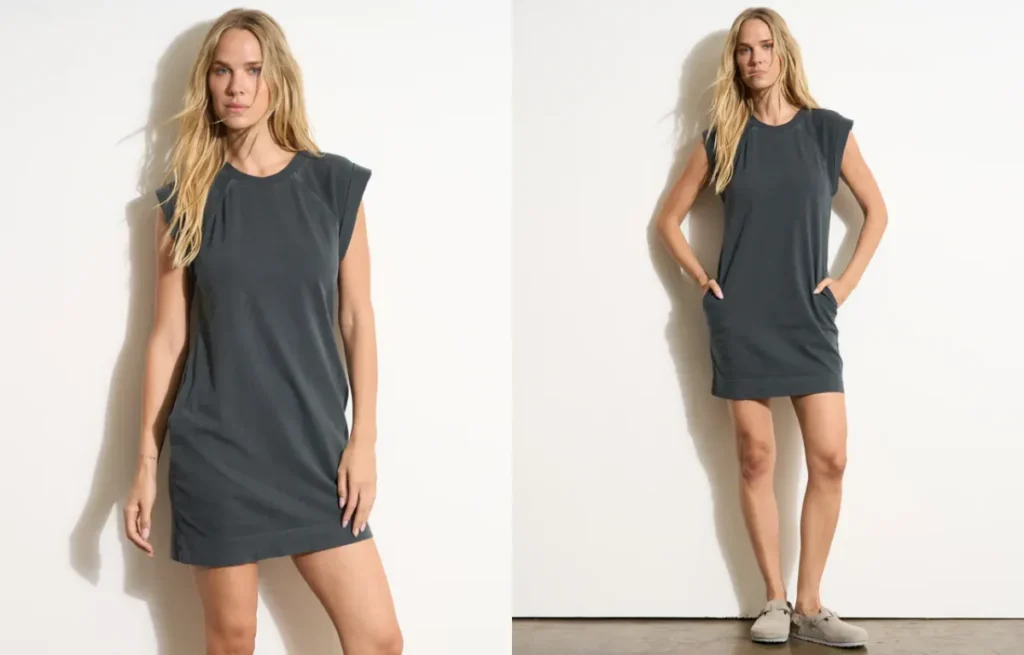
Short Sleeve
Why are short sleeves a universal go-to in women’s fashion?
Short sleeves provide coverage and comfort while allowing freedom of movement. They fit almost any season, market, or age group.
Short sleeves typically extend from the shoulder to just above the elbow, making them ideal for everyday wear, workwear, and transitional collections. Their shape can be tailored to enhance or soften the upper arm area.
They may seem basic, but getting the short sleeve right is anything but simple.
Short sleeves combine comfort, function, and adaptability
Short sleeves are considered the “default” in many designs, but they can still reflect trend direction, body confidence, and regional tastes. Here’s why they remain in nearly every collection I help develop:
- Seasonal Flexibility: Suitable for both summer and transitional weather.
- Body Inclusivity: Offers more coverage than sleeveless but less restriction than long sleeves.
- Easy Pairing: Layers well with jackets or stands alone.
- Customizable Shape: Can be fitted, boxy, flared, gathered, or cuffed.
Common short sleeve variations:
| Short Sleeve Type | Description | Best Application |
|---|---|---|
| Basic Set-In | Standard fitted sleeve | Everyday dresses |
| Dolman/Drop Shoulder | Attached lower on the shoulder seam | Relaxed or oversized silhouettes |
| Cuffed Sleeve | Sleeve ends with a sewn or rolled cuff | Casual, youthful looks |
| Flutter Sleeve | Short and flared for movement | Feminine, soft silhouettes |
| Gathered Sleeve | Small gathers at the crown | Romantic, vintage-inspired looks |
Technical deep dive: how to perfect short sleeves in production
From a manufacturing perspective, short sleeves are deceptively challenging. Their simplicity leaves no room for error, and buyer expectations around fit and finish are high.
- Sleeve Cap Shape Is Crucial
The curve at the top of the sleeve must perfectly match the armhole. If the cap is too flat, it causes pulling; if too high, it creates puffiness. - Fit Across Sizes Must Be Consistent
Short sleeves highlight the upper arm, an area many customers are sensitive about. We pay extra attention to the width and taper in each size grade. A 1cm increase in bicep width can improve fit across multiple body types. - Fabric Type Affects Drape
Structured fabrics give short sleeves shape and definition. Soft fabrics flow more but may cling or collapse. I always advise testing both with and without interfacing depending on the silhouette. - Shoulder Seam Placement Matters
A high-placed seam gives a more fitted, polished look. A dropped seam feels more casual and oversized. Decide early in the design process which direction you’re aiming for. - Sleeve Opening Finish
Short sleeve hems are highly visible. Whether you use a double fold, binding, or cover stitch, the execution has to be flawless—especially in plain color fabrics. - Heat and Humidity Considerations
If you’re selling in hot climates (like Australia or Southeast Asia), ventilation matters. We often suggest slight vent details or breathable fabrics for better airflow.
Factory Insight: Optimizing Short Sleeves for Global Markets
We once produced a batch of short-sleeved cotton dresses for a U.S. client targeting plus-size women. Our original pattern used standard sleeve grading. After fit testing, we increased the bicep measurement by 2.5cm and added a slight forward tilt to the sleeve angle—sales nearly doubled the following season.
Common Mistakes Brands Make with Short Sleeves:
- Using the same sleeve for all fabrics without testing
- Ignoring the shoulder slope in different markets
- Not adjusting sleeve angle for posture differences
- Skipping customer feedback on sleeve tightness
Best practices:
- Always sample in final fabric
- Review bicep width across sizes
- Compare drop vs. set-in shoulder styles for your market
- Use structured finishes on high-end styles for polish
Short sleeves can be a bestseller—if they’re done with intention, not as an afterthought.
Tulip Sleeve
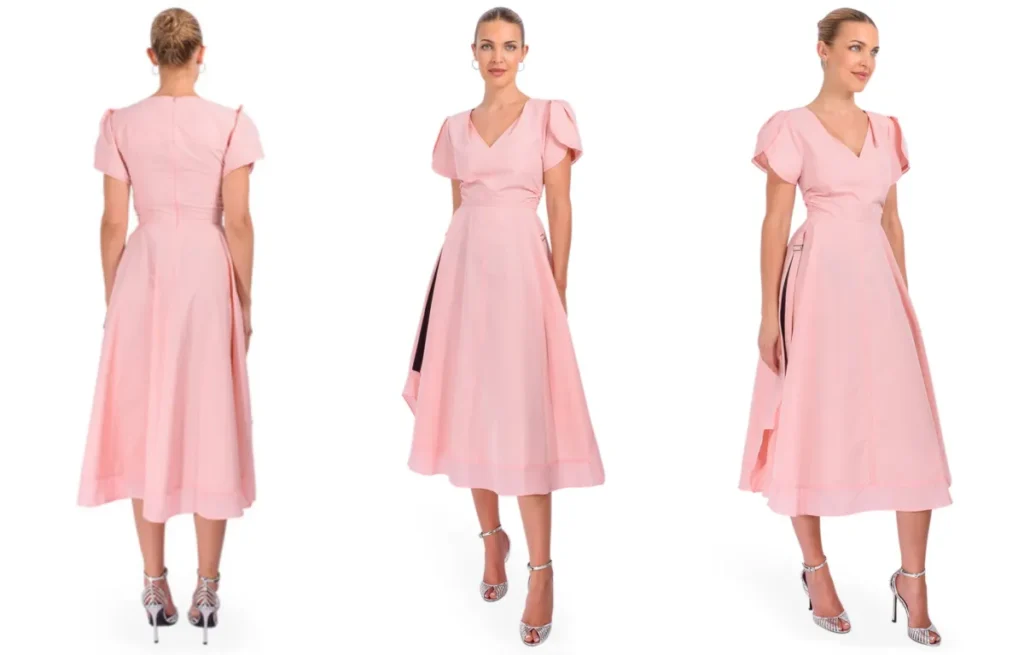
What makes tulip sleeves a feminine and functional choice?
Tulip sleeves overlap at the upper arm, forming a petal-like shape that adds elegance and soft structure without bulk.
Tulip sleeves are short, overlapping sleeve panels that curve gently over the shoulder and upper arm, offering a delicate look that combines coverage with ease of movement.
This design stands out in the market, especially when paired with tailored or romantic dress silhouettes.
Tulip sleeves offer softness, motion, and visual interest
The design gets its name from its petal-like shape. It’s flattering on many body types and is especially appreciated by customers who want arm coverage without the heaviness of traditional sleeves.
Here’s why tulip sleeves work:
- They soften angular shoulders: Great for balancing a strong upper body.
- They offer modest coverage: Without fully enclosing the arm.
- They allow movement: Overlapping construction provides flexibility.
- They add subtle volume: Without overwhelming the silhouette.
Common tulip sleeve styles:
| Tulip Sleeve Type | Description | Best Use Case |
|---|---|---|
| Classic Overlap | Two symmetrical curved panels | Office and semi-formal dresses |
| Single-Flare Petal | One longer petal over a shorter base | Soft, feminine silhouettes |
| Structured Tulip | Reinforced with interfacing for shape | High-end or occasion dresses |
| Draped Tulip | Made with fluid fabric, loose overlap | Boho or flowy summer dresses |
Dive deeper: Technical aspects of designing and producing tulip sleeves
Tulip sleeves may look graceful and effortless, but their pattern, stitching, and fit require careful attention. Here’s how we approach them in production:
- Pattern Symmetry and Overlap Alignment
The left and right panels must overlap at just the right point on the upper arm. If the angle is too steep or too shallow, the sleeve gaps or flattens. We use 3D CAD software to preview the curve before cutting fabric. - Control Sleeve Bulk at the Seam
Where the two panels overlap, seam bulk can become a problem—especially in woven fabrics. To avoid this, we grade the seam allowance inward and often use French seams or flat-felled seams to reduce thickness without compromising structure. - Hem Shape and Finishing
The outer curve of a tulip sleeve is very visible. We often use narrow rolled hems or baby hems to keep the curve clean. For bridal or premium garments, we sometimes use hand-finished blind stitching for a seamless edge. - Fabric Selection Is Critical
Stiffer fabrics like cotton poplin or taffeta hold the tulip shape beautifully. Lightweight fabrics like rayon or chiffon flow more, which works well for a draped tulip but may need interfacing for the overlapping points. - Shoulder Fit and Balance
Because the tulip sleeve starts right at the shoulder point, its fit heavily depends on the bodice shoulder seam. If this area isn’t structured or stable, the sleeve can droop or pull forward. We reinforce this area with fusing or bias tape, especially in fitted bodices. - Sleeve Opening Comfort
The curved overlap means the bottom of the sleeve opens slightly. This adds mobility but needs testing for gaping. For petite sizes, we often shorten the overlap; for plus sizes, we extend the inner panel for full coverage.
Case Study: Solving Tulip Sleeve Fit Issues for a UK Boutique Brand
One of our UK-based buyers submitted a tulip sleeve A-line dress that looked perfect in the initial sketch—but the fit test showed the sleeve flared out awkwardly. The issue? The outer petal was cut too flat, and the inner petal was too short. We revised the angle by 15 degrees, added a 1cm inner panel extension, and stitched the overlap point 1.5cm lower—problem solved. The dress became their best-selling style that season.
Tips I always give when clients are producing tulip sleeves:
- Test the sleeve in both soft and structured fabrics
- Confirm overlap placement during sample fitting
- Avoid thick seam finishes in overlapping areas
- Reinforce shoulder seams subtly for long-term wear
Tulip sleeves are not just decorative—they’re a smart way to deliver elegance with practical wearability.
Petal Sleeve
What defines petal sleeves and why are they unique?
Petal sleeves are short, curved panels that cross over the shoulder, mimicking flower petals. They’re light, elegant, and subtly eye-catching.
Petal sleeves overlap in a soft, curved shape over the upper arm, offering a decorative and feminine alternative to regular short sleeves. They are ideal for romantic, formal, and spring-summer collections.
They are similar to tulip sleeves—but with softer curves and typically less structure.
Petal sleeves add elegance without weight or volume
Petal sleeves blend seamlessly into delicate dress styles, often showing up in bridalwear, romantic occasion dresses, or soft contemporary lines. Here’s what makes them valuable:
- Visual softness: The curve creates a gentle, non-angular shape.
- Light coverage: They give modesty without feeling bulky or warm.
- Graceful motion: The overlapping shape moves with the body.
- Design versatility: Works with wrap dresses, empire cuts, or even bodycon styles when handled properly.
Petal vs. Tulip: What’s the difference?
| Feature | Petal Sleeve | Tulip Sleeve |
|---|---|---|
| Curve Shape | Soft, wide rounded curve | Slightly sharper or more structured |
| Overlap Direction | Often front-over-back | Often back-over-front or side-cross |
| Fabric Structure | Typically soft and flowy | Can be soft or structured |
| Common Use | Bridesmaid, cocktail, summer styles | Office, formal, fashion-forward |
Technical considerations when creating petal sleeves
Though visually light, petal sleeves require a high level of precision in pattern cutting, sewing, and fitting. I’ve seen firsthand how a poor curve or incorrect overlap can ruin an otherwise perfect design.
- Pattern Drafting: Curve and Angle
The curve must match the shoulder line and armhole perfectly. We use a mix of flat pattern drafting and 3D modeling to ensure the sleeve overlaps naturally without pulling or sagging. - Fabric Choice Affects Sleeve Behavior
Petal sleeves usually rely on soft, drapey fabrics like chiffon, satin, or crepe. Heavier fabrics cause stiffness and lose the petal effect. For lighter fabrics, we often add a narrow hem or bias binding to keep the edge clean. - Seam Management at the Shoulder
Overlapping panels add bulk at the shoulder seam. We trim seam allowances aggressively and sometimes use French seams to reduce visible stitch lines on sheer fabrics. - Mobility and Arm Fit
Since petal sleeves don’t have a traditional underarm seam, fitting must focus on arm movement. We test by raising and rotating the arms to make sure the overlap doesn’t shift or gap awkwardly. - Size Grading Challenges
Petal sleeves are very sensitive to changes in size. A small pattern error becomes more obvious in plus or petite sizes. We grade each sleeve curve manually, not automatically, to preserve shape and proportion. - Edge Finish and Aesthetics
The sleeve edge is fully visible—often the focal point. We recommend:
- Baby hem for lightweight fabric
- Rolled hem for semi-sheer styles
- Blind stitch for high-end gowns
One client wanted soft petal sleeves on a satin midi dress. The first sample used satin with no interfacing and a narrow hem. The result? The sleeve edges curled and didn’t lie flat. Our solution: we added lightweight fusible interfacing just to the curved edge and changed to a 0.5cm clean-finished hem. The sleeve sat perfectly—no more curling, and sales rose by 30%.
My tips when sourcing or developing petal sleeves:
- Always test the sleeve in final fabric—not just muslin
- Confirm overlap direction and position during sample fitting
- Avoid topstitching unless it’s part of the design
- Double-check curve depth on all graded sizes
- Offer the design with and without sleeves to expand audience reach
Petal sleeves seem soft and delicate—but they demand high control in design and production to achieve that effortless look.
Puff Sleeve
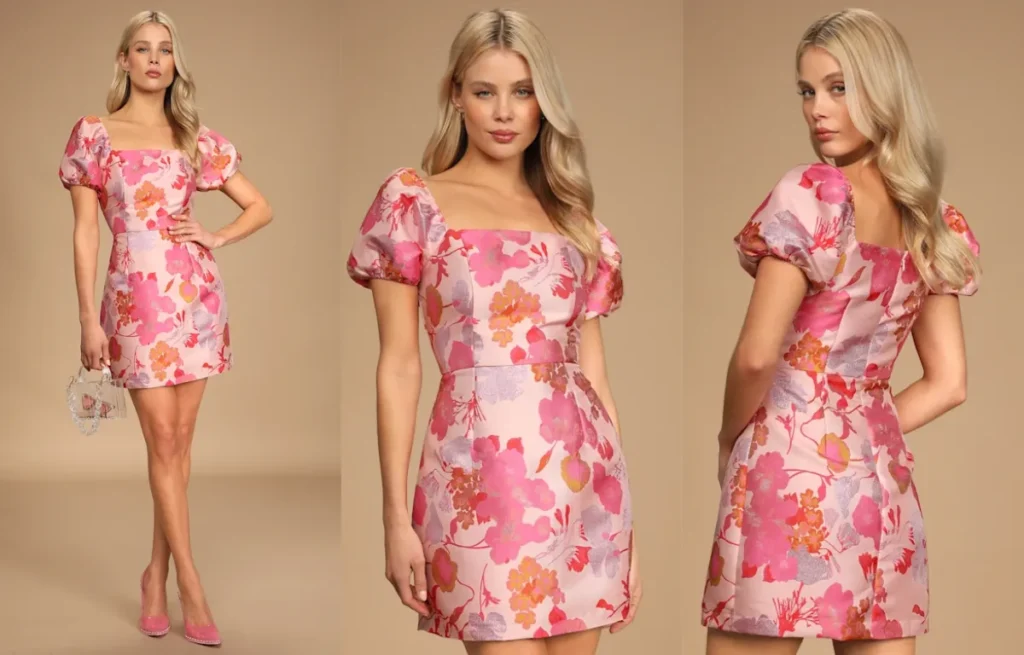
Why are puff sleeves such a bold statement in modern fashion?
Puff sleeves add volume, drama, and vintage flair. They define the shoulder and draw attention upward.
Puff sleeves are sleeves that gather at the shoulder and often at the hem, creating a rounded, voluminous shape that works across romantic, retro, or statement-driven styles.
They’re highly visible, emotionally expressive—and very sensitive to proportion.
Puff sleeves make a silhouette instantly memorable
From Victorian fashion to ’80s revival to today’s Gen Z trends, puff sleeves have always cycled through popularity. What makes them work so well?
- They balance body proportions: Great for customers with pear or triangle shapes.
- They add instant drama: A basic bodice becomes a fashion-forward look.
- They offer variety: From soft gathers to oversized balloon sleeves.
- They photograph well: Ideal for social-media-driven styles.
Key variations of puff sleeves:
| Puff Sleeve Style | Description | Best Application |
|---|---|---|
| Classic Puff | Gathers at shoulder and sleeve opening | Vintage or romantic dresses |
| Balloon Sleeve | Extra volume and length, often elbow or full | Statement or editorial looks |
| Leg-of-Mutton Sleeve | Large at top, tapered toward wrist | Historical or formal fashion |
| Short Puff | Small, rounded shape, above the elbow | Youthful or casual styles |
| Juliet Sleeve | Puff at shoulder, then fitted to wrist | Medieval or fairytale-inspired |
What are the production challenges of puff sleeves?
While puff sleeves are loved for their visual effect, they’re one of the hardest sleeves to get right technically. They require extra planning in design, pattern-making, and construction.
To produce a puff sleeve that holds its shape and fits comfortably, you must master gathering, sleeve head shaping, fabric behavior, and reinforcement—every millimeter counts.
Let’s go deeper into each technical component.
1. Gathering Ratio: The Foundation of Volume
The “puff” effect comes from gathering fabric. Too little, and the sleeve looks flat. Too much, and it overwhelms the bodice.
- Standard Ratio: We usually start with a 1.5:1 or 2:1 gather ratio. For very dramatic sleeves, it can go up to 3:1.
- Even Distribution: We always mark key notches on the sleeve and bodice to ensure the gathers are symmetrical.
- Thread Choice: For structured fabrics, we use heavier gathering threads to prevent breakage during production.
2. Sleeve Cap Height and Curve
The sleeve head must rise high enough to allow fullness but still fit into the armhole.
- A taller sleeve cap = more volume.
- A flatter cap = more width, less height.
We often draft two or three cap variations during the sampling phase and test each one for mobility and visual impact.
3. Fabric Selection Affects Shape Retention
Fabric plays a huge role in how the puff sleeve sits:
| Fabric Type | Effect on Puff Sleeve |
|---|---|
| Organza | Holds shape, stiff volume |
| Cotton Poplin | Crisp and structured |
| Chiffon | Soft and collapsible |
| Rayon or Viscose | Flowy, subtle puff |
| Tulle | Extreme volume, often layered |
Lightweight but structured fabrics work best when the puff needs to maintain form all day. For soft, draping styles, we sometimes add lightweight interfacing only to the sleeve head.
4. Shoulder Seam Strength and Support
The shoulder seam bears the weight of the puff. In heavy or oversized sleeves, this seam must be reinforced:
- We use stay tape or bias binding on the shoulder seam
- Bar-tack the sleeve join for added strength
- Test for sagging after 6–8 hours of wear simulation
5. Cuff Finish and Puff Control
The sleeve hem also affects how the puff forms. Common finishes include:
- Elastic cuffs: Create a rounded bubble effect
- Shirred cuffs: Add texture and comfort
- Fixed band cuffs: Define where the puff ends
We make sure to test the sleeve fullness with each cuff finish. A tight band will amplify the puff above it, while a looser finish creates a soft fall.
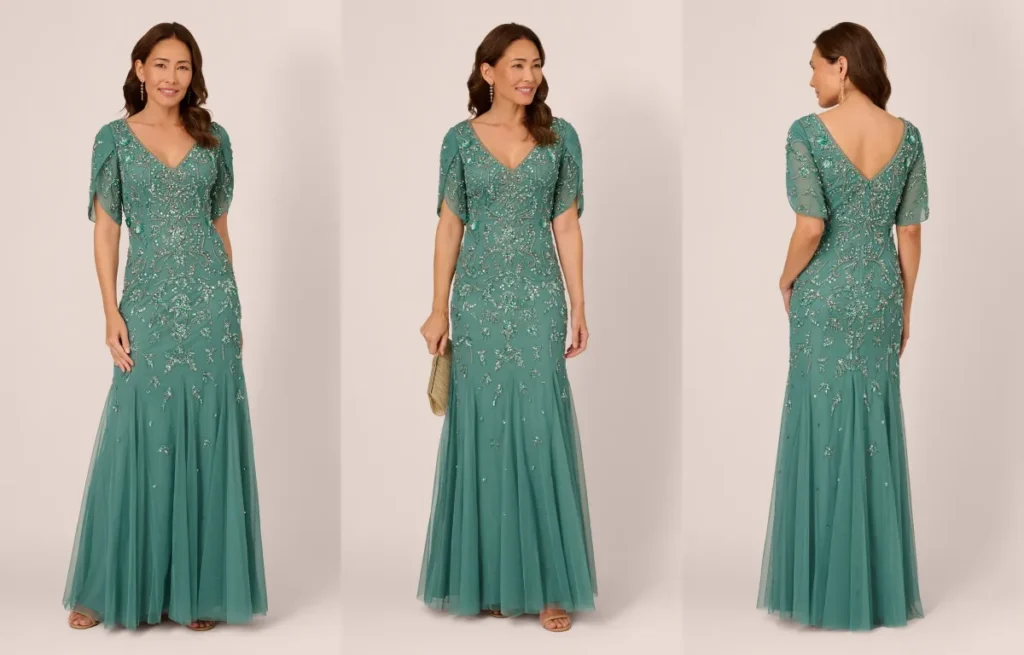
Flutter Sleeve
What makes flutter sleeves so popular in women’s dress design?
Flutter sleeves offer movement, softness, and a touch of romance. They create a floating effect that feels feminine and light.
Flutter sleeves are loose, flowing sleeves that usually extend from the shoulder or upper arm and flare outward, creating a draped, fluttering effect as the wearer moves.
They’re especially common in summer collections, bohemian styles, and wedding guest looks.
Flutter sleeves add elegance through motion
What makes flutter sleeves so attractive isn’t just how they look when still—but how they move. They’re perfect for collections that focus on softness, flow, and airiness.
Common features of flutter sleeves:
- No sleeve cap structure: They’re typically cut as a wide, circular shape.
- Unrestricted underarm: This allows airflow and comfort.
- Visually elongating: The diagonal drape can make arms look slimmer.
- Great for sheer or layered looks: Especially with fabrics like chiffon or georgette.
Key flutter sleeve styles:
| Flutter Sleeve Type | Description | Best Use Case |
|---|---|---|
| Classic Circle Cut | Seamless circular flare from shoulder | Casual or romantic dresses |
| Layered Flutter | Multiple soft layers for volume | Bridesmaid or evening styles |
| Extended Flutter | Longer length, often elbow-length | Resortwear or boho collections |
| Angled Flutter | Cut diagonally for more visual interest | High-fashion or editorial looks |
What technical challenges do flutter sleeves bring to production?
Flutter sleeves may seem easy—they don’t have cuffs, structure, or tight seams. But this simplicity hides complex challenges in fabric control, cutting precision, and edge finishing.
To produce flutter sleeves that float naturally and fit perfectly, you must understand fabric weight, cutting angles, shoulder seam behavior, and how the sleeve interacts with the bodice.
Let’s break it down.
1. Cutting Shape: Circle vs. Bias
Flutter sleeves are often cut as a circle or semi-circle pattern. The curve and width control the level of flare.
- Circle cuts: Create even, dramatic flutter across the arm.
- Bias cuts: Add more fluidity and softness.
- Quarter-circle sleeves: Offer more subtle movement.
We use test samples with paper and muslin to finalize the shape before committing to final fabric. Even a few millimeters can change how the sleeve falls.
2. Fabric Weight and Drape
Lightweight fabrics are essential. The wrong fabric choice ruins the flutter effect.
| Fabric Type | Behavior in Flutter Sleeves |
|---|---|
| Chiffon | Very fluid, ideal for soft movement |
| Georgette | Slightly textured, good volume |
| Rayon | Soft drape but may cling |
| Satin | Heavier flutter, shiny appearance |
| Tulle | Voluminous and structured flutter |
The key is to match the flutter shape to the fabric’s drape—heavy circle cuts in stiff fabrics look awkward. We always test the sleeve’s fall on a mannequin or fit model before proceeding.
3. Hem Finishing: Clean and Invisible
The edge of a flutter sleeve is highly visible. Finishing it wrong can ruin the whole look.
Recommended hem finishes:
- Baby hem: A narrow folded hem, ideal for chiffon and georgette.
- Rolled hem: Done on a serger, for semi-sheer fabrics.
- Lettuce hem: For stretch fabrics, adds a wavy edge.
- Blind stitch hem: Used in higher-end garments.
For premium production, we often use a French seam at the shoulder join and a hand-finished baby hem at the edge.
4. Shoulder Seam and Balance
Flutter sleeves are lightweight—but they pull differently on the shoulder than fitted sleeves. The sleeve’s weight distribution must be even.
- We check the shoulder seam angle during sampling.
- For large flutter sleeves, we reinforce the shoulder seam with bias tape or clear elastic.
- If the bodice is strapless or sleeveless, flutter sleeves are sometimes sewn as an overlay—not part of the armhole.
5. Armhole Fit and Mobility
Since flutter sleeves don’t provide structure around the arm, the armhole must be perfectly cut. Too loose, and the sleeve droops. Too tight, and the sleeve bunches up.
We always advise:
- Test fit with movement (arm raising, rotation)
- Adjust front/back balance to prevent sleeve twist
- Use lining if the sleeve is sheer but customer expects modesty
Real Case: Fixing Flutter Sleeve Fit for a U.S. Boutique Buyer
A U.S. brand approached us with a flowy dress design featuring long flutter sleeves in rayon. But during sampling, the sleeves twisted and bunched under the arm. We revised the pattern from a full-circle to a three-quarter-circle cut, shifted the shoulder seam slightly forward, and used a bias-bound hem. The result? Cleaner fit, better movement, and a 20% increase in reorders.
My factory tips for flutter sleeve production:
- Sample the sleeve with final fabric and full hem
- Use shoulder seam reinforcement if the sleeve is oversized
- Avoid topstitching on sheer fabrics—keep edges clean
- Match sleeve volume to dress style: soft flutters for bodycon, full flutters for A-line
Flutter sleeves require light hands and sharp eyes—they must look effortless while being technically refined.
Three-Quarter Sleeve
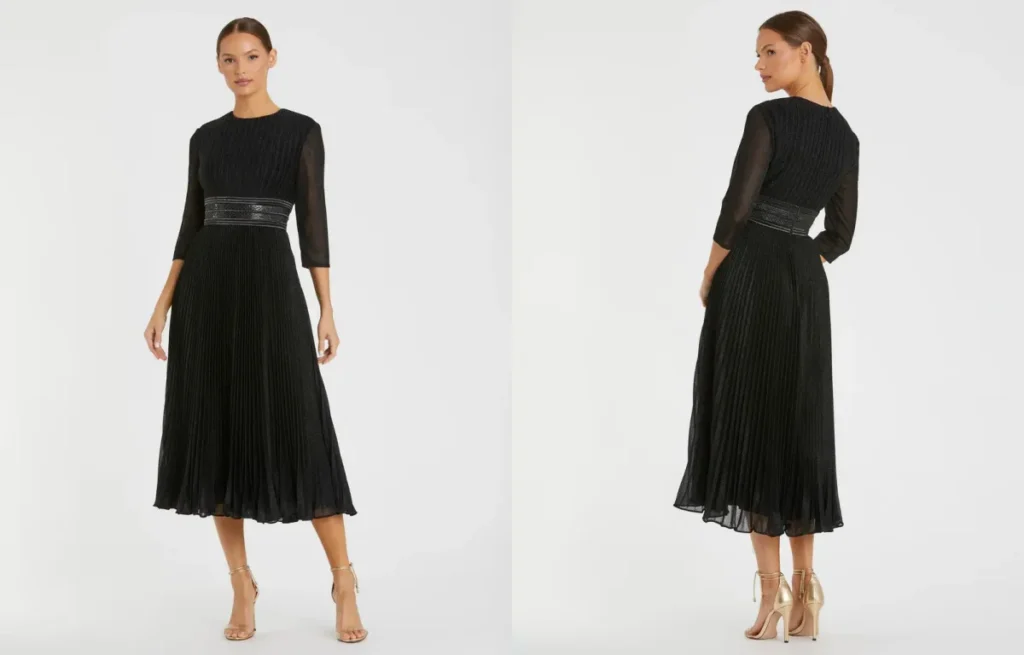
Why are three-quarter sleeves a smart choice in modern dress design?
Three-quarter sleeves end between the elbow and wrist, offering arm coverage while keeping the look light and wearable.
Three-quarter sleeves typically cover about 75% of the arm length, making them ideal for transitional weather, modest fashion, and professional or dressy casual outfits.
They strike a balance between full-length and short sleeves—both in form and function.
Three-quarter sleeves offer comfort, coverage, and flexibility
This style suits women across age groups and markets because it offers just enough coverage without restricting movement or appearing too heavy.
Benefits of three-quarter sleeves:
- Flattering on most body types: Draws attention to the waist and slims the arms.
- Ideal for in-between seasons: Especially spring and fall collections.
- Office-appropriate: Adds formality without the bulk of long sleeves.
- Layer-friendly: Fits easily under jackets or coats.
Common types of three-quarter sleeves:
| Sleeve Type | Description | Best Use Case |
|---|---|---|
| Fitted Three-Quarter | Slim silhouette from shoulder to hem | Workwear, sheath dresses |
| Bell Three-Quarter | Flared from elbow to sleeve end | Boho, casual, or romantic styles |
| Ruched Three-Quarter | With elastic or gathered detail at forearm | Trendy or youthful designs |
| Bishop Three-Quarter | Voluminous, gathered into a cuff | Evening or upscale fashion |
| Slit Three-Quarter | Small slit at sleeve hem for mobility | Casual chic or minimalist styles |
What technical aspects must be considered when producing three-quarter sleeves?
Although three-quarter sleeves may seem easy to execute, their length and visibility make them extremely detail-sensitive. Poor proportion, fit, or finishing will be immediately noticeable.
To produce high-quality three-quarter sleeves, you must perfect the sleeve cap shape, ensure mobility, choose the right fabric, and pay attention to finishing—especially at the hem and elbow curve.
Let’s dive deeper into the most important production challenges and best practices.
1. Sleeve Length Placement Is Critical
The sleeve must end at the right part of the forearm to avoid awkward proportions.
- Standard position: Between 5–7 cm below the elbow
- We adjust length based on average arm length in the target market (for example, UK vs. U.S. vs. Asia)
- Hem width also affects visual length—wider hems make the sleeve appear shorter
2. Fabric Drape and Weight Control Silhouette
Three-quarter sleeves often need soft structure. Here’s how different fabrics behave:
| Fabric Type | Behavior on Three-Quarter Sleeve |
|---|---|
| Cotton Poplin | Clean, structured appearance |
| Jersey | Stretchy and comfortable, ideal for fitted |
| Chiffon | Light and flowy, needs lining or slip |
| Linen | Breathable but wrinkles easily |
| Crepe | Smooth, midweight—great for dresses |
We often recommend medium-weight fabrics for this sleeve type—too light and the sleeve lacks shape; too heavy and it stiffens or restricts.
3. Movement and Comfort Must Be Tested
The elbow bend and forearm taper are crucial for comfort. Common issues include:
- Tightness at the forearm: Limits arm movement
- Overly loose sleeve: Looks bulky under jackets
- Wrong sleeve pitch: Causes twisting or pulling
To fix this, we create test patterns with arm movement range built in, and we adjust the bicep-to-hem taper based on feedback from fitting sessions.
4. Hem Finish Visibility and Durability
Because the hem falls at a highly visible point, it must be clean and durable. Our standard finishes include:
- Double-needle stitching: Clean, durable edge for knit or casual styles
- Blind hem stitch: For formal dresses or smoother finishes
- Elastic casing or cuff: Used in bishop or ruched styles
We also reinforce seams at the elbow curve to prevent puckering or breakage during movement.
5. Shoulder Seam and Cap Shaping
Three-quarter sleeves depend on a well-balanced sleeve cap to hold their shape across the arm.
- We balance ease allowance (usually 1.5–2cm at bicep)
- Use a slightly forward-angled sleeve pitch for more natural arm motion
- Interface the shoulder seam if the sleeve is fitted or attached to a tailored bodice
Real Factory Example: Rescuing a Failed Three-Quarter Sleeve Design
A client from Western Europe submitted a dress with structured three-quarter sleeves in a linen blend. The issue? The sleeves looked great on mannequins but were too tight in live fittings. We adjusted the lower arm circumference by 2cm, shifted the seam toward the back armhole, and softened the inner elbow curve. The new version not only fit better—it got higher customer reviews for comfort and polish.
My recommendations when designing or sourcing three-quarter sleeves:
- Always test arm bend and sleeve pitch in real wear
- Avoid overly stiff fabrics unless fully tailored
- Use appropriate hem finishes for the price point
- Adjust sleeve length for regional body measurements
- Reinforce elbow curve and shoulder seam
Three-quarter sleeves are incredibly versatile—but only when designed with wearability and proportion in mind.
Bell Sleeve
Why are bell sleeves a standout feature in fashion-forward dress design?
Bell sleeves flare outward from the arm, creating movement, drama, and visual flow. They’re instantly recognizable and emotionally expressive.
Bell sleeves are sleeves that gradually or abruptly widen from the elbow or upper arm to the wrist, forming a bell-like shape. They’re common in boho, vintage, and statement-driven styles.
Their shape commands attention—and their technical execution requires balance.
Bell sleeves offer visual drama and graceful movement
They’ve appeared throughout fashion history—from Renaissance gowns to ’70s bohemian styles and modern runways. Today, they continue to add flair to dresses designed for impact.
Why bell sleeves resonate with consumers:
- They create arm movement drama: Perfect for motion and photos.
- They add volume without bulk at the shoulder: Balances out pear or triangle body shapes.
- They work across fabric types: From flowy chiffon to structured crepe.
- They communicate femininity or strength: Depending on styling and sleeve length.
Types of bell sleeves:
| Sleeve Type | Description | Best Use Case |
|---|---|---|
| Classic Bell | Flare starts from the elbow to wrist | Vintage-inspired, formal dresses |
| Fluted Sleeve | More gradual flare from mid-arm | Minimalist or casual styles |
| Tiered Bell | Layers of flared fabric for extra drama | Boho or editorial collections |
| Slit Bell | Features a vertical opening along the flare | Evening or resort wear |
| Short Bell | Ends above the elbow with a soft flare | Youthful, casual summer dresses |
What are the production challenges of bell sleeves?
Bell sleeves might seem simple—they’re just a flare, right? But the truth is, their flow, structure, and balance require high precision from pattern-making to cutting and hemming.
To produce clean, wearable bell sleeves, manufacturers must carefully manage sleeve angle, fabric weight, drape behavior, and finishing—all while keeping the sleeve balanced with the dress bodice.
Here’s how we handle these challenges at our factory.
1. Flare Angle and Shape Precision
The bell shape depends on both the flare angle and the sleeve length. We often test multiple flare widths in sampling.
- Shallow angle: Creates a subtle, elegant look
- Steep angle: Adds dramatic flair
- Asymmetrical or layered cuts: For trend-forward styles
We draft using a pivot technique to open the flare without distorting the armhole fit. This ensures the sleeve hangs naturally and doesn’t twist.
2. Fabric Selection and Drape Control
Bell sleeves need fabric that holds shape but also flows. Here’s how different materials perform:
| Fabric Type | Behavior on Bell Sleeves |
|---|---|
| Chiffon | Light, airy, high motion |
| Crepe | Structured but still flows |
| Organza | Crisp with sculptural shape |
| Rayon | Soft but may collapse without lining |
| Cotton | Moderate structure, ideal for tiered designs |
If the sleeve is long and heavy, we sometimes interface the upper sleeve or add hidden support to prevent drag at the shoulder seam.
3. Sleeve Balance with the Bodice
Bell sleeves can pull visually and physically on the bodice. The dress must be balanced, especially at the shoulder and neckline.
- For dramatic bell sleeves, we adjust the shoulder seam angle slightly forward
- In drop shoulder designs, we test for sleeve drop consistency between sizes
- We sometimes add internal shoulder stabilizers for plus-size garments
4. Finishing the Flared Hem
The sleeve hem is a focal point—it must be clean and even. Depending on fabric and price point, we use:
- Rolled hem (serger): For chiffon or georgette
- Baby hem: Lightweight and nearly invisible
- Narrow facing or bias binding: For structured sleeves
- Lettuce hem: For stretch knits or casual styles
We avoid wide hems on bell sleeves as they tend to stiffen the movement and visually shorten the arm.
5. Sleeve Grading Challenges
Grading bell sleeves is more than just scaling length—it requires adjusting the flare ratio across sizes.
- Larger sizes need slightly longer and wider sleeves to maintain proportional flare
- Smaller sizes can be overwhelmed by too much volume
- We grade in both width and sleeve angle to maintain flow
Case Example: Correcting Bell Sleeve Fit for a Boho Brand
An Australian client designed a maxi dress with tiered bell sleeves. The sample looked perfect—but in size XL, the sleeve flared too wide and got caught in the side seams. Our fix: We reduced the flare ratio by 15% in larger sizes and shifted the sleeve join forward. The result? Cleaner fit and faster production time.
My production tips for bell sleeves:
- Always test the full sleeve length + flare in final fabric
- Watch for shoulder seam strain with heavy or layered sleeves
- Use symmetrical flare patterns to avoid sleeve twist
- Interface carefully when fabric collapses too easily
- Grade flare width—not just length—for size accuracy
Bell sleeves are a design signature—but they only succeed when construction meets creativity.
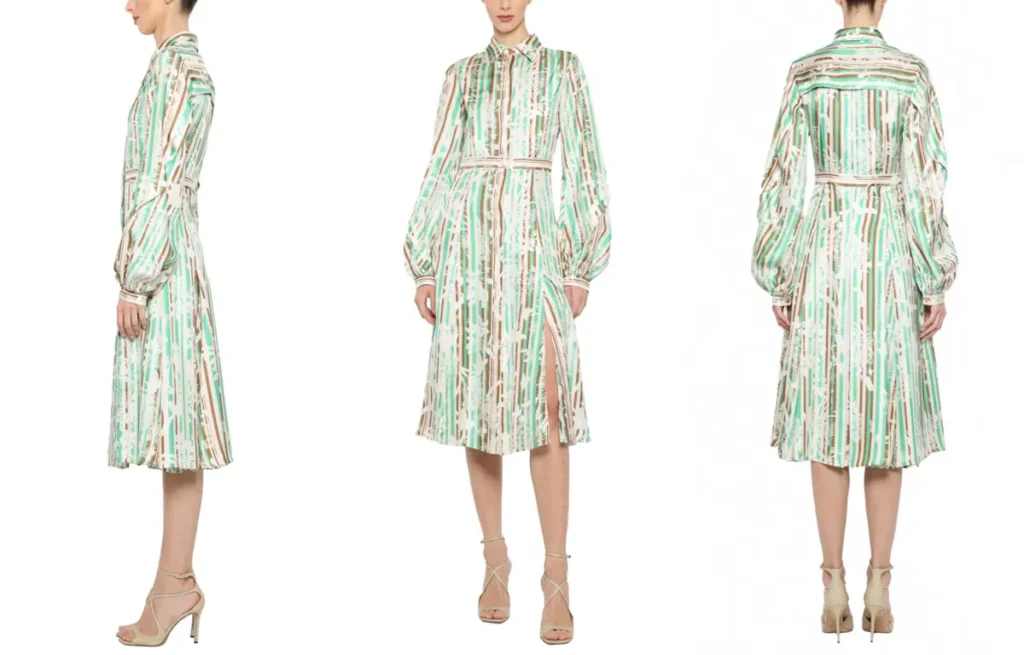
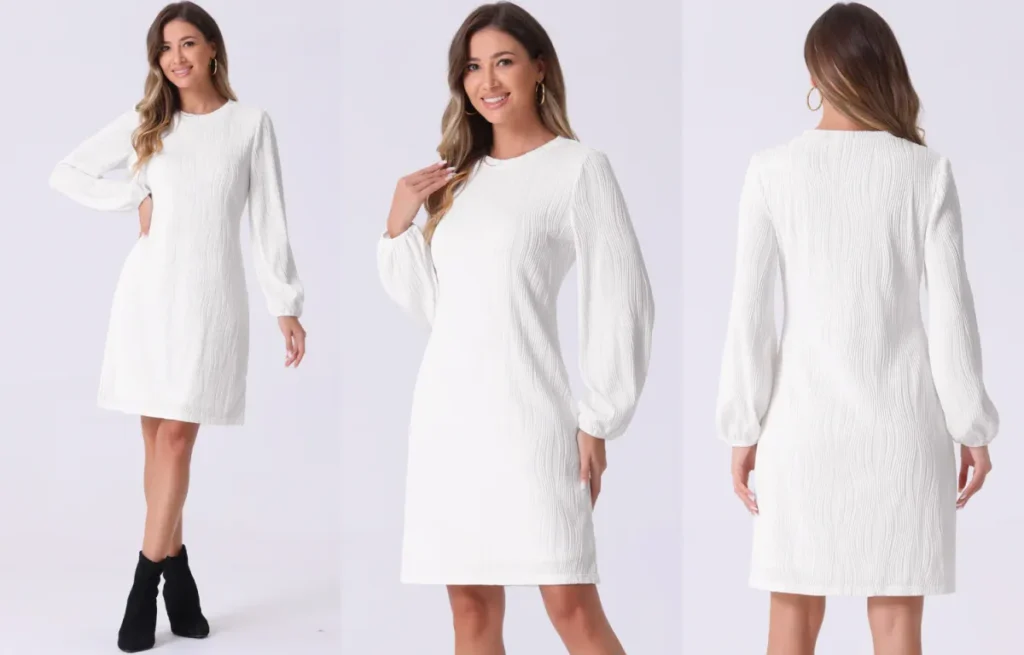
Bishop Sleeve

Why are bishop sleeves loved in both casual and formal dress designs?
Bishop sleeves are full-length, voluminous sleeves gathered into a narrow cuff—creating soft drama and timeless elegance.
Bishop sleeves feature fullness through the arm that is drawn into a fitted wrist cuff, creating a graceful balloon shape that flows with movement and adds visual softness to the overall silhouette.
They’re highly adaptable—romantic for eveningwear, relaxed for boho looks, and sophisticated for office-ready dresses.
Bishop sleeves combine softness with structure
They add visual interest without adding bulk at the shoulder. This makes them more wearable than puff sleeves for many customers, especially those looking for elegance and comfort.
Key features of bishop sleeves:
- Gathered fullness through the forearm: Provides volume and ease.
- Tapered or cuffed wrist: Controls the flow of fabric and adds polish.
- Longer sleeve length: Usually reaches past the wrist for a billowy look.
- Balance-friendly: Works well with both fitted and flowing bodices.
Common variations of bishop sleeves:
| Sleeve Type | Description | Best Use Case |
|---|---|---|
| Classic Bishop | Full volume gathered into a buttoned cuff | Formal and evening dresses |
| Boho Bishop | Softer fabric, looser cuff, more flow | Festival or resort styles |
| Sheer Bishop | Made with chiffon or mesh, often unlined | Romantic or layered dresses |
| Panel Bishop | Made from panels with seams for tailored volume | High-end or structured looks |
What are the technical challenges of producing bishop sleeves?
While bishop sleeves may appear soft and effortless, they are highly technical. Their signature volume and flow require precise control from pattern drafting to cuff construction.
To create a bishop sleeve that fits comfortably and looks refined, factories must master sleeve width, fabric behavior, cuff shaping, and volume grading across sizes.
Let’s go deeper into the details.
1. Sleeve Width and Gathering Ratio
The drama of the bishop sleeve depends on how much fabric is added between the armhole and the cuff.
- Typical gathering ratio: 1.8:1 to 2.5:1 (sleeve width to cuff width)
- Too much volume: Causes bunching or pulling at the underarm
- Too little volume: Loses the billowy effect
We mark key notches during sewing to distribute gathers evenly across the forearm—this maintains balance and visual symmetry.
2. Fabric Selection Determines Volume and Flow
Bishop sleeves look best in fabrics with soft drape. Here’s how different textiles behave:
| Fabric Type | Behavior in Bishop Sleeves |
|---|---|
| Chiffon | Light, airy, high movement |
| Crepe | Flowy with slight structure |
| Cotton Lawn | Crisp, better for daytime wear |
| Satin | Elegant drape with natural sheen |
| Tulle | Dramatic, layered effect |
Heavier fabrics can make bishop sleeves stiff or bulky, so we often adjust the fullness ratio based on fabric weight.
3. Armhole and Shoulder Integration
Bishop sleeves don’t have extra fullness at the shoulder, so the armhole must fit cleanly.
- We draft a slightly deeper armhole to allow room for fabric gathers
- The shoulder seam must be reinforced to handle fabric weight
- In some cases, we add a small pleat at the shoulder for added ease
4. Cuff Construction and Fit
The cuff anchors the entire sleeve. It needs to be functional, secure, and aesthetically clean.
Common cuff finishes:
- Buttoned cuff: Classic look, used in formal designs
- Elastic cuff: For casual or boho styles
- Shirred cuff: Adds comfort and stretch
- Extended cuff with darts: For tailored or high-fashion pieces
We recommend testing wrist circumference during sampling—many returns happen due to cuffs being too tight or too loose.
5. Sleeve Length and Hem Accuracy
Because the volume is concentrated toward the bottom, length control is critical. Too short, and it looks awkward. Too long, and it bunches over the hand.
- We recommend checking sleeve length on both petite and tall fit models
- Always account for fabric shrinkage when using rayon or viscose
- Hem allowance must be exact, especially if using a narrow rolled hem
Real Case: Fixing Bishop Sleeve Fit for a U.S. Client
A client submitted a bishop sleeve dress in crepe with a single-button cuff. During fit testing, the sleeves looked bulky, and the cuff rotated around the wrist. We reduced sleeve width by 15%, added light fusible interfacing to the cuff, and moved the cuff button 1cm closer to the placket seam. The improved version had better drape and stayed in place—leading to a reorder from multiple boutiques.
My factory tips for perfect bishop sleeves:
- Use clear gathering marks to control fabric distribution
- Always reinforce shoulder seams, especially for long sleeves
- Choose cuffs that match both fabric and target price point
- Grade sleeve fullness carefully across sizes
- Sample in final fabric to test true drape and weight
Bishop sleeves look effortless—but behind the beauty is a series of technical decisions that shape how the garment performs.
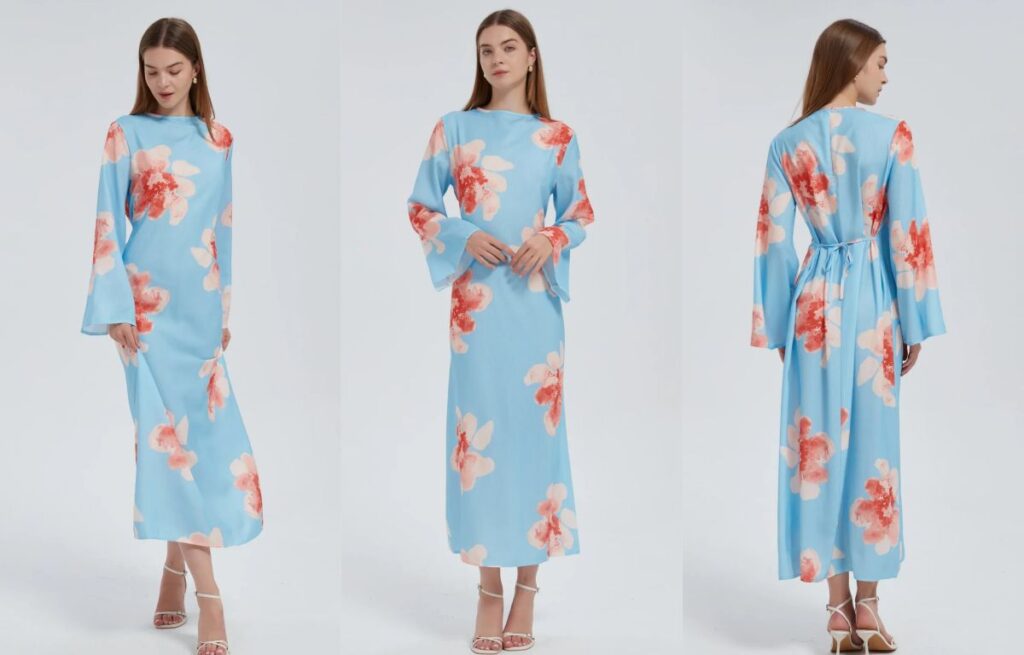
Poet Sleeve
What makes poet sleeves a distinctive choice in dress design?
Poet sleeves are long, voluminous sleeves that gather into a narrow cuff, often finished with ruffles or lace for added romance and drama.
Poet sleeves are wide, flowing sleeves that extend to the wrist and are gathered or cinched into a cuff—usually with a decorative finish like ruffles, lace trim, or flared hems.
They originated from 19th-century and Renaissance fashion, but have found renewed popularity in modern boho, cottagecore, and romantic dress collections.
Poet sleeves bring fluidity, vintage charm, and visual drama
Unlike bishop sleeves, which are full but subtle, poet sleeves go further—they exaggerate flow, celebrate softness, and often serve as a visual focal point.
Key stylistic advantages:
- Visually elongates the arm with a soft vertical line.
- Adds theatrical flair without overwhelming the silhouette.
- Pairs well with soft, draping fabrics like chiffon or viscose.
- Enhances movement in both photos and real wear.
Common poet sleeve variations:
| Sleeve Style | Description | Best Application |
|---|---|---|
| Classic Poet | Full sleeve with ruffled or lace-trimmed cuff | Vintage-inspired or romantic looks |
| Layered Poet | Extra volume with two-tier sleeve structure | High-fashion or editorial pieces |
| Slit Poet | Open seam from elbow down, cinched at wrist | Resort or formalwear |
| Smocked Cuff Poet | Elasticized gathering for casual or boho styles | Everyday dresses, festival fashion |
What technical factors affect the success of poet sleeve production?
Poet sleeves may appear effortless and soft, but they require exact attention to fabric control, cuff construction, and sleeve balance. Done wrong, they look heavy or costume-like. Done right, they elevate the entire dress.
To produce poet sleeves that flow well, fit comfortably, and stay in proportion, you need precise pattern drafting, material management, and expert finishing techniques.
Let’s explore the production requirements in detail.
1. Gathering Ratio and Volume Control
Poet sleeves are known for their fullness—but too much fabric can cause drag or awkward bulk at the wrist.
- Ideal gathering ratio: 2.5:1 to 3:1 between sleeve width and cuff width
- For structured fabrics: reduce ratio to 2:1 or less
- For soft fabrics: go higher, but always test gather density at the wrist
We often place multiple notches on the sleeve hem to distribute gathers evenly. Irregular gathering is one of the most common reasons samples get rejected.
2. Sleeve Length Must Be Precise
Poet sleeves are long by design, but their length must be controlled.
- Sleeve typically extends 3–5 cm past the wrist before being gathered
- Extra length allows for soft folds to build above the cuff
- On tall or petite sizes, improper grading causes sleeve “stacking” or wrist restriction
We always test sleeve length with the cuff attached—not in flat form—because the volume and gather affect final perceived length.
3. Fabric Selection Impacts Movement and Weight
Poet sleeves work best with lightweight, draping materials that create soft folds. Here’s how common fabrics perform:
| Fabric Type | Behavior on Poet Sleeves |
|---|---|
| Chiffon | Airy, soft, highly dynamic |
| Viscose | Drapes well but may stretch or grow |
| Crepe | Light texture, medium drape |
| Cotton Voile | Crisp but still breathable |
| Satin | Smooth, reflective, creates elegant folds |
Heavier materials can make poet sleeves feel costume-like. For stability in lightweight fabrics, we sometimes add stay stitching or soft interfacing at the armhole and cuff seam.
4. Cuff Construction and Finishing
The cuff is the key detail in poet sleeves—it holds the structure and creates contrast with the sleeve’s volume.
Popular cuff finishes:
- Buttoned Cuff with Ruffle: Elegant, great for formalwear.
- Smocked Cuff: Adds comfort, especially for casual dresses.
- Elastic Channel: Easiest for production, flexible in sizing.
- Ruffle or Flounce Edge: For a more dramatic, romantic look.
We reinforce cuffs with fusible interfacing to help them maintain shape. For smocked cuffs, we use clear elastic with zigzag stitching to prevent breakage over time.
5. Shoulder Seam and Armhole Fit
Because poet sleeves are heavy at the bottom, they can pull down the bodice or twist the armhole if not supported properly.
- We strengthen the shoulder seam with bias tape or stay tape
- Adjust sleeve pitch slightly forward to match the body’s natural posture
- Add a small underarm dart if needed to correct sleeve tilt during movement
Real Production Example: Solving Volume Issues in Poet Sleeves
A North American client sent us a viscose midi dress with poet sleeves for a fall capsule. The first sample had sleeves that looked flat when worn. The issue? The sleeve curve was too shallow, and the cuff width was too large. We increased the cap height, adjusted the gather ratio to 2.8:1, and narrowed the cuff by 2 cm. The result? A better silhouette and improved customer try-on feedback.
My production tips for poet sleeves:
- Use fluid, lightweight fabric—avoid stiff materials unless stylistically intentional
- Reinforce cuffs, especially when using buttons or elastic
- Grade sleeve length with real model proportions (not just CAD scale)
- Always test with full cuff attached to confirm drape and arm movement
- Align poet sleeves with dress bodice style—avoid overcomplicating minimal silhouettes
Poet sleeves are meant to feel like poetry in motion—but achieving that takes precision, testing, and a deep understanding of material behavior.
Lantern Sleeve
What makes lantern sleeves a bold and structured design feature?
Lantern sleeves are full, rounded sleeves that billow out between the shoulder and wrist, often narrowing at both ends to create a defined “lantern” shape.
Lantern sleeves are characterized by wide volume in the mid-arm section, cinched at both the upper arm and wrist, forming a balloon-like, sculptural silhouette.
Unlike bishop sleeves (which flow softly), lantern sleeves hold their form and create more visual weight—ideal for statement pieces.
Lantern sleeves add volume, structure, and visual drama
They work well for high-fashion collections, editorial designs, or customers who love architectural shapes in their clothing.
Key reasons lantern sleeves stand out:
- Strong visual identity: Instantly recognizable silhouette.
- Sculptural quality: Adds volume without shoulder exaggeration.
- Works across fabrics: From stiff cottons to structured synthetics.
- Perfect for seasonal transitions: Adds coverage but remains breathable.
Common lantern sleeve types:
| Sleeve Type | Description | Best Use Case |
|---|---|---|
| Classic Lantern | Full volume between elbow and wrist | Fashion-forward day dresses |
| Double Lantern | Two puffed sections separated by a narrow band | Couture or occasion wear |
| Short Lantern | Ends at the elbow, with dramatic mid-arm volume | Summer or retro styles |
| Paneled Lantern | Constructed with vertical panels for sharp shape | High-end, structured collections |
What are the technical challenges of producing lantern sleeves?
Lantern sleeves are not just about adding fabric. They demand precise pattern work, thoughtful seam placement, and consistent volume control to avoid an unbalanced or “bulky” final look.
To manufacture lantern sleeves successfully, producers must control puff placement, sleeve tapering, fabric stiffness, and seam stability—without losing the intended shape.
Let’s look deeper at the construction requirements.
1. Pattern Structure and Shape Control
Lantern sleeves require at least two parts: an upper fitted portion, and a wider mid-section. Sometimes they also have a third part—the wrist cuff.
- We use slash-and-spread pattern techniques to add volume in the mid-section.
- The top and bottom of the sleeve are fitted to the armhole and cuff, meaning precision is key to avoid pulling or ballooning in the wrong place.
- We always add multiple notches to align panels during sewing.
2. Fabric Behavior Defines the Volume
Fabric choice makes or breaks a lantern sleeve. Here’s how different fabrics perform:
| Fabric Type | Effect on Lantern Sleeve |
|---|---|
| Cotton Poplin | Crisp, holds shape well |
| Taffeta | Adds structure with sheen |
| Chiffon | Needs lining or interfacing to hold shape |
| Satin | Smooth, but may collapse without support |
| Linen Blend | Natural texture, moderate puff |
We often advise clients to test this sleeve in at least two fabric types before finalizing design direction.
3. Seam Management and Sleeve Weight
Because of the volume, lantern sleeves can get heavy—especially in woven fabrics.
- Reinforce shoulder seams with stay tape or interfacing
- Consider using panel lines to distribute fabric tension and add design interest
- Use lightweight lining inside the sleeve if fabric is too stiff or itchy
We also test the sleeve’s “hang” to ensure it doesn’t twist or pull forward due to unbalanced weight distribution.
4. Cuff and Sleeve Hem Finishing
Lantern sleeves always taper back into the wrist or elbow. The finish here needs to be clean and supportive.
Popular finishes include:
- Fitted cuff with buttons or loops: For high-end finishes
- Elastic casing: For comfort and flexibility
- Shirred cuff: For volume contrast and texture
We always make sure the cuff circumference is customer-friendly—too tight becomes uncomfortable, too loose loses the sleeve’s form.
5. Grading and Sizing Across Markets
Grading lantern sleeves isn’t just about making them longer or shorter—it’s about adjusting volume without overwhelming smaller sizes.
- We use volume ratio scaling to ensure size XS doesn’t look too puffy, and XL still gets full visual effect.
- In some markets (like Japan or UK), we reduce sleeve flare by 10–15% compared to the U.S. or Australian versions.
Client Example: Fixing Lantern Sleeve Collapse in Midweight Satin
A Western European client submitted a midi dress with lantern sleeves in satin. The prototype looked flat. The issue? The mid-arm section lacked support, and the cuff was too wide. We added organza interlining in the outer sleeve, reduced cuff width by 2cm, and re-shaped the sleeve curve. Final result: sculpted, elegant sleeves with no collapse, and strong customer response post-launch.
My best practices for lantern sleeves:
- Always sample with the final fabric + lining
- Reinforce all stress points: shoulder seam, elbow seam, cuff join
- Grade volume, not just length, across sizes
- Keep the sleeve balanced with the bodice style—avoid pairing with voluminous skirts unless intentional
- Use internal support (interfacing or lining) if fabric can’t hold shape alone
Lantern sleeves are about balance—between shape, structure, and comfort. When done right, they elevate a dress into a statement piece.
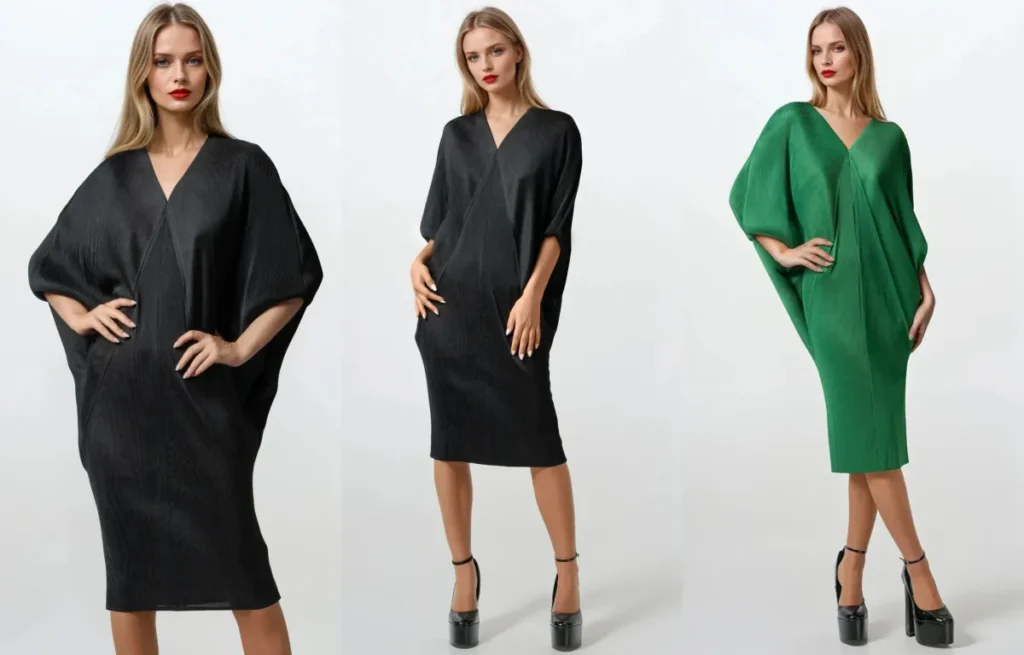
Kimono Sleeve
What makes kimono sleeves a timeless and elegant sleeve style?
Kimono sleeves are cut as one piece with the bodice, extending from the shoulder in a wide, straight shape, often without a defined armhole seam.
Kimono sleeves are integrated directly into the dress pattern rather than set in separately, creating a soft, relaxed silhouette that drapes gently from shoulder to wrist.
Inspired by traditional Japanese garments, this style has become a modern favorite in loungewear, resortwear, and minimalist fashion.
Kimono sleeves create effortless flow and relaxed structure
Because they lack set-in armholes, kimono sleeves are less restrictive and more sculptural. They support ease of movement and flatter a wide range of body types.
Key features of kimono sleeves:
- Seamless shoulder-to-arm flow: No sleeve attachment seam
- Wide opening: Often loose or straight from the body
- Soft drape: Depends on fabric weight and grain
- Perfect for prints: Large sleeve area enhances visual layout
Common kimono sleeve styles:
| Sleeve Type | Description | Best Use Case |
|---|---|---|
| Short Kimono Sleeve | Cut wide and ends above the elbow | Summer or casual dresses |
| Long Kimono Sleeve | Flows down to the wrist, often with taper or cuff | Loungewear, kaftans, eveningwear |
| Dolman Variation | Tapers from shoulder to wrist, often batwing-like | Relaxed, oversized silhouettes |
| Structured Kimono | Uses interfacing or cuffs to add edge or polish | Workwear, formal styles |
What technical factors affect the construction of kimono sleeves?
While they look simple, kimono sleeves bring unique challenges in pattern drafting, fabric usage, and grading. Since they’re part of the bodice, even small mistakes can affect the entire garment.
To produce kimono sleeves effectively, factories must balance pattern shape, fit, seam behavior, and fabric weight—while preserving the relaxed aesthetic and avoiding common structural issues.
Here’s how we manage the details in our production process.
1. Pattern Shape and Arm Movement
Kimono sleeves are cut as an extension of the bodice, meaning they lack a separate armhole or shoulder seam. This changes how the garment moves.
- The underarm curve must be carefully drafted to allow mobility without pulling or fabric bunching
- We add a gusset or diamond-shaped panel under the arm for better movement in fitted styles
- For looser fits, we increase sleeve drop and flare to compensate for limited arm lift
2. Fabric Drape and Structural Balance
Kimono sleeves rely heavily on fabric choice to maintain shape. The wrong fabric can make the sleeve collapse, stretch, or lose its visual appeal.
| Fabric Type | Behavior in Kimono Sleeves |
|---|---|
| Rayon/Viscose | Soft, drapey—ideal for flowing silhouettes |
| Linen | Holds shape, adds casual structure |
| Cotton Lawn | Crisp but lightweight—great for summer |
| Satin | Elegant drape, but may require reinforcement |
| Jersey Knit | Comfortable, but stretches at underarm |
We sometimes reinforce the shoulder seam or neckline with bias tape to prevent stretching—especially for kimono sleeves in knits or soft woven fabrics.
3. Seam and Hem Construction
Without a traditional armhole seam, the construction of kimono sleeves must be clean and intentional.
- Flat-felled seams or French seams are preferred for visible underarm areas
- Sleeve hems need precise edge finishing due to their wide visibility:
- Rolled hem for light fabrics
- Double fold for casual wear
- Blind stitch for formal finishes
We also recommend staystitching the neckline and shoulder edge before assembly to maintain stability during production.
4. Sizing and Grading Challenges
Grading kimono sleeves is complex because the sleeve and bodice are one unit.
- Sleeve width and body width must scale together, or the shape becomes distorted
- In smaller sizes, sleeves can look oversized or unflattering
- In larger sizes, underarm fabric can bunch or restrict movement
Our solution: manual grading with adjusted underarm curves instead of using automatic software scaling.
5. Fit Testing and Posture Considerations
Kimono sleeves behave differently on various body types. Arm position, bust size, and shoulder slope all affect the drape.
- We fit-test on multiple body shapes during sampling
- In fitted kimono-sleeve designs, we may raise the underarm curve or angle the sleeve slightly forward to align with the body’s natural movement
Client Story: Saving a Minimalist Dress With Drooping Kimono Sleeves
A UK-based brand brought us a minimal linen dress with elbow-length kimono sleeves. Their original sample had stretched-out shoulders and sagging sleeves. We stabilized the neckline with fusible tape, added a small underarm gusset, and reduced sleeve drop by 1.5 cm. After these changes, the sleeve draped cleanly and the dress became a top seller.
My recommendations for producing kimono sleeves:
- Sample with the final fabric—drape and weight matter more here than in other sleeve styles
- Use gussets or adjust the underarm curve for mobility in fitted styles
- Avoid excessive neckline width—it causes sleeve droop
- Grade manually to maintain silhouette across all sizes
- Test movement with active wearers—kimono sleeves can restrict more than they seem
Kimono sleeves deliver elegance and comfort, but only when pattern and structure are perfectly balanced.
Batwing Sleeve Dolman Sleeve
What are batwing and dolman sleeves, and how are they used in fashion?
Batwing and dolman sleeves are wide, deep-cut sleeves that extend from the bodice with minimal armhole shaping, creating a draped effect from shoulder to wrist.
Dolman sleeves (often called batwing sleeves) are characterized by a deep armhole and wide sleeve shape that narrows toward the wrist, resulting in a continuous, flowing line from bodice to sleeve.
Although the terms are sometimes used interchangeably, there are subtle differences in how they’re applied.
Batwing and dolman sleeves create bold silhouettes with soft comfort
These sleeves are ideal for oversized, relaxed silhouettes and are widely used in resortwear, lounge sets, and editorial collections.
Dolman vs. Batwing—What’s the difference?
| Feature | Dolman Sleeve | Batwing Sleeve |
|---|---|---|
| Armhole Depth | Starts near waist or lower rib | Deep, exaggerated cut close to waistline |
| Fit | Can be soft or structured | Usually flowy and oversized |
| Silhouette | Smoother integration with bodice | More dramatic drape with large “wing” |
| Application | Minimalist, boho, relaxed fashion | Statement, editorial, or streetwear |
Why fashion brands love these sleeve styles:
- Creates bold volume without shoulder bulk
- Offers high comfort and freedom of movement
- Great for draping fabrics and bold prints
- Perfect for one-size-fits-many designs
What technical challenges come with producing dolman and batwing sleeves?
While visually impressive, batwing and dolman sleeves are complex to construct. Their patterns require careful manipulation, and poor execution leads to bunching, bulk, or poor arm movement.
To successfully produce dolman and batwing sleeves, factories must carefully manage armhole curve, fabric weight, seam shaping, and fit testing—especially across size ranges.
Let’s dive into each element.
1. Pattern Integration and Armhole Curve
Unlike traditional sleeves, dolman and batwing sleeves are cut in one piece with the bodice. This makes their armhole shaping critically important.
- We use a long, shallow curve from underarm to waist
- Pivot method is often used during drafting to open sleeve volume
- We always test movement range—poor curves can restrict arm lift
For knitwear or jersey garments, we slightly raise the underarm to improve shape retention.
2. Fabric Behavior and Drape
These sleeves rely heavily on drape. Structured fabrics will not fall naturally and may look awkward.
| Fabric Type | Behavior in Dolman/Batwing Sleeves |
|---|---|
| Viscose | Excellent drape, soft shape |
| Jersey Knit | Comfortable and stretchy, ideal for movement |
| Silk Crepe | Flowy, perfect for premium pieces |
| Rayon | Lightweight, but must watch for stretching |
| Linen Blend | Moderate structure, best for casual styles |
We avoid stiff weaves like denim or canvas for this sleeve type.
3. Seam Finishing and Support
With wider underarm areas, dolman sleeves require strong seam support to prevent distortion over time.
- French seams or flat-felled seams work well for delicate fabrics
- We reinforce the underarm with bias tape or twill tape
- In high-movement garments, we sometimes add underarm gussets for comfort
4. Grading and Size Adaptation
Grading these sleeves is particularly challenging. A small mistake in proportion can lead to a shapeless or unflattering look.
- We use manual grading to ensure sleeve depth scales with body width
- In smaller sizes, we reduce the “wing span” by shortening the curve
- In larger sizes, we increase width without making the garment look baggy
For one-size-fits-all garments, we draft a midpoint sample and adjust final width using pleats or gathers if necessary.
5. Fit and Movement Testing
These sleeves may look dramatic—but they must function, too.
- We test range of motion: arm lift, stretch, and cross-body movement
- For woven fabrics, we use slightly forward sleeve pitch to improve arm flexibility
- We adjust neckline width if the sleeve pulls backward due to weight
Client Case: Redesigning Dolman Sleeves for a U.S. Knitwear Brand
A client sent us a sample of a dolman-sleeve jersey dress. The original looked fine on a hanger, but pulled awkwardly at the back neckline when worn. After reviewing the pattern, we shortened the sleeve length by 2 cm, raised the armhole curve, and shifted the neckline forward by 1.2 cm. The fit improved immediately—and sales picked up after launch.
Factory Tips for Dolman/Batwing Sleeve Success:
- Always test full arm movement in sampling
- Avoid overly stiff fabrics unless you’re going for sculptural effect
- Reinforce underarm seams to prevent wear and tear
- Grade carefully—these sleeves need more than just length adjustment
- Match the sleeve’s visual weight with the dress’s silhouette—balance is everything
Batwing and dolman sleeves work best when fashion meets function—and when drape, movement, and proportion are all handled with care.
Raglan Sleeve
What makes raglan sleeves different from other sleeve styles?
Raglan sleeves extend in one piece to the neckline, with a diagonal seam from the underarm to the collarbone—eliminating the traditional shoulder seam.
Raglan sleeves are sleeves that are attached to the bodice with a diagonal seam that starts at the neckline and runs to the underarm, offering greater range of motion and a more relaxed fit.
Originally used in sportswear, this sleeve has found its way into casual, athleisure, and even contemporary women’s dress designs.
Raglan sleeves create smooth lines and superior comfort
This sleeve construction offers a softer shoulder slope and eliminates bulk, making it ideal for relaxed silhouettes and stretchy fabrics.
Key design benefits of raglan sleeves:
- Enhanced mobility: No set-in shoulder seam, allowing easier arm movement
- Flattering diagonal line: Visually narrows broad shoulders
- Seam becomes a design feature: Can be highlighted with contrast stitching
- Pairs well with both knits and wovens: Adaptable across fabric types
Common raglan sleeve variations:
| Raglan Sleeve Style | Description | Best Use Case |
|---|---|---|
| Classic Raglan | One-piece sleeve with diagonal seam | Casual dresses, knitwear |
| Two-Piece Raglan | Sleeve made of two panels for shaping | Structured wovens, tailored looks |
| Gathered Raglan | Sleeve head gathered along raglan seam | Feminine, vintage-inspired styles |
| Colorblock Raglan | Contrast fabric used along sleeve or seam | Sporty or youth-focused designs |
What are the technical challenges of producing raglan sleeves?
Though they look simple, raglan sleeves require precise pattern drafting and careful consideration of arm movement, shoulder fit, and seam shaping. A poorly made raglan sleeve causes twisting, sagging, or bunching—especially at the neckline.
To manufacture high-quality raglan sleeves, factories must focus on sleeve curve drafting, neckline shaping, shoulder mobility, and grading across body types.
Let’s go into more detail.
1. Pattern Drafting and Sleeve Curve
The success of a raglan sleeve begins with the right diagonal seam line.
- The angle of the seam affects shoulder width and arm fit
- Too steep: sleeve pulls across the chest
- Too shallow: causes sagging at the upper back
We use a blend of drafting and 3D fitting software to visualize how the sleeve curve lays on the body. We also test both standing and sitting postures during sampling.
2. Fabric Selection and Movement
Raglan sleeves are especially popular in stretch and knit fabrics, but can also work in light to mid-weight wovens with enough ease.
| Fabric Type | Behavior with Raglan Sleeve |
|---|---|
| Cotton Jersey | Ideal for casual and fitted raglan styles |
| French Terry | Adds softness and structure |
| Woven Rayon | Drapes well, needs gathering or shaping |
| Linen | Works for boxy or oversized raglan designs |
| Ponte Knit | Excellent stretch recovery |
For woven styles, we often add a small dart or princess seam near the bust to improve shaping.
3. Neckline Construction and Stability
Since the sleeve extends to the neckline, that seam becomes critical to the garment’s balance.
- We reinforce raglan seams with stay tape or binding
- For round necklines, we adjust sleeve curve to avoid puckering
- For V-necks or boat necks, we shape the raglan seam accordingly to avoid distortion
In high-end garments, we finish the neckline with clean binding or facing for structure and appearance.
4. Grading and Size Adaptation
Raglan sleeves require thoughtful grading—especially at the raglan seam, where body width and shoulder shape vary dramatically between sizes.
- We use independent grading on sleeve curve and bodice seam
- In larger sizes, we slightly raise the underarm point for better fit
- In petite sizes, we reduce sleeve width to avoid overwhelming proportions
We never apply a single grading ratio across the entire sleeve—it leads to poor alignment at the neckline and shoulder.
5. Seam Finishing and Visual Impact
The diagonal seam of a raglan sleeve can be subtle or a focal point.
Popular finish options:
- Flatlock seam: Used in activewear or casual dresses
- Topstitched seam: Adds sporty, bold character
- Invisible seam: Preferred for minimalist or feminine dresses
- Contrast fabric insert: Adds color or texture interest
We test every seam finish against the fabric stretch to ensure no distortion appears during wear.
Client Case: Refining a Raglan Sleeve Dress for a Knitwear Brand
A U.S. client launched a knit midi dress with raglan sleeves. The initial sample had underarm bunching and neckline puckering. We re-drafted the sleeve with a softer curve, added 1.5 cm ease at the bust, and stabilized the neckline with fusible tape. The updated version draped naturally and required no further revisions.
My recommendations when producing raglan sleeves:
- Use stretch fabric when possible—it improves movement and reduces seam tension
- Draft the sleeve and neckline together—not as separate pieces
- Reinforce seams at neckline and shoulder, especially for structured fabrics
- Grade sleeve curve independently for each size
- Fit-test for both arm movement and neckline lay
Raglan sleeves offer a clean, functional alternative to set-in sleeves—but only when the shape is right and the fabric behaves as expected.
Peasant Sleeve
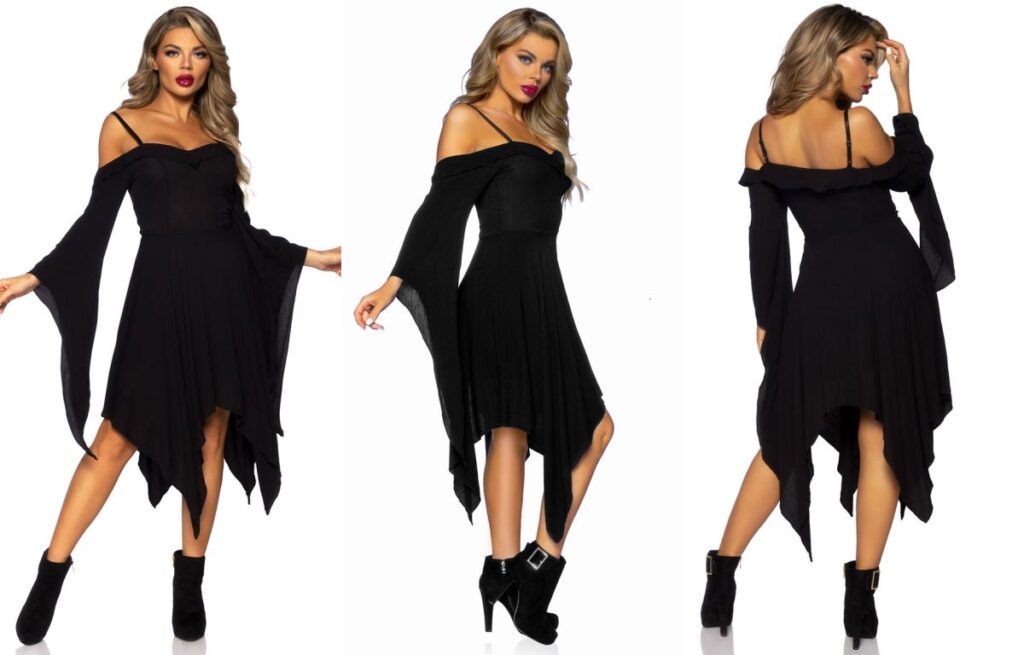
What makes peasant sleeves a staple in romantic and bohemian dress styles?
Peasant sleeves are soft, full sleeves—typically long—gathered at the shoulder and wrist, often finished with elastic or ties.
Peasant sleeves are characterized by generous volume, gathered or shirred sleeve heads, and cinched wrists, creating a relaxed and flowing silhouette that feels timeless and wearable.
This sleeve design dates back centuries and remains relevant today for its comfort and charm.
Peasant sleeves bring softness, movement, and romantic detailing
Their popularity in modern fashion reflects a broader shift toward comfort-driven silhouettes with visual softness.
Key stylistic features of peasant sleeves:
- Gathered at the sleeve head: Adds volume without shoulder structure
- Elastic or tie cuffs: Helps control fullness at the wrist
- Often paired with lightweight fabrics: Enhances flow and breathability
- Versatile fit: Works across body shapes and dress lengths
Common variations of peasant sleeves:
| Sleeve Type | Description | Best Use Case |
|---|---|---|
| Classic Peasant | Full-length sleeve with gathered top and cuff | Boho and casual dresses |
| Short Peasant | Above-elbow version with puffed appearance | Summer or festival dresses |
| Tiered Peasant | Includes horizontal gathers or panels | High-volume editorial looks |
| Tie-Cuff Peasant | Finished with drawstrings at the wrist | Romantic or vintage styles |
What technical challenges come with producing peasant sleeves?
Peasant sleeves appear relaxed, but achieving their signature softness requires careful attention to volume control, seam strength, and finishing—especially at the gather points.
To create high-quality peasant sleeves, manufacturers must manage sleeve fullness, maintain proportion, reinforce stress areas, and match the sleeve to the dress’s overall construction and silhouette.
Let’s go deeper into the technical process.
1. Gathering Distribution at Sleeve Head
The fullness at the sleeve cap must be distributed evenly to avoid bulky or uneven puckering.
- We use a 1.8:1 to 2.5:1 gathering ratio at the sleeve head
- For symmetric gathers, we mark center and quadrant notches along the sleeve and bodice
- Gathers must align smoothly with the shoulder seam or neckline if off-shoulder
In off-shoulder peasant designs, we test how the gathers behave when the neckline is elasticated—tension must be even across sizes.
2. Cuff Design and Elastic Fit
The gathered cuff area often uses elastic, which must be fitted carefully to avoid discomfort or poor shape retention.
Popular cuff finishing techniques:
- Elastic casing: Clean finish, common in RTW dresses
- Smocked cuffs: Decorative and functional
- Self-fabric ties: Adjustable and adds a romantic touch
- Frilled edge: Softens the transition between sleeve and wrist
We test the final sleeve length with the elastic in place, as gathering pulls the sleeve up by 2–4 cm depending on fabric.
3. Fabric Selection Affects Sleeve Behavior
Peasant sleeves need light to medium-weight fabrics with good drape. Here’s how common fabrics behave:
| Fabric Type | Performance in Peasant Sleeves |
|---|---|
| Viscose/Rayon | Excellent drape, soft volume |
| Cotton Voile | Breathable, slightly crisp |
| Chiffon | Very fluid—often requires lining |
| Linen Blend | Natural texture, moderate volume |
| Tencel | Sustainable, smooth drape |
We recommend pre-washing rayon or viscose fabrics before cutting to prevent shrinkage after production.
4. Seam Strength at High-Stress Areas
Peasant sleeves experience stress at the gathers—especially where the sleeve head joins the bodice.
- We use reinforced stitching or stay tape at shoulder joins
- For heavier fabrics, we reduce gathering density to prevent tearing
- Sleeves with very full volume may require underarm gussets for added movement
5. Grading and Volume Scaling
Volume doesn’t scale the same as length. When grading peasant sleeves across sizes, we adjust not only the length but also:
- Gathering density: Less for XS, more for XL to maintain proportional volume
- Elastic length: Custom per size to ensure fit and comfort
- Sleeve head height: Adjusted based on shoulder width and neckline shape
We often hand-grade peasant sleeve patterns to preserve the original silhouette across the full size range.
Real Production Example: Correcting Peasant Sleeves for a Boho Capsule
A client wanted a romantic viscose midi dress with peasant sleeves. The initial sample had uneven gathers, and the elastic cuff was too tight on extended sizes. We rebalanced the gathering notches, widened the sleeve opening by 2 cm, and recalculated the elastic length per size. The revised sleeve had smoother flow and received strong customer reviews after launch.
Factory tips for flawless peasant sleeve production:
- Always gather with notched alignment for even fullness
- Test final sleeve length with elastic or smocking already inserted
- Prewash shrink-prone fabrics like rayon before cutting
- Use light interfacing at shoulder join for extra reinforcement
- Match sleeve volume with bodice shape—avoid overgathering on slim silhouettes
Peasant sleeves may look soft and simple, but their success depends on precise volume control and thoughtful shaping.
Off-Shoulder Sleeve
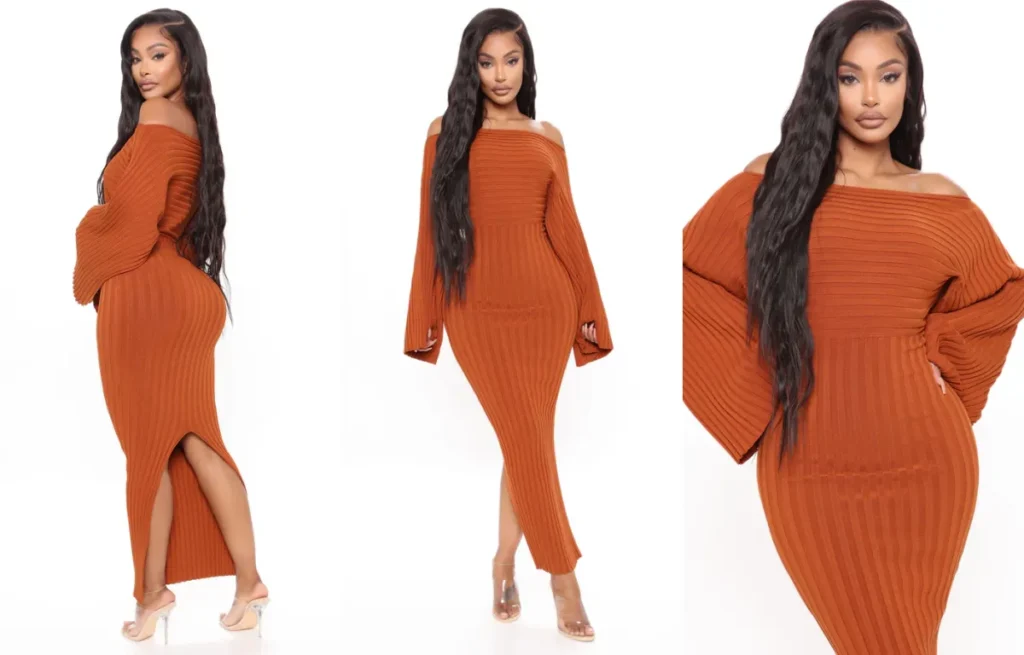
What makes off-shoulder sleeves so popular in women’s fashion?
Off-shoulder sleeves expose the shoulders while covering the arms, offering a sensual yet elegant look that works across casual, formal, and bridal styles.
Off-shoulder sleeves are sleeves that start below the shoulders, leaving the neckline and shoulders bare. They’re often attached to a fitted bodice or elasticated neckline, with or without support around the upper arm.
They’re loved by customers for their graceful neckline exposure—and loved by designers for their sculptural, feminine effect.
Off-shoulder sleeves strike the perfect balance between structure and softness
They instantly elevate a look while still feeling wearable and approachable. But that balance depends entirely on how they’re built.
Key features of off-shoulder sleeves:
- No traditional armhole: The sleeve is anchored below the shoulder
- Often elasticated or fitted with stay tape: Holds shape in place
- Can be short, long, puffed, or ruffled: Highly adaptable
- Neckline becomes a focal point: Ideal for statement design
Common off-shoulder sleeve variations:
| Sleeve Style | Description | Best Use Case |
|---|---|---|
| Classic Off-Shoulder | Straight-across neckline with full arm sleeves | Evening or bridal dresses |
| Ruffle Off-Shoulder | Layer of gathered fabric along neckline | Resort, beach, or summer looks |
| Puff Off-Shoulder | Voluminous sleeve with elastic edge | Trend-forward, youthful designs |
| Fitted Off-Shoulder | Smooth, tailored sleeve from upper arm to wrist | Elegant or bodycon silhouettes |
| Detachable Off-Shoulder | Sleeve attaches to a strapless base | Versatile styling, multi-look |
What technical challenges come with producing off-shoulder sleeves?
Off-shoulder sleeves are architecturally complex. Without shoulder support, the bodice must do all the work of anchoring both the sleeve and the neckline. Poor construction leads to slippage, twisting, or restricted movement.
To make off-shoulder sleeves functional and flattering, manufacturers must control the neckline shape, sleeve stability, elastic tension, and bodice reinforcement.
Let’s break down the process.
1. Neckline Shape and Support Are Crucial
Since the sleeves sit below the shoulder line, the neckline must hold its position without climbing up or falling down.
- We use neckline stay tape or clear elastic to help stabilize the shape
- For structured garments, we often use interfacing or boning in the bodice
- In soft dresses, elastic casings help the neckline conform to the body
We always sample neckline shape on live fit models, because mannequins often don’t reflect real shoulder slope or movement.
2. Sleeve Join and Arm Mobility
Sleeves that are fully attached to the bodice can restrict arm movement unless designed with extra ease.
Options to increase comfort and wearability:
- Add a gusset or underarm panel for movement
- Use separate arm sleeves with minimal join at the side seam
- Use elasticated top edge to allow stretch when raising arms
We test arm movement in every sample. A dress that rides up when raising the arms will cause poor wearability and high return rates.
3. Fabric Selection for Structure vs. Drape
Off-shoulder sleeves need just enough body to hold shape—but not so much that they feel rigid.
| Fabric Type | Effect on Off-Shoulder Sleeves |
|---|---|
| Satin | Smooth, great for fitted and formal styles |
| Chiffon | Light and romantic, needs lining or support |
| Cotton Poplin | Crisp, holds puffed shapes well |
| Tulle | Used for sheer, voluminous sleeves |
| Viscose/Rayon | Flowy, ideal for draped off-shoulder styles |
In structured styles, we often interface the neckline or upper sleeve to maintain shape. In casual or boho designs, we let fabric drape naturally and rely on elasticated channels.
4. Elastic Fit and Edge Finishing
Elastic placement is one of the most important details for comfort and function.
We calculate elastic length using:
- Neckline circumference – 10 to 15% stretch allowance
- Double casing in sleeves or neckline to reduce slippage
- Secure topstitching or clean hidden seam depending on price point
In premium designs, we avoid visible elastic and use invisible channels with blind stitching for a clean edge.
5. Grading and Size Scaling
Off-shoulder designs scale differently than traditional sleeves. A poor grade leads to neckline gaping or sleeve tightness.
- We use manual grading for neckline curve
- Adjust elastic length per size—do not apply a single percentage
- In plus sizes, we often raise the neckline slightly for coverage and support
We also test bust-to-shoulder ratios carefully across sizes to avoid slippage.
Real Case: Fixing an Off-Shoulder Fit Issue for a UK-Based Client
A client launched a ruffle off-shoulder mini dress in rayon. The neckline kept riding up during wear. We reviewed the pattern and found the elastic tension was too weak and the neckline curve too shallow. We shortened the elastic by 3 cm, deepened the neckline curve, and added stay tape. The fit improved dramatically—no more riding up, and customer reviews turned positive.
My tips for producing off-shoulder sleeves:
- Always test arm mobility with a full wear simulation
- Reinforce neckline with interfacing or elastic—never leave it unsupported
- Grade neckline and elastic length by size, not as a fixed ratio
- Pair off-shoulder sleeves with a well-fitted bodice to avoid slippage
- Choose fabric that complements the desired silhouette—structured for formal, drapey for casual
Off-shoulder sleeves may look soft and effortless—but they rely on smart engineering and thoughtful shaping to actually work on the body.
Cape Sleeve
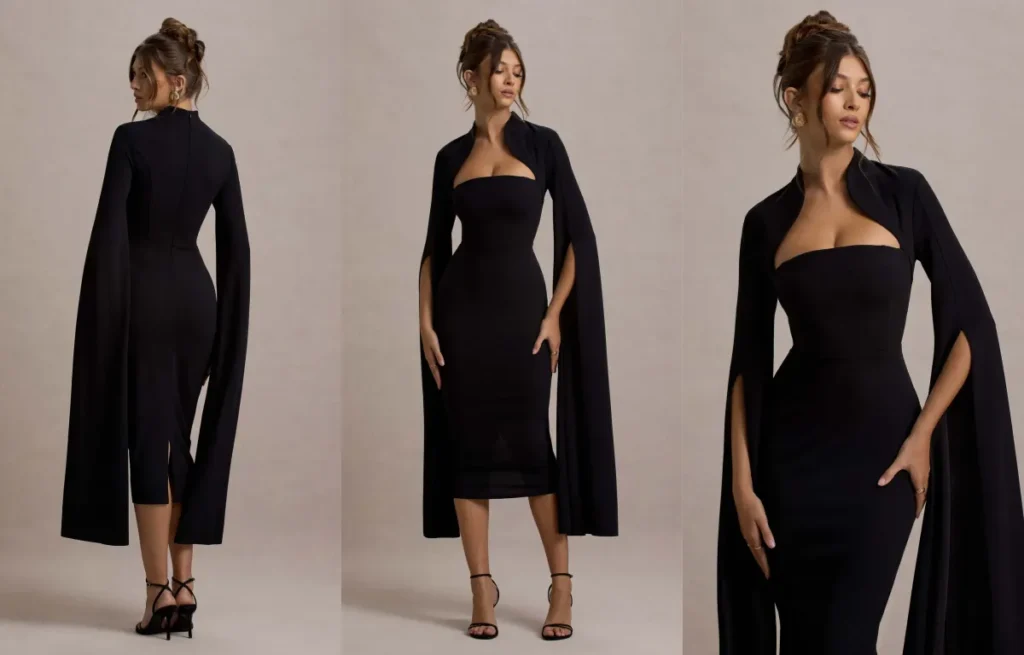
What defines a cape sleeve and why is it so impactful in dress design?
Cape sleeves are wide, flowing panels that drape over the shoulders and arms like a cape, often without enclosing the armhole like traditional sleeves.
A cape sleeve is a sleeve style where fabric is extended from the shoulder and flows freely over the upper arm, resembling a short cape or draped overlay. It can be attached at the shoulder seam or neckline and is often left open under the arm.
Cape sleeves add instant drama and softness without sacrificing comfort or breathability.
Cape sleeves combine elegance, movement, and lightweight drama
They’re ideal for special occasion dresses, bridalwear, or upscale resort styles, where flow and presence matter as much as structure.
Key features of cape sleeves:
- Open construction: No underarm seam, fabric drapes freely
- Layered or unlined: Often sheer or floaty for movement
- Focus on shoulder drape: Can flow from front, back, or both
- Sleeve-as-overlay: Feels like part of the dress rather than a separate sleeve
Common cape sleeve styles:
| Sleeve Style | Description | Best Use Case |
|---|---|---|
| Shoulder Cape Sleeve | Drape starts at shoulder and covers upper arm | Cocktail and formal dresses |
| Front-Drape Cape | Fabric falls from front neckline around the arm | Bridalwear and romantic gowns |
| Back-Drape Cape | Drapes from back shoulder seam | Evening and red-carpet designs |
| Split Cape Sleeve | Open along shoulder or side seam | Modern and minimalist dresses |
| Short Capelet Sleeve | Ends above the elbow, soft flutter effect | Resort and summer styles |
What are the technical challenges of producing cape sleeves?
Cape sleeves require more than just adding extra fabric. The challenge lies in keeping them elegant without affecting garment balance, comfort, or functionality.
To execute cape sleeves successfully, manufacturers must carefully control drape behavior, seam placement, fabric finish, and pattern alignment with the dress bodice.
Let’s break it down.
1. Pattern Shape and Drape Control
Unlike standard sleeves, cape sleeves don’t rely on a defined armhole. Their shape is built on curves and hanglines.
- We often use semi-circle or curved rectangle patterns
- The shoulder slope and neckline angle must support the sleeve drape without pulling the bodice
- Drape testing is key—we test sleeve fall on mannequins and fit models before finalizing
In sleeveless dresses with cape overlays, we anchor the cape at shoulder points or neckline facings to ensure it doesn’t shift or slide.
2. Fabric Selection for Fluidity
Cape sleeves rely on fabric flow more than any other sleeve type.
| Fabric Type | Behavior on Cape Sleeves |
|---|---|
| Chiffon | Ideal for layering, airy and lightweight |
| Georgette | Slightly textured, adds soft volume |
| Organza | Crisp and structured, for editorial drama |
| Silk Crepe | Fluid with a premium drape |
| Tulle | Great for high-volume bridal designs |
We advise against using heavy fabrics, as they can cause shoulder drag or distort the bodice line.
3. Seam Placement and Reinforcement
Since cape sleeves often attach at the shoulder or neckline, those seams must be clean and secure.
- We reinforce shoulder seams with stay tape or interfacing
- For sheer capes, we use invisible overlock or French seams for softness
- In bridalwear, cape sleeves are often hand-tacked for clean invisibility
4. Finishing the Cape Edge
The outer edge of the sleeve is fully visible, so edge finishing needs to be precise and appropriate to the fabric.
Popular finishes:
- Baby hem: Most common for chiffon and light fabrics
- Rolled hem (serger): Adds subtle wave, good for stretch or tulle
- Blind hem: Preferred for clean, luxury finish
- Raw edge with heat seal: Used occasionally in synthetic fabrics with controlled fraying
In high-end pieces, we often hand-finish hems to avoid rippling.
5. Functional Considerations for Wearability
Cape sleeves must be elegant—but not annoying to wear. Common wearability issues include:
- Cape swinging into the front: We sometimes add an invisible arm loop inside the cape to anchor it subtly
- Underarm exposure: In non-sheer fabrics, we shape the cape to curve under the bust or arm slightly
- Too much back drag: If the cape is long or heavy, we test with weighted neckline facings
Client Case: Correcting Cape Sleeve Imbalance on a Satin Dress
A client submitted a sample of a long cape-sleeve gown in satin. The sleeves pulled the neckline backward and caused a visible pucker. We solved it by adding interfacing at the shoulder seam, reducing sleeve length by 5 cm, and reinforcing the neckline facing. The cape then flowed naturally—without compromising dress balance.
My factory tips for cape sleeve success:
- Sample with final fabric—drape testing is non-negotiable
- Avoid overly heavy fabrics unless sleeve is short
- Reinforce all anchor seams, especially in sheer garments
- Choose the hem finish that best matches fabric weight and price point
- Test sleeve swing during motion—walking, sitting, turning
Cape sleeves feel effortless—but delivering that effect takes smart engineering and careful material handling.
Why does sleeve selection matter for brand success?
Sleeve design isn’t just visual—it directly affects sell-through, comfort, and customer feedback.
- Fit issues in sleeves are a top reason for returns (especially in elasticated or tight styles)
- Wrong volume can overwhelm petite frames or disappear on plus-size silhouettes
- Fabric-sleeve mismatch often leads to sagging or stiffness
- On-trend sleeves can position a brand as fashion-forward—or outdated
We’ve worked with brands that pivoted a failing product just by updating sleeve style or construction. For example, switching from cap sleeves to flutter sleeves in one summer collection helped a client in Australia reduce return rates and increase reorders by 20%.
Conclusion
There’s no such thing as a “basic sleeve”—every sleeve type carries its own design language and technical needs. Mastering sleeve selection means building dresses that look better, wear better, and sell better.